
How to Guide


C
D
Wallboard is an easy surface in which to make a
r
elatively neat hole. Actually, the hole doesn’t even
h
ave to be that neat, since the speaker’s outer
frame will cover it. Just make sure you don’t make
it any bigger than the template. In the following
steps, you’re going to locate a section of wall
between two studs, mark the outer boundaries
of the hole, drill a small hole in the center to
confirm your location and then cut the main hole.
1. First you must determine the location of your
wall studs so that the speaker can be approx-
imately centered between them. There are
several ways to go about this:
• Tap on the surface and listen to the resulting
“THUMP”. When it’s deeper, you’re between
studs. When it’s sharper and more flat-sounding,
you’re close to a stud.
• Use a stud-finder, a simple little device which
works by locating the studs behind a wall.
• Identify wall studs by the position of electrical
outlets or switches. There will be a stud either
directly to the left or right of an electrical fixture.
This gives you a point of measurement, since
studs are either 18 or 16 inches apart in newer
houses, 12 inches apart on pre-WW2 homes.
2. When you’re reasonably sure of where the wall
stud 2 x 4’s are (and are TOTALLY sure that
there isn’t an electrical cable, water pipe or
heating duct in that vicinity of your proposed
cutout) position one of the cardboard mounting
templates and draw around the inside outline
with a pencil. If you don’t trust your eye, use a
level to make sure the hole will be straight.
Repeat for the other speaker position.
3.
Drill a 1-inch hole in the center of the pencil
outline which you have just drawn.
5
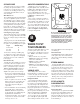
I
f you like the designer white finish, we
r
ecommend you use the white cloth décor
accessory grilles included with your new FH8-W
speakers. But if you want your speakers to
completely blend in with a colored wall or
accent the surface, paintable metal grilles are
also included with your new FH8-W speakers.
The speakers’ outer surfaces are primed to
accept ordinary latex wall paint or aerosol spray
paint. Because the surface behind the perforated
grille should remain unpainted, you will need to
mask this area off before you begin painting.
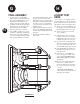
1.
First the speaker’s grille must be removed.
From the back of the speaker, use the
mounting legs to push the grille off.
2.
If you are going to use standard, canned, wall
paint so your speakers will match the wall
color, you will need to thin the paint to nearly
the consistency of water. This is critical since
paint with any thickness will plug the holes in
the grille which will impede the sound from
getting to the room. Once you thin the paint it
may take several coats to get good consistent
color coverage without plugging the holes in
the grille. One trick to use is to blow air
through the grille holes as you are in the
painting process to keep the holes open. Paint
the outer speaker frame and grille separately. A
medium nap roller or fine brush will work OK
if you take your time and are careful. If you’re
using spray paint, make sure that you achieve
the same coverage on both grille and frame.
Take care to use very light coats on the grille to
avoid plugging the holes (perforations). Also,
be sure to spray at different angles to achieve
good even coverage of the perforations and
edges. You must take extreme precautions when
painting the grille not to get paint in the holes of
the grille. There's no need to replace the grille
at this time since you will need access to the
inner speaker surface during installation.
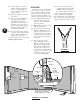
4
. Obtain a length of stiff wire such as an unwound,
t
otally un-bent coat hanger. Bend it so that the
last 12 inches is at a right angle to the rest.
5. Insert the angled part into the 1-inch hole you
just drilled and probe to left and right to confirm
that a stud is not close on either side.
• If there is a close stud on one side, just repo-
sition the cardboard template a few inches in the
opposite direction and redraw your pencil
outline, keeping the 1-inch hole within
the pencil outline’s inner boundaries.
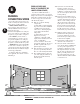
6. If there are no obstructions, cut the hole
along the pencil outline. If the surface is
wallboard, simply cut it increasingly deeper with
utility knife until it gives way and then pull it out
by grasping the cut-out through the 1-inch hole.
• If you’re dealing with lath and plaster or
thick paneling, you need to use a different
technique. Drill 1-inch holes at the corners of
the pencil outline. Then use a keyhole saw or
even a hacksaw blade with VERY slow strokes
to saw through and remove the inner surface.
7. Temporarily place the B
.
I
.
C speaker into the cut-
out to insure that it fits properly. It’s OK if the
hole is slightly large, since it will be covered by the
speaker’s outer frame. Actual installation will hap-
pen later, after you’ve routed the speaker wires.
8. Repeat steps 1 through 7 for the other speaker.
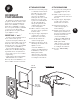
9. Now it’s time to drill the hole on the OTHER
end – at the point where the wires from the
speakers will exit to the amplifier/receiver.
• Use the same 1-inch drill bit as before.
• If you want a totally finished job, install an
outlet box against a stud and cover it with a
TV cable or single outlet plate which has one
hole in the middle for the wires to exit from.
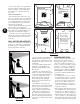
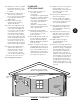
DRAWING 5
A. Trace template
outline
B. Drill 1 inch
pilot hole
C. Probe with wire
for stud clearance
D. Cut speaker
hole along outline
CUTTING
HOLES
FOR THE
SPEAKERS
CLOTH
DÉCOR &
PAINTABLE
GRILLES