
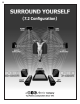
How to Guide


5
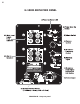
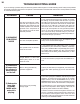
H-100II AMPLIFIER PANEL
1. POWER INDICATOR LED – When the subwoofer is ON, this LED light will be green. When the subwoofer is
in the STANDBY mode, it will be red.
2. POWER/AUTO ON SWITCH – This toggle switch turns the subwoofer on and off. When the switch is in the
OFF position, the subwoofer will not play. When the switch is in the ON position, the subwoofer will stay on
at all times. When the switch is in the AUTO position, the subwoofer will automatically come on when bass
frequencies are fed to it. Then after around 15-20 minutes after you stop playing music, the subwoofer will
automatically go into STANDBY mode until more bass frequencies are fed to it. STANDBY mode uses very
little electricity.
3. PHASE SWITCH – This switch is used to set the subwoofer’s phase to either normal “0º” or reverse “180º”
(out of) phase. The physical location of your subwoofer and main speakers determines the phase setting that
will sound best at your main listening position. Once you determine the placement of the subwoofer, you will
need to try both positions of this switch to determine which setting sounds better in your room. If this requires
using the “180º” mode, don’t worry, there is nothing “abnormal” about it.
4. VOLUME CONTROL – Rotating this knob clockwise increases the output level of the subwoofer. To start
out, make sure that the VOLUME is turned all the way down (fully counterclockwise). Then, slowly adjust the
volume to blend with the other speakers in your system. Care should be taken not to overdrive the subwoofer
to the point of audible distortion.
5. CROSSOVER FREQUENCY CONTROL – If you are connecting your subwoofer to a Dolby Digital type
receiver which has a low level SUBWOOFER or LFE output that requires a subwoofer cable for connection,
you will adjust and set your subwoofer crossover through your receiver, not by using this control. Please check
your receiver owner’s manual for instructions.
If your receiver is not digital (example: stereo only integrated amp or older Dolby Pro Logic receiver) and/or you
are using the HIGH LEVEL INPUT speaker connections, you will use this control to set your crossover in your
subwoofer. This control determines what lower part of the frequency spectrum will be reproduced by the sub-
woofer and what higher parts will be handled by your main speakers. It is a “crossover” control. Rotating the
knob sets the point where all lower frequencies will be handled by the subwoofer and all higher frequencies
will be routed to your main stereo speakers. As a starting point, if you are using left and right tower speakers,
set the CROSSOVER FREQUENCY CONTROL to 80 Hz, with bookshelf speakers to 100 Hz, and with small mini
speakers to 120 Hz.
6. SUB RCA INPUT – This jack is used with a cable to connect your subwoofer to your receiver. This is the
preferred connection. If you use this connection, you will not use #10 and #11.
7. CROSSOVER FROM DIGITAL RECEIVER OR SUB SWITCH – If you are using a Dolby Digital receiver
which has a low level SUBWOOFER or LFE output that requires a subwoofer cable for connection, set this switch
to “Digital Receiver” so you can adjust your subwoofer crossover through your receiver. If your receiver is not
digital (example: older Dolby Pro Logic receiver or stereo only integrated amp) and/or you are using the HIGH
LEVEL INPUT speaker connections, set this switch to “Pro Logic Receiver” so you can adjust your crossover
through your subwoofer.
8. POWER INPUT – This connector is the AC power “in” for the power cord which is supplied with your
H-100II.
9. REMOVABLE FUSE HOLDER – By pushing in and turning counter-clockwise, you can remove and replace
the fuse. Use only the correctly rated 5 x 20 mm, 1.6 amp 250-volt replacement fuses.
10. OUTPUT TO SPEAKERS – If your receiver does not have a SUBWOOFER or LFE output, use these color
coded binding posts to run speaker wire from your main left and right speaker terminals to these OUTPUT
TO SPEAKER terminals. Note: These cannot be used in conjunction with SUB-IN low level inputs (See #6).
11. HIGH LEVEL INPUTS FROM AMPLIFIER – If your receiver does not have a SUBWOOFER or LFE
output, use these color coded binding posts to run speaker wire from your receiver’s main left and right
speaker terminals to these HIGH LEVEL INPUTS.