
How to Guide


SUBWOOFER CONNECTION - METHOD A
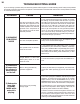
Connecting to Receivers with a SUBWOOFER or LFE Output Jack
All Dolby Digital, DTS, THX, and Bass Management equipped receivers have a low level SUBWOOFER or LFE output jack. If you
have this, you will use the METHOD A connection as shown below in Drawing C. This is the recommended and easiest connection.
If your receiver does not have a low level SUBWOOFER or LFE output jack, you will use METHOD B (Drawing D) on Page 7 to
connect your subwoofer to the receiver.
For this connection, you will need a mono interconnect cable with a male RCA jack on both ends. This can be purchased at the
majority of electronics and audio stores. Make sure the length of your cable is long enough to reach from your receiver to your sub-
w
oofer location. The cable should lie flat with a little bit of slack to give some placement flexibility.
WIRELESS HOOKUP
- If you prefer a wireless connection rather than using a subwoofer cable, you can connect your
H-100II wirelessly to your digital receiver with a BIC WTR-SYS kit. You can also add an unlimited amount of wireless H-100II
subs to your system by adding BIC W-Receivers. Please contact BIC sales at 877-558-4242, ext. #1 for more information.
HOOKUP STEPS
1. IMPORTANT: Make sure that ALL stereo
system components including the subwoofer
are turned OFF before proceeding.
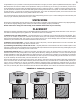
2. Locate the SUBWOOFER or LFE output
connector on the rear of your receiver and
connect one end of the RCA cable to it.
3. Route the RCA cable to the subwoofer lo-
cation (trying to minimize areas where it
may be stepped on). Connect the other end
of the cable directly to the SUB IN.
4. Connect your main (and surround speak-
ers if applicable) to the receiver according
to the receivers owner manual.
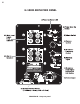
5. Connect the included power cord to the
POWER INPUT (#1) on the back of your
H-100II. Then connect its plug to an AC
outlet ONLY. Since your H-100II draws a
moderately high amount of current, we do
not recommend plugging it into a “conve-
nience” outlet (switched or unswitched)
found on the back of receivers and other
stereo components.
6. Set the CROSSOVER FROM DIGITAL
RECEIVER OR SUB SWITCH (#2) to the
“Digital Receiver” position (on left). This will
enable you to set the crossover from your
digital receiver and disable the CROSS-
OVER FREQUENCY CONTROL (#3) on
the back of your H-100II (also see Page 5,
#5). Refer to your receiver’s owner manual
for instructions on how to set your crossover.
You also need to make sure the SUB-
WOOFER ON setting is set in your receiver.
Otherwise, the receiver will send no signals
to the subwoofer and there will be no sound.
7. Set the PHASE SWITCH (#4) to 0°.
You will later need to follow instructions on
Page 5, #3 for room settings.
8. You are now ready to turn your POWER
SWITCH (#5) on and enjoy the deep bass
you have been waiting for. You can learn
more about the “auto” feature on this switch
on Page 5, #2.
9. See Page 9 for “Initial Listening Test”.
6
DRAWING C
Connecting with a Subwoofer or LFE output jack.