
How to Guide

3
SPEAKER WIRE
The amount of wire you’re going to need will
vary with speaker placement (which we cover
next). But we’re covering the subject of wire
now because it’s something you may have to go
out and obtain along with whatever tools you
don’t already have.
What kind to use
We recommend using inexpensive, multi-stranded
“zip-cord” for amplifier-to-speaker connections.
Also called lamp cord, it’s sold in pre-packed
rolls and in bulk displays at hardware, lighting
and home improvement stores. Zip-cord’s outside
covering (insulation) can be transparent, black,
brown, white, etc. Color doesn’t matter. Wire-
thickness does. For in-wall and in-ceiling, a good
quality wire should be used so the outside plastic
covering won’t crack and break down over time.
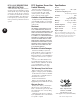
Selecting the proper gauge
Wire is measured in “gauges.” For no particularly
good reason, the bigger the number, the smaller
the wire. For example, 18-gauge is thinner than
14-gauge.
The gauge of wire you need is determined by the
distance between your amplifier/receiver and
the speakers. Use the following chart as a guide:
Length Minimum Gauge
Less than 10 ft. 18
10 to 50 ft. 16
Over 50 ft. 14
If in doubt, be safe and get a smaller gauge
(i.e. thicker wire). Using too thin a gauge over
a long distance can compromise sound quality.
And besides, there isn’t a vast cost difference
between gauges.
How much to buy
Basically, more than you think you need. As we
noted earlier, a discussion of lengths is sort of
premature until you’ve decided on exact place-
ment, so you may want to skip to Section B on
“Where to put your speakers.” But if you
have a rough idea of the distance from your
amplifier to the speakers, here are a few tips:
s Because of the complicated paths which are
often required to route wires, you’ll definitely
need more than the amount derived from
simple measurements.
s Even if one speaker is a lot closer to the amp
than the other speaker, you should use the
same length of wire for both paths. This
ensures that both speakers will play at
equal volume.
s Professional installers often use the following
rule of thumb: amp to speaker distance
TIMES FIVE. That allows enough for both
speaker paths plus a very healthy margin
for unplanned detours. Remember the
electrician’s favorite adage:
“You can always cut off extra wire, but you
cannot make wire longer once it is cut.”
AMPLIFIER CONSIDERATIONS
Virtually any receiver, power amplifier or
integrated amplifier can be used with your B
.
I
.
C
Ceiling Speaker. Although B
.
I
.
C speakers are
rated for high power, it’s OK to use an even
more powerful amplifier if you take some
simple precautions, which we cover on page 7
(“Taking care of your new B
.
I
.
Cspeakers”).
A more serious consideration is whether or
not you intend to power more than one set of
speakers with the same amplifier or receiver. If
you intend to hook speakers to both “A” and
“B” receiver outputs and then play both sets of
speakers at the same time, you should read the
section starting on page 7 of this manual
(“More on amplifiers and impedances”),
to avoid potential problems.
B
VARIOUS USES
B
.
I
.
C Ceiling Speakers can be used for background
music, as a primary listening system, or as built-in
surround and rear speakers in an audio/video
home theater.
Background music
If you just want low-volume background
music to float through a room, placement for
best acoustics is not particularly critical. You can
pretty well ignore all our diagrams and tips on
imaging and other acoustical matters. Just put
your speaker where it’s convenient and non-
intrusive to room decor. You can even place the
speaker in an adjoining room, such as a living
room that flows into a formal dining room, or in
a kitchen and breakfast nook.
Surround sound
B
.
I
.
C Ceiling Speakers make excellent surround
and rear speakers. They can be mounted in any
of the positions shown in Drawings 2 and 3,
especially from the ceiling.
OTHER ACOUSTIC
CONSIDERATIONS
For best fidelity, there are several other factors
to keep in mind before you start actual installation.
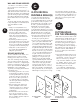
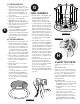
B
.
I
.
C ceiling speakers may be used
for surround and rear sound chan-
nels by placing them (1)
be
hind or (2)
in the ceiling, just behind the viewer.
DRAWING 2
DRAWING 3
Open
Attic
B
.
I
.
C
Speaker
Standard Room
1
2
DRAWING 4
Cone of
Coverage
WHERE TO PUT
YOUR SPEAKER(S)
Since these are primarily used in ceiling applica-
tions, we highly recommend installing in an open
attic space. If you need to go into the ceiling of a
first floor room (in a two story house), we rec-
ommend the use of a professional installer.
Vertical placement
Treble frequencies are
quite directional. While
the dome tweeters in
B
.
I
.
C H-310C speakers
are designed to disperse
high frequencies over a
wide area, they will give
you the best sound
when positioned so that
they cover the listening
area in a cone of
Placement can make all the difference in how
your B
.
I
.
C speaker systems sound – and how
easy they are to install. There are at least three
“WHERES” and a “HOW” to factor into your layout:
s HOW you intend to use your speakers
s WHERE they’ll sound best (acoustic
considerations)
s WHERE it’s possible to install them
(ceiling surfaces)
s WHERE they can be installed that makes it
easy to get wire to them without remodeling
your entire house.
coverage as shown in Drawing 4. Of course, if the
speakers are being in
stalled in an area where listeners
usually stand up (such as a kitchen or hallway), they
are best suited for ceiling mount (see Drawing 3).
Corners and reflections
When a speaker is placed close to the corner
of a room, bass frequencies are emphasized.
Treble is emphasized when it reflects back from
reflective surfaces such as large windows. Con-
versely, highs tend to be muffled by soft surfaces such
as drapes, rugs, upholstered furniture, carpeted steps
and even textured fabric wall paper.
1
2