
How to Guide


2
CONGRATULATIONS
– on selecting this B
.
I
.
C Muro Ceiling Speaker. Like all B
.
I
.
C speakers, they combine advanced acoustic
technology with durability and will provide years of musical enjoyment.
This manual is designed to make your ceiling speakes as easy to install as it is to listen to. If you’ve
had any home “do-it-yourself ” experience, you should find installation of your new speaker a simple job.
However, we suggest you read through this manual before starting out. If you then decide that installing
your Muro Ceiling Speaker is a bit beyond your skills, we’ve included suggestions for locating sources of
affordable outside help.
What you need to do the job
Speaker system parts inventory . . . . . . . . . . . . . . . . . . . . . . . . . . . . . . . . . . . 2
Tools for installation . . . . . . . . . . . . . . . . . . . . . . . . . . . . . . . . . . . . . . . . . . . 2
Speaker wire . . . . . . . . . . . . . . . . . . . . . . . . . . . . . . . . . . . . . . . . . . . . . . . . . 3
Amplifier considerations . . . . . . . . . . . . . . . . . . . . . . . . . . . . . . . . . . . . . . . . 3
Where to put your speakers
Various uses . . . . . . . . . . . . . . . . . . . . . . . . . . . . . . . . . . . . . . . . . . . . . . . . . 3
Stereo imaging . . . . . . . . . . . . . . . . . . . . . . . . . . . . . . . . . . . . . . . . . . . . . . . 3
Other acoustic considerations . . . . . . . . . . . . . . . . . . . . . . . . . . . . . . . . . . . . 3
Surround sound . . . . . . . . . . . . . . . . . . . . . . . . . . . . . . . . . . . . . . . . . . . . . . 3
Wall & ceiling surfaces . . . . . . . . . . . . . . . . . . . . . . . . . . . . . . . . . . . . . . . . . 4
Speaker wire paths . . . . . . . . . . . . . . . . . . . . . . . . . . . . . . . . . . . . . . . . . . . . 4
Painting your speakers . . . . . . . . . . . . . . . . . . . . . . . . . . . . . . . . . . . . . . . . . . . . 4
Cutting holes for the speakers. . . . . . . . . . . . . . . . . . . . . . . . . . . . . . . . . . . . . . . 4
Running connecting wires. . . . . . . . . . . . . . . . . . . . . . . . . . . . . . . . . . . . . . . . . . 5
Hooking up your speakers
At the speaker end. . . . . . . . . . . . . . . . . . . . . . . . . . . . . . . . . . . . . . . . . . . . . 6
At the amplifier end. . . . . . . . . . . . . . . . . . . . . . . . . . . . . . . . . . . . . . . . . . . . 6
Final assembly . . . . . . . . . . . . . . . . . . . . . . . . . . . . . . . . . . . . . . . . . . . . . . . . . . 6
A short “test drive” . . . . . . . . . . . . . . . . . . . . . . . . . . . . . . . . . . . . . . . . . . . . . . . 6
A quick troubleshooting guide. . . . . . . . . . . . . . . . . . . . . . . . . . . . . . . . . . . . 7
Further reading
Taking care of your new in-wall speakers . . . . . . . . . . . . . . . . . . . . . . . . . . . 7
More on amplifiers and impedances . . . . . . . . . . . . . . . . . . . . . . . . . . . . . . . 7
Installing B
.
I
.
C Muro speakers during new construction. . . . . . . . . . . . . . . . 7
B
.
I
.
C Muro MSR5D, MSR6D, MSR8D description and specifications . . . . . . . 8
Outside help . . . . . . . . . . . . . . . . . . . . . . . . . . . . . . . . . . . . . . . . . . . . . . . . . 8
Limited Warranty. . . . . . . . . . . . . . . . . . . . . . . . . . . . . . . . . . . . . . . . . . . . . . 8
A
B
C
D
E
F
G
H
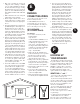
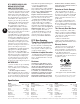
DRAWING 1
Cut-Out Template
Speaker
Grille
TABLE OF CONTENTS
A
WHAT YOU NEED
TO DO THE JOB
SPEAKER SYSTEM
PARTS INVENTORY
Before you get involved in the actual installation
process, it’s a good idea to check for possible
shipping damage and identify parts and hardware.
You should have the parts shown in Drawing 1:
m One (1) B
.
I
.
C Muro loudspeaker system
with attached grille
m White cardboard mounting template
m White cardboard masking template for
painting
m Black grille adhesive
If anything is missing after a thorough search
of the box and packing materials, contact the
dealer where you bought your speaker.
Although the B
.
I
.
C Muro Ceiling System is
extremely well packed to withstand the rigors
of shipping, you should still inspect it closely,
especially if there is any damage to the outside
carton. If you find anything wrong, contact your
dealer or the shipper who delivered the speaker.
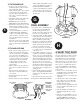
TOOLS FOR INSTALLATION
IN EXISTING WALLS
It doesn’t take a whole workshop to install
your new speaker, just a few simple tools:
m A pencil
m A drill with a 1-inch flat bit
m A retractable utility knife or keyhole saw
m A length of stiff wire about 3 feet long (a
straightened wire coat hanger works fine)
m A Phillips-head screw driver which will fit the
black screws included with your speakers
m A pair of diagonal pliers or wire strippers
Some of the following may also be needed,
depending on the application.
m A stud finder
m Drill bit just slightly larger than the diameter
of one speaker wire
m Plumb bob or small weight on a string
m Insulated staples for securing speaker wire
m Masking tape or foam “double-stick” tape
m Paint and applicator for changing grille and
outer frame finish
Black grille
adhesive in
polybag