Installation Manual Volvo C30 T5 Front Mount Intercooler System
Volvo C30 T5 Intercooler System / Installation Manual C i Contents Important Information i Parts List i Required Tools and Materials 1 1.0 - Vehicle Preparation 1 2.0 - Removing and Trimming Front Fascia (Nose Section) 2 3.0 - Removing Factory Intercoolers and Tubes 3 4.0 - Installing New Intercooler 4 5.0 - Start Engine and Check Connections 6 6.0 - Trim and Install Front Fascia (Nose Section) 7 7.
Volvo C30 T5 Intercooler System / Installation Manual 1 Required Tools and Materials To efficiently complete the installation of your intercooler you will need the following tools and materials, in addition to those parts supplied with your intercooler.
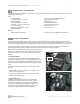
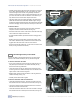
Volvo C30 T5 Intercooler System / Installation Manual 2.0 2 Removing Front Fascia (Nose Section) The first step in the installation will involve removal of the front fascia (front nose section) of the vehicle (see Fig. 2.1). The front fascia of the C30 is comprised of two pieces, an upper section and a lower section, as shown in Figure 2.1. These two sections remaining joined during the installation process and will not be separated.
Volvo C30 T5 Intercooler System / Installation Manual • Carefully remove the five (5) plastic rivets securing the front fascia to the upper radiator bulkhead (see Fig. 2.4). Please note, these rivets are designed to be reused. Using a Phillips screwdriver press the center section of the rivet down approximately 1/8”, until you feel a click, when the rivet has released. Once released, you may extract the rivet from the hole. Repeat for all rivets.
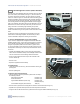
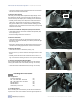
Volvo C30 T5 Intercooler System / Installation Manual 4 • Loosen hose clamp securing intercooler outlet hose to intercooler and disconnect hose from intercooler. Mounting Bolt 3.3 Remove Hose Clamps The factory hose clamps will be replaced with high-strength T-bolt hose clamps for use with your new intercooler. You will need to remove the factory hose clamps prior to installing the new intercooler. • Carefully remove factory hose clamps from intercooler inlet and outlet hoses.
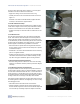
Volvo C30 T5 Intercooler System / Installation Manual 5 the on the factory intercooler. Refer to Figure 4.1 to ensure proper orientation of the sensor relative to the intercooler. • Apply a thin coating of motor oil to the IAT sensor o-ring. • Carefully insert sensor into new intercooler. Position as shown in Figure 4.1. • Install M5- 0.8 x 20mm bolt and M5 washer (supplied with intercooler kit) to secure fastener. Tighten fastener. 4.
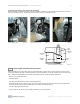
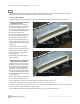
Volvo C30 T5 Intercooler System / Installation Manual 6 4.6 Recheck All Fasteners, Hose Clamps and Connections Before proceeding, recheck all hose clamps for proper installation and clearance. Also recheck intercooler position (as per step 4.3) and all mounting fasteners. Recheck IAT sensor harness to be sure it is properly connected. Intercooler Mounting Point Left-Side Mounting Point Figure 4.5 Intercooler Mounting Point Right-Side Mounting Point Intercooler To Radiator Gap Figure 4.4 Figure 4.
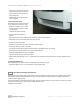
Volvo C30 T5 Intercooler System / Installation Manual 6.0 7 Trim and Install Front Fascia (Nose Section) This step requires relatively easy trimming of the plastic and urethane components of the front fascia. All trimming can be easily accomplished with a hacksaw or cutting wheel and cleaned up with a file and sand paper. 6.1 Remove Lower Grill Insert The plastic grill insert in the lower grill opening is secured by nine plastic tabs. Carefully release tabs and remove grill insert. 6.
Volvo C30 T5 Intercooler System / Installation Manual 8 • Draw lines on side surfaces connecting upper and lower corners (see Fig. 6.1). • Using hacksaw or cutting wheel, carefully cut along lines. • Carefully clean up cut edges with file and/or sandpaper. 6.4 Reinstall Front Fascia Reinstall front fascia in reverse sequence of removal process (see Step 2.0, pg 2). • Position front fascia in front of car and connect driving light wiring connectors (if so equipped). • Lift fascia and guide into position.