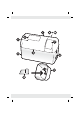
Before using your bread-maker … In order to ensure the safe transport of your new automatic bread-maker, the unit contains transport safety devices that must be removed before use. FIG 1. Unpack the unit and remove the outer packaging. Then place the unit on a flat and stable surface. 1. Now open the baking chamber of the unit. (FIG. 1.) 2. Remove the cardboard spacer inserts. (FIG. 2.) 3. Tilt the two baking tins forward or backward slightly and lift them out of the bread-maker. (FIG. 3.) 4.
KH 2230 OPERATING MANUAL
IMPORTANT SAFETY INSTRUCTIONS FOLLOW THESE SAFETY INSTRUCTIONS CLOSELY: • • • • • • • • • • • • • • • • • • • • • • • • Read all instructions thoroughly. Do not touch any hot surfaces. Use handles, knobs or a potholder. Do not close or clog the steam vent openings. A steam outlet to a certain degree is normal. Do not cover the steam vent openings. To avoid the danger of electric shock, do not immerse the lead, plug or any other part of this bread machine in water or other liquids.
TABLE OF CONTENTS IMPORTANT SAFETY INSTRUCTIONS TABLE OF CONTENTS BFEORE YOUR FIRST USE ABOUT YOUR BREAD MACHINE KNOW YOUR BREAD MACHINE CONTROL PANEL SETTINGS USING YOUR BREAD MACHINE USING THE TIMER MEINTENANCE AND CLEANING HELPFUL INFORMATION ABOUT INGREDIENTS RECIPE TIPS BREAD MACHINE CYCLE TIMES RECIPES QUESTIONS AND ANSWERS / TROUBLESHOOTING BEFORE FIRST USE Before first usage, please read this Instruction Manual thoroughly and keep it handy for future reference.
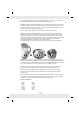
KNOW YOUR BREAD MACHINE BIFINETT KH 2230 1. 2. 3. 4. 5. 6. 7. 8. 9. 10. 11. 12. Lid Lid Handle Viewing Window Air Vents Baking Tin Baking Chamber Control Panel Main Housing Power Flex Power Plug Drive Shaft Kneading blade CONTROL PANEL OF THE BIFINETT KH 2230 Note: Please peel off the plastic sticker on the control panel before its first use. Note: When using the touch pad controls, be sure to press the pad until you hear a beep. WINDOW-DISPLAY • • • • Shows the MENU number(s) selected.
SETTINGS BREAD SETTINGS: Your new bread machine has four bread settings (Basic, French, Wheat, Sweet) and two time modes (Normal [default setting] and Express). Each bread setting is described below. The baking times in the Normal time mode vary from 2:00 to 3:30 hours, according to the selected setting or setting combination. In the Express time mode, the baking times range between 0:45 and 1:50 hours. For the exact setting times we refer you to the “Bread Machine Cycle Times” schedule.
2. Attach the kneading blades onto the shafts inside the baking tins by lining up the flat side of the blade with the flat side on the shaft. Push the blade firmly onto the shaft. Attention: Be sure to fix the kneading blade firmly to its place to prevent it from loosening during its operation, which might have a detrimental effect on the kneading or mixing process. Be sure the shaft is clean of any residue (i. e. dough).
8 Wheat 9 Wheat 10 Sweet Wheat Sweet Sweet 7. Press the COLOUR button to choose the crust colour. When you press the button you will hear a beep and the display window will show the colour you selected. Alternatively, you can also select the Express mode with this button. Note: At this point, you can press the TIMER button to delay the completing of the baking process for up to 13 hours For further details see Using the Timer. 8. Press the START/STOP button to start the chosen setting.
USING THE TIMER Use the TIMER button to delay the completion of the bread-making process. You can set the machine to start up to almost 13 hours later. TO SET THE TIMER, FOLLOW THESE INSTRUCTIONS: Note: First, follow the steps 1 through to 7 in Using Your Bread Machine. Do not use the TIMER with recipes that call for perishable ingredients, such as eggs, fresh milk, sour cream or cheese. 1. Determine the time you want to have the bread finished. For example: It is 7:30 p.m.
Caution: Do not clean any part(s) of the bread machine in a dishwasher! STORING THE UNIT Before storing the unit, be sure to dry all parts of it, including the viewing window. Close the lid, and do not place any items upon the machine. TROUBLESHOOTING Specific questions about the functions of the bread machine as well as problems with ingredients or recipe are addressed under Questions and Answers / Troubleshooting.
reasons, salt may be left out. However, in this case the bread may rise higher than it normally does. LIQUIDS Liquids, such as milk, water, or a combination of powdered milk and water, can be used when making bread. While milk improves the flavour of the bread, it also gives it a velvety texture and softens its crust, water alone produces a crispier crust. Some recipes call for juice (orange, apple, etc.) to be added as a flavour enhancer.
SPECIAL GLAZES FOR YEAST BREADS Give your freshely-baked bread a professional finish. After glazing, generously sprinkle with your choice of poppy, sesame or caraway seeds, if desired. Select one of the following special glazes to enhance your bread: EGG GLAZE Beat 1 large egg and 1 tablespoon of water together, brush generously over dough. Melted Butter Crust Brush melted butter over just-baked bread for a softer, tender crust.
BREAD MACHINE CYCLE TIMES NORMAL CYCLE SETTINGS AND TIMES BASIC & BASIC Delay 2:10time 12:50 Preheat Knead 1 0:05:00 Rest 0:05:00 Knead 2 0:10:00 Rest 0:00:30 Knead 3 0:10:00 Rise 1 0:15:00 Knead 4 0:00:30 Rise 2 0:08:30 Knead 5 0:00:30 Rise 3 0:27:00 Baking 0:48:00 Keep 1:00:00 warm Total2:10:00 Time Fruit1:50:00 Nut-Signal BASIC & WHEAT 2:3512:55 0:05:00 0:05:00 0:05:00 0:10:00 0:00:30 0:09:30 0:15:00 0:00:30 0:12:30 0:00:30 0:31:30 1:00:00 1:00:00 BASIC & SWEET BASIC FRENCH FRENCH FRENCH WHEAT & & & &
BREAD RECIPES Basic White Bread 5/8 cup water 1 tablespoon oil 1 tablespoon sugar 1 teaspoon salt 2 1/4 cups bread flour 5/6 teaspoons dry yeast Use Basic cycle Express White Bread ¾ cup + 2 tablespoons warm water (43°C) 1 tablespoons oil 4 tablespoons sugar 1 teaspoon salt 2 1/4 cups bread flour 1 tablespoon dry yeast Use Basic cycle, Express mode Egg Bread 5/8 cups water (including 1 egg) 1 tablespoon oil 1 tablespoon sugar 1 teaspoon salt 2 cups bread flour 5/6 teaspoons dry yeast Use Basic cycle — do
Sweet Bread 2/3 cup water 1 tablespoon oil ½ teaspoon salt ¼ cup sugar 1 tablespoon milk powder 2 cups bread flour 1 teaspoon dry yeast Use Sweet cycle French Bread 2/3 cup water 1 tablespoon oil 1 tablespoon sugar ¾ teaspoon salt 2 cups bread flour 1 teaspoon dry yeast Use French cycle Express French Bread ¾ cup warm water (43°C) 1 tablespoon oil 1 tablespoon sugar ¾ teaspoon salt 2 cups bread flour 1 teaspoon dry yeast Use French cycle, Express mode Chevre-cracked pepper Bread 5/8 cup water 30 g soft g
QUESTIONS AND ANSWERS / TROUBLESHOOTING Question Answer What should I do if the kneading blade comes out with the bread? Remove it with a crochet hook or a sandwich pick before slicing the bread. Since the blade can be separated from the tin, the remaining of the kneading blade is not due to a failure of the appliance. Why does my bread sometimes have some flour on the side crust? Your dough might be too dry. Next time, check your recipe and measuring.
Why did the dough only partially mix? Check to make sure that the kneading blades and baking tins are inserted properly. Also check the dough consistency. After 5 minutes of kneading, check the dough. If it is too dry, add liquid, if it is too moist, add flour. Only add 1/2 to 1 tablespoon at a time. Why didn’t the bread rise? The yeast might have passed the expiry date. Possibly no yeast was added at all. Check the condition of the yeast.
DECLARATION OF CONFORMANCE We, Kompernaß Handelsgesellschaft mbH, Burgstr. 21, D-44867 Bochum, Germany, declare this appliance to be in conformance with all applicable international standards, safety requirements and the EC Directives. No. of appliance/Type: KH 2230 Bochum, 31.03.