
Personal Lift User Manual

4 — MAINTENANCE
4-13
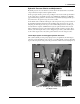
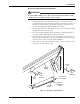
4. Drive out the pivot pin with a hammer and a brass or hardwood drift. Do not al-
low the free end of the cylinder to fall.
5. Fully retract the cylinder.
6. Turn off the key switch and remove the key.
7. Tag the hydraulic hoses that connect to the cylinder valve block. Each valve
block port is stamped with an identity number.
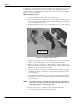
8. Place absorbent drip cloths below the cylinder ports. Remove the hydraulic
hoses from the lift cylinder. Plug the hose fittings to prevent fluid leakage. Pro-
tect exposed cylinder ports with plugs and caps.
9. At the base of the cylinder, unscrew and remove the keeper pins from both sides
of the pivot pin. Thread the removed keeper pin screws and keeper pins to the
mating beam for use during cylinder installation.
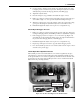
10. Drive out the pivot pin with a hammer and a brass or hardwood drift.
11. Lift and remove the cylinder using an overhead hoist and lifting straps.
12. After repairing the hydraulic cylinder, reinstall the cylinder in the reverse order
of removal.
13. Power up the hydraulic system and check for leakage. Tighten the hydraulic fit-
tings as needed.
14. Bleed entrapped air from the hydraulic cylinder according to instructions in
paragraph 4-4.
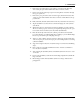
Jib Boom Cylinder Removal and Installation
1. Fully lower the outriggers and the upper and lower boom.
2. Extend the jib beam to raise the basket a few inches.
3. Place shoring under the jib beam. Lower the beam onto the shoring to support
the weight of the basket.
4. Place shoring under both rear corners of the basket. Adjust the shoring to relieve
any binding torque load on the upper jib beam pivot pins.
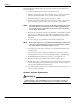
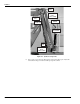
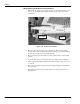
5. Remove the four keeper pins from the upper jib beam pivot pins (Figure 4-9).
Secure the keeper pins to the mating beam for use during cylinder installation.