
Installation Guide

or to foundation plates that
are fi rmly anchored to the
foundation. No part of the
BILCO Door should be cov-
ered with concrete. Apply
bead of silicone caulking
compound (not supplied) to
clean, dry masonry founda-
tion underneath door frame.
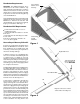
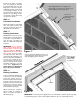
Verify that door frame is
level and square as shown
in Figure 1.
Using pre drilled holes in
sidepieces, header, and sill
as a guide, mark and drill
holes into the foundation
2-1/4” deep using a 1/4”
carbide tipped masonry bit
as shown in Figure 4. Apply
silicone caulk around each
anchor hole and insert nail-in
anchors, making sure anchor
heads contact door frame
and are embedded in caulk.
Hammer down anchors until
fl ush and secure.
Once the frame is fully
anchored to the areaway,
caulk the seams between the
header and the side panels
as shown in Figure 4.
STEP - 4
Install Doors
Caution: Door leaves are
heavy and will slam closed
until gas spring lift assistance
is installed in Step 5. Use
caution until gas springs are
fully operational.
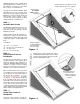
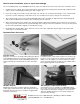
Position right hand door leaf
so that hinge pins align just
above hinge brackets on side
panels as shown in Figure 5.
Slide door downward so the
hinge pins fully engage into
brackets and secure using a
cotter pin as shown in Fig-
ure 5. Repeat for left hand
door leaf.
STEP - 5
Install Lift Assistance
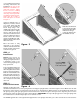
Starting on either door leaf,
attach ball stud fasteners to lower spring bracket and upper spring bracket as shown in Figure 6. Note: Make sure the that
ball portion of the fastener is facing away from the house on both brackets. With fasteners securely tightened and door in
the open position, push gas spring onto lower ball fastener as shown in Figure 6 until you hear it snap into place. Position
and snap top end of gas spring onto upper spring bracket. IMPORTANT: The exposed spring portion of the gas spring must
be on the bottom as shown. Repeat process on other door leaf.
The BILCO Type BR door is designed with supplemental coils springs that allow you to fi ne tune the door’s lift assistance
Cotter
Pin
Figure - 5
Slide door downward
so the hinge pins fully
engage into brackets
and secure using a
cotter pin. Repeat for
left hand door leaf.
Figure - 6
Ball stud
fasteners
Push and SNAP
gas spring onto
ball stud fastener
Exposed spring
on bottom
Large
diameter
portion of
gas spring
on top