
Installation Guide
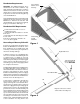
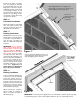

based on the angle of installa-
tion. The springs are installed
by simply sliding them onto the
hinge pins as shown in Figure
7. Multiple springs can be used
on each hinge and you can ad-
just the quantity until the door
operates to your liking. Secure
coil springs to hinge pins using
cotter pins as shown.
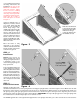
STEP - 6
Lift Handle Installation
Attach lift handle to right hand
door leaf using fasteners and
separate instruction sheet pro-
vided with door hardware.
STEP - 7
Painting Instructions
BILCO Basement doors are sup-
plied in either a red oxide primer
or powder coat paint fi nish. If
your door has a powder coat
fi nish, no additional fi nishing is
required.
IMPORTANT: Doors supplied
with a primer fi nish must be
painted within forty-fi ve (45)
days of installation. BILCO re-
quires the use an exterior alkyd
base enamel. For best results,
carefully follow the directions
on the paint label and apply one
thin coat of paint followed by a
second coat on both the exte-
rior and interior primed steel
surfaces of the door. Two quarts
should be suffi cient to coat the
entire door. Application of
paints that are not alkyd based
may void product warranty.
STEP - 8
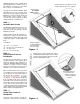
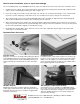
Flashing installation
Position aluminum fl ashing strip
so that it rests on top of header
panel and against house as
shown in Figure 8. Anchor fl ash-
ing strip to house using the ap-
propriate fasteners for the wall
construction as shown. (Note:
these fasteners are not included
in the hardware package).
When anchoring is complete,
replace siding as required so
that it covers the top edge of
the fl ashing strip.
Slide supplemental coils springs onto
hinge pin(s). Use as many or a few as you
like to adjust your door operation.
Figure - 7
Position aluminum fl ashing strip on top
of header panel and secure to exterior
wall using appropriate fasteners.
Figure - 8
Header
Replace house
siding OVER
fl ashing strip
as required
IMPORTANT: For masonry home applications, run a full bead of caulk along the top edge
of the fl ashing strip to ensure a watertight installation. (Do not caulk using mortar).
Secure coil
springs to hinge
pins using
cotter pins