
Installation Guide


Replacing a door where concrete
areaway is in need of major repair
If the surface of your concrete areaway is in need of major repair, you will need to
recap it or install Bilco foundation plates before installing your basement door.
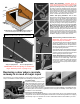
Foundation Plates
Optional Foundation plates are the
fastest and easiest way to improve the
surface of an areaway with minor dam-
age. They easily cover rough masonry
to improve the areaway’s appearance
and can be used to reduce the width of an odd size areaway to allow installation of a standard size door.
Foundation plates are constructed of galvanized steel for long-life and durability. Contact Bilco or your
local dealer for more information.
Capping your Concrete Areaway
If the surface of your foundation areaway is in need of major repair, the top of the areaway should be
recapped with concrete before installing a Bilco basement door. Contact Bilco for guidelines on recapping
your areaway or log-on to www.bilco.com to nd a certied Bilco basement door installer in your area.
Page 3
STEP 3: Door Installation: CAUTION: Doors are
heavy until gas spring operators are installed. Two
people may be required for door assembly. Install
right door by holding it vertically over the right side piece
as shown in Figure #3. Position the door so that the
door hinges t into the hinge brackets that are welded
onto the side piece as shown. Line up the holes in the
hinges with the hinge pivot holes in the brackets and
insert the 5/16” x 1-1/4” hinge pins and cotter pins as
shown. Install the left door in the same manner.
STEP 4: Gas Spring Installation: With the Bilco
basement door frame solidly anchored, the gas spring
operators can now be installed. Attach lower spring
bracket to side piece stiffener (on side of stiffener facing
top step) using (2) 5/16” x 1/2” bolts and lock nuts as
shown in Figure 4B. Attach ball fasteners supplied in
bag with gas springs to lower spring bracket and up-
per spring bracket as shown in Figure #4A & B. Note:
Make sure the that ball portion of the fastener is
facing towards the house on both brackets. With
fasteners securely tightened and door in the open
position, push gas spring onto lower ball fastener as
shown in Figure 4B until you hear it snap into place.
Position and snap other end of gas spring onto upper
spring bracket shown in Figure 4A to complete spring
installation. Repeat process on other door leaf.
#3
Install hinge pin so that head of pin is facing towards the
house as shown (Left door and side piece shown)
IMPORTANT! An interior door at the bottom of the steps is
required to prevent heat loss and reduce condensation.
Hinge Pin
Cotter Pin
Bilco Foundation Plates
Figure #4
A:Upper Spring Bracket B: Lower Spring Bracket
B
B
A
A
Push
Push
IMPORTANT: Install Gas Springs as shown with
larger diameter portion of spring on top.
Side piece
stiffener
Lower
spring
bracket
STEP 5: Painting the Bilco basement door:
IMPORTANT: Door must be painted within
forty-ve (45) days of installation.
The Bilco Basement Door and optional extension
panels are supplied with a uniform baked-on
Sherwin-Williams primer nish. See paint label on
the interior of the door leaf or go to www.bilco.com
for complete painting instructions.
Optional stair stringers and foundation plates are
galvanized steel but can be painted for aesthetic
purposes. If painted, a metal primer must be used
prior to applying the nish coat of paint.
STEP 6: Rubber Bumper Installation: After the
nish paint has dried, install two rubber bumpers
in the holes on the outside edge of each door.
Bumpers are installed by twisting the small end
into the hole until it is fully seated. Bumpers
cushion the doors in the open position and protect
the nish paint.