
Instructions / Assembly


BILCO Foundation Plates, available from
your BILCO Dealer, to fi nish the top of
the sidewalls. See page 6 or visit www.
bilco.com for more information.
4) Single Course Brick Sidewalls: Brick
sidewalls that are only one brick wide
may not be strong enough to support the
BILCO Door. They should be reinforced
with another course of brick, or by a
concrete wall poured against the brick
wall and tied into it with wall ties.
STEP - 1
Assemble Door Frame
The BILCO Type BR basement door con-
sists of seven parts (see front cover for
part names), two gas springs, and the
hardware package*.
Begin assembly of the door frame by at-
taching sill to side pieces with two 1/4”
round head bolts with bolt heads on the
outside per Figure - 2. Hand tighten sill
bolts.
* Hardware
(8) 5/16” x 1” cotter pins
(2) 1/4”-20 x 1/2” round head bolts
(2) 1/4”-20 hex nuts
(21) 1/4” x 2” nail-in anchors
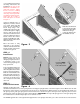
STEP - 2
Position Door Frame on
Foundation
Be sure masonry foundation is in good
condition and level, clean and dry. Door
sidepieces must be fully supported on
each side. BILCO Foundation Plates are
available for rough or uneven areaway
surfaces (see last page of instructions or
www.bilco.com for more information).
Move assembled door frame into place
on foundation. Position header panel on
top of side pieces as shown in Figure 3.
For proper door operation, the frame
must be level and square. To square,
see Figure - 3 and measure diagonals
from top right inside corner to bottom
left inside corner of frame and from top
left inside corner to bottom right inside
corner. Move lower end of frame to left
or right until diagonal measurements are
equal. Adjust sill by pivoting until fl ush
with foundation and tighten bolts.
STEP - 3
Anchor Door Frame to
Foundation
The door frame must be securely an-
chored to a sound masonry foundation,
Header panel
placed ON
TOP of frame
assembly
Diagonal dimen-
sions A and B will
be equal if the
frame is square
Drill anchor holes using holes in sill,
header and side pieces as a guide
Figure - 3
Apply silicone caulk around each anchor
hole drilled and insert nail-in anchors. mak-
ing sure anchor heads contact door frame
and are embedded in caulk.
Figure - 4
The header panel is
connected to the
side pieces by the
nail-in foundation
anchors.
Caulk
Seam