
Installation Instructions

Plastic anchor
not shown
(Inserted in concrete)
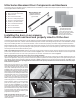
Starting with either door panel, position panel
on side piece so that the door is in the closed
position. Note: there are (8) hinge mounting
holes in each door panel, (4) for each hinge.
Start by attaching the top hinge to the door
panel with (1)1/4-20 x 1” pan head screw,
hand-tighten about half way. Position bottom
hinge on cover panel and hand tighten all four
mounting screws. Insert remaining three
screws into top hinge and hand tighten. Once
all eight hinge attachment screws are in place,
tighten securely with a screwdriver as shown
in Figure 8.
STEP 4: Motion damper installation
Starting with either door leaf, attach ball stud fasteners to
upper and lower mounting brackets as shown in Figure 9.
Ball or round portion of fastener should be facing towards the
house as shown on both brackets. Secure nuts to ball studs
using a 1/2” wrench. Attach end of damper to lower mounting
bracket located on side panel. This is done by simply pushing
the damper onto the ball stud until it snaps into place as
shown in Figure 9A. Attach other end of damper to bracket
to upper bracket located on door leaf. Note: You may need to
push down slightly on the damper to align it with the ball stud.
Repeat damper installation instructions on other door leaf.
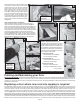
STEP 5: Install side panel inserts
Replacing a door where new concrete capping is required
For installations requiring a new concrete cap, start by removing the top 3" to 4" of deteriorated masonry to permit the pouring of the cap
without increasing the height of the present top step. Build a simple wood form as shown in Figure 10 on the next page, ensuring that the form
is level and square. The top of the new concrete capping should be a little higher than the surrounding grade (a height of at least 4" is
desirable). Assemble door frame per STEP 1 on page 2 of these instructions. Move the assembled frame into place over capping form as
shown in Figure 11 on next page, positioning it exactly as the door will be when the capping is poured. This is done by blocking up the frame
temporarily so bottom of side pieces are at the same height as the top of the inside form board. Note: All parts of the Bilco basement door
must rest on top of the concrete capping and must not be buried in it. The Siding above the door may need to be removed and replaced
to position door flush against the house. Place a level against each side piece and check plumb. Square door by measuring diagonals and
shifting frame as required. With the door frame in place, insert #12 x 1-1/2" slotted hex head screws with washers and spacers into anchor
5 6
7 8
Page 3
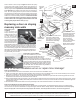
1. Solid Panel Insert
Used when light and ventilation
are not required in areaway
2. Vent Panel Insert *
Adds ventilation and fresh air to
basements and areaways.
3. Clear Panel Insert
Adds light to dark basement
areaways to facilitate easier access.
Painting and Maintaining your Door
DO NOT PAINT DOOR. The Bilco Ultra Series basement door is made from a corrosion resistant high-density polyethylene material that
cannot be painted. The door features construction from corrosion resistant materials and is designed to be virtually maintenance free. As
required, the door can be cleaned using non-abrasive household cleaners. Occasional lubrication of all moving parts with a standard spray
lubricant is recommended.
9
The Bilco Ultra Series basement door is
supplied with interchangeable side panel
inserts. Inserts allow you to add light and/
or ventilation to your basement areaway. A
description of insert options is provided be-
low and complete installation instructions
are supplied in the insert kit.
1
2
3
IMPORTANT: An interior door at the bottom of the steps is required to prevent heat loss and reduce condensation.
* Factory installed
A
B
PUSH
House
Upper Bracket
Lower Bracket
Install Damper
with large
diameter end
attached to
door leaf