
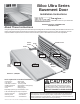
Installation Instructions
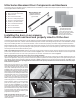

Replacing a door on sloping
masonry side walls
Insert slotted hex head
screw with nylon spacer
and steel washer into
side piece anchor hole.
Screw two spring nuts
onto each bolt as
shown, one holding
spacer in place and one
2-3 turns from the
bottom, before embed-
ding into wet concrete.
Drill three anchor holes in sill
and insert a slotted round
head screw in each. Screw
one spring nut 2-3 turns on
bottom before embedding
into wet concrete
How to correct installation errors or repair minor damage*
After lining up
bottom edges of
both doors, nail
bracing forms on
both sides
Concrete
capping after
pouring
Concrete
capping
after
pouring
Level
Set form so
capping will
be level
Concrete capping
after pouring
Line up
bottom edges
of both doors
10
11
12
Door not shedding water
If your Bilco basement door does not shed water, look for and correct these installation errors.
1.
Doors do not fully close. Stand on steps and slowly close each door to see if the bottom edge of one or both is binding on the concrete.
Chip away or rub down excess concrete with mason's stone so flange is not obstructed.
2.
Masonry not high enough. The masonry under the Bilco basement door should be 4" higher than the surrounding grade and concrete
should be level so water cannot accumulate in front of the sill.
3. Water seeping between sides and masonry. The unit should be caulked all around the exterior where the sides and masonry meet, as well
as where the unit joins the building wall. If side pieces have been buried in concrete, the unit should be removed and stairwell recapped so
assembly rests on top.
4.
Blocked header. Make certain header is clear. Any blockage in this channel will cause water to overflow the header.
Doors Out of Alignment or Doors Not Seated Properly
If doors do not seat themselves properly or bounce slightly when in closed position, and bottom flanges of doors are not obstructed by
concrete in front of sill, loosen all fasteners on hinge and upper and lower motion damper brackets.
Close both door leaves until properly
aligned and lying flat on the side panels. Slowly retighten all fasteners, alternating between locations, until all are fully tightened.
*The Bilco basement door is carefully and adequately packed to withstand all normal shipping abuse. This information is provided to
show how easily minor repairs can be made, thus saving the builder or homeowner much unnecessary inconvenience. For
additional information or assistance, please contact our customer service department at (800) 854-9724 (Mon- Fri).
Page 4
slots as shown in inset on right in Figure 11. Attach two spring
nuts to each of the screws as shown. Attach door panels to as-
sembled frame by following STEP 3 of door assembly instruc-
tions on pages 2 and 3. Important: Do not install motion damp-
ers at this time. Pour capping and close doors to recheck align-
ment. Be sure capping is level to prevent water accumulation
around base of door frame. After concrete hardens remove forms
and tighten all anchor screws. Complete installation by following
STEPS 3-5 of door assembly instructions. Caulk all around the
exterior of the frame where it meets the masonry and at the
seams between the new capping and foundation walls with
exterior grade polyurethane caulk (opaque).
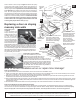
Side walls in poor
condition
If your areaway has
sloped masonry side
walls that have loose or
crumbling masonry and
are not structurally
sound, they can be re-
moved and an Ultra Se-
ries door can be installed
on the new flat areaway.
Remove and discard ex-
isting basement door. If sloping masonry side walls are of stone,
brick, block, or poured concrete, they can usually be removed
by striking them with a sledge hammer (see photo above). Be
sure to wear safety goggles. Once side walls are removed and
debris has been cleared, follow the above section (Replacing a
door where new concrete capping is required) to cap your area-
way and install your new door.
Level
Side Panel
Side walls in good condition
Door can be installed on your side
walls if they are structurally solid, have no
loose or crumbling masonry, and have a
uniformly flat and level surface on which to anchor a
door. If your side walls meet these conditions, it is best
to return the Ultra Series door and use a Bilco Sloped
Wall Basement Door. The SLW Door (shown on left)
will simplify your installation by capping over your exist-
ing side walls. Note: the SLW door is only available in
prime painted steel construction.