
Instructions / Assembly


B
A
B
A
Locknut
5/16"-18 x 3/4" Long
Carriage Bolt
Right End View
SLW
Support
Bracket
SLW Side Piece
*
* Minimum
2" overlap
with sidewalls
C
B
A
Fill pocket
Sill
Right
side piece
Nuts
inside
Flat heads of
bolts outside
Nuts under
Left
side piece
Header
Round heads of
bolts outside
FIGURE - 8
FIGURE - 7
Measure Diagonals
Move lower
end of frame
until diagonals
are equal
FIGURE - 9
Apply
silicone caulk
under frame
FIGURE - 10
SECTION C
DOOR ASSEMBLY AND INSTALLATION
CAUTION: The BILCO Basement Door sheds water in all normal
conditions only when installed and caulked in accordance with
these instructions. If there are no rain gutters above, a diverter
must be installed to prevent roof water from flowing directly onto
the BILCO Door.
Sloped sidewalls must be structurally sound and level for proper
operation of your new Bilco Door. Remove the old door and check
sidewalls (see Figure - 1 on page 2). If no repairs are required,
begin your installation with Step - 1.
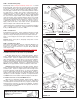
STEP - 1 Assemble Door Frame
The Bilco SLW basement door consists of nine parts (see front
cover for part names), four torsion rods with cams ( Note: Model
SLW3641 contains two torsion rods only), and the hardware pack-
age*. Begin assembly of frame by attaching support brackets to
side pieces with carriage bolts and locknuts per Figure 7. Apply a
bead of caulking (not provided) to each header end plate per
Figure - 8A. Attach header to side pieces with four 1/4” round head
bolts and nuts. (Note: to determine SLW left side from right side,
position so that the two holes in the upturned flange of each side
are at the bottom, see Figure - 8C). Header end plates must be
under the side pieces, with bolt heads facing out, per Figure - 8B.
Tighten bolts until caulking squeezes out. Remove excess caulk
and use it to fill inside joint, per Figure - 8B. Attach sill to side
pieces with four 1/4” flat head bolts. Nuts must face inside, per
Figure - 8C. Hand tighten.
* Hardware
(10) 5/16" x 3/4" carriage bolts and locknuts
(6) 1/4” x 5/8" round head bolts and nuts
(4) 1/4” x 1/2” flat head bolts and nuts
(4) 5/16" x 1-1/4” hinge pins with cotter pins
(15) 1/4” x 2" nail-in anchors
(4) rubber door bumpers
(1) vial lubricant
STEP - 2 Position Door Frame on Foundation
Be sure masonry foundation is in good condition and level, clean
and dry. Door side pieces must overlap foundation sidewalls by at
least 2" on each side. If overlap is less than 2", install Bilco
Foundation Plates according to SECTION B before door frame is
placed on foundation. Move assembled door frame into place on
foundation. For proper door operation, the frame must be level
and square. To square, see Figure - 9 and measure diagonals
from top right inside corner to bottom left inside corner of
frame and from top left inside corner to bottom right inside
corner. Move lower end of frame to left or right until diagonal
measurements are equal. Adjust sill by pivoting until level and
tighten bolts. To adjust sill on extremely high sidewalls, it may be
necessary to remove the upper sill bolts.
STEP - 3 Anchor Door Frame To Foundation
The door frame must be securely anchored to a sound masonry
foundation, or to foundation plates that are firmly anchored to the
foundation. No part of the Bilco Door should be covered with con-
crete. Apply bead of silicone caulking compound (not supplied) to
clean, dry masonry foundation (or optional foundation plates)
underneath door frame, per Figure - 10. Verify that door frame is
level and square. Using pre drilled holes in side pieces and sill as
a guide, drill holes into the foundation 2-1/4" deep using a 1/4”
carbide tipped masonry bit. Apply silicone caulk around each
anchor hole and insert nail-in anchors, making sure anchor heads
contact door frame and are embedded in caulk. Hammer nailpins
down until flush.
Page 4
Fill pocket and seal
vertical joint with
caulking compound
both ends of header
Place bead
of caulking
compound on
both end plates
before bolting
header to side pieces