
Instructions / Assembly


About These Instructions
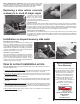
It may be helpful to you to look through this entire folder before proceeding with the detailed assembly and
installation instructions. The names of the various parts referred to in the instructions are indicated below.
IMPORTANT: If your door was supplied with a red oxide primer nish, it must be painted within forty-ve (45) days of
installation. See paint label on interior of door leaf or go to www.BILCO.com for complete painting instructions. If your
door has a powder coat nish, no additional nishing is required.
When the doors are open for access, the area should be personally guarded to prevent
anyone from falling down the stairs. Doors should be closed and locked when not in use.
KEEP OFF DOORS TO AVOID INJURY
Surface may be slippery. In extreme conditions, steel in the summer sun can
become hot and cause injury. White or a light color nish coat will reect sunlight
and reduce the temperature of the metal. KEEP OFF DOORS.
CAUTION
Depending upon the type of installation,
some or all of the following will be required:
• Hammer and Nails
• Circular Saw
• Masonry Chisel
• Shovel and Trowel
• Level
• Tape Measure
• Electric Drill
• Phillips head screwdriver
• Wrenches and Sockets:
7/16” and 1/2”
• 1/4" Carbide Masonry Drill Bit
• Exterior Grade
Polyurethane Caulk (Opaque)
• Work Gloves
• Safety Goggles
Sill
Slide Bolt Lock
(optional Keyed
Lock Kit available)
Right Door
Left Door
Hinge
Header
Left
Side piece
Right
Side
piece
Gas
Spring
Upper Spring
Bracket
Lower Spring
Bracket
Patent # 6,799,395
Printed in U.S.A. ©
Copyright, 2019, The BILCO Company, New Haven, CT 06505 ABC155B REV 14.0
Classic Series BILCO Basement Door
Installation Instructions
BILCO Customer Service (800) 854-9724
www.BILCO.com