
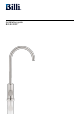
Installation Guide

3
Installing the
dispenser.
IMPORTANT: This Billi appliance is to be installed by a licensed trades person in accordance with
AS/NZS 3500.1 and AS/NZ 3500.2 and in compliance with applicable state regulatory requirements.
For correct operation of this appliance, it is essential to observe the manufacturer’s instructions.
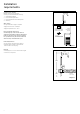
1. Determine Component Location
A stop tap (not supplied) is to be installed
in an easily accessible position for later
service. Determine the location of each
of the components, taking into account
the tube lengths and space available.
Refer to Diagrams 1 & 2.
2. Mount Backflow Prevention/
Pressure Regulator Valves
Fit combined backflow prevention/
pressure limiting valve (supplied) to
stop tap in accordance with enclosed
manufacturer’s instructions.
3. Flush Lines
It is important to flush lines before fitting.
Install outlet fitting to combined valve.
Refer to Diagram 4.
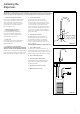
4. Install Dispenser Tap Assembly
DISPENSER MUST NOT BE INSTALLED BELOW
THE SPILL LEVEL OF THE RECEIVING FIXTURE.
A 22mm hole is required either in the benchtop
or flat surface of sink adjacent to bowl of sink.
Mount the dispenser tap. Refer to Diagram 3.
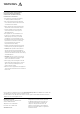
5. Install Chiller Module
Connect all plastic tubing as shown.
Refer to Diagram 4. All connections are
made using push-fit connectors. Trim tubes
to correct lengths. Tubes should be cleanly
cut square using a sharp knife or plastic
tube cutter. Ensure that tube ends are round
and not flattened or kinked, then push into
connectors firmly until properly seated (to
release, press the outer ring in while pulling
gently on the tube).
6. Install Drain Connection
The Billi dispenser tap incorporates an
air break above the spill level of the sink
and therefore a tundish is not required.
Connect a 3/8" drain tube to dishwasher
nipple, or alternativedrainage point, using
fittings supplied.
ENSURE DRAIN TUBE HAS A CONTINUAL FALL.
7. Turn on Water Supply
Pull dispenser tap lever and then turn on
water supply. After water flows from outlet,
release lever and ensure that there are no leaks.
Pull lever again and run for at least 5 minutes.
8. Turn on Electricity Supply
9. Set Chilled Water Temperature
Set the desired water temperature using
temperature control knob. Refer to Billi
B-3000 User Guide.
10. Re-check Connections for Leaks
11. Explain Operation to User
Diagram 3
22mm
Hole
Flexible
braided
hose
1/4" Blue tube
6mm Black
1/2" Stop tap
(installed by plumber)
Power cord
10mm Black
Adaptor
Fitting
To drainage point
e.g. Dishwasher nipple
Diagram 4
Locking
bush
Locking
nut