Wireless Broadband Firewall Gateway Quick Start Guide
Federal Communication Commission Interference Statement This equipment has been tested and found to comply with the limits for a Class B digital device, pursuant to Part 15 of the FCC Rules. These limits are designed to provide reasonable protection against harmful interference in a residential installation. This equipment generates, uses and can radiate radio frequency energy and, if not installed and used in accordance with the instructions, may cause harmful interference to radio communications.
Quick Start Guide About the Product This Wireless Broadband Firewall Gateway provides SOHO and residential users the ideal solution for sharing a high-speed broadband Internet connection among a 11Mbps wireless network and a 10/100Mbps Fast Ethernet backbone. It integrates robust firewall and routing functions with advanced 802.11b wireless technology, maximizing your network security and efficiency while minimizing the network complexity and maintenance costs.
Wireless Broadband Firewall Gateway Domain Name System (DNS) relay: Provides an easy way to map the domain name (a friendly name for user such as www.yahoo.com) and IP address. When local machine sets its DNS server with this router’s IP address. Then every DNS conversion request packet from the PC to this router will be forwarded to the real DNS in outside network. After the router gets the reply, then forwards it back to the PC.
Quick Start Guide Rich Packet Filtering: Not only filter the packet based on IP address, but also based on Port numbers. It will increase the performance in LAN and WAN, also provide a higher-level security control. Static and RIP1/2 Routing: Supports an easy static routing table or RIP1/2 routing protocol to support routing capability. Dynamic Host Control Protocol (DHCP) Client and Server: In the WAN site, the DHCP client can get an IP address from the Internet Server Provider (ISP) automatically.
Wireless Broadband Firewall Gateway Package Contents 1. Wireless Broadband Firewall Gateway 2. One CD containing the on-line manual 3. One straight-through CAT5 Ethernet cable 4. One power adapter 5. This Quick Start Guide For more detailed instructions on configuring and using the Wireless Broadband Firewall Gateway, please refer to the on-line manual.
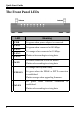
Quick Start Guide The Front Panel LEDs LED 1 PWR 2 LAN 1 3 LAN 2 4 LAN 3 5 LAN 4 6 WAN Meaning Lit green when power adapter is connected. Lit green when connected at 100 Mbps. Lit orange when connected at 10 Mbps. Flashes when sending/receiving data. Lit when connected to a WAN device. Flashes when sending/receiving data. Lit orange when system ready. 7 PPP/SYS Lit green when the PPPoE or PPTP connection is established. Flashes orange when upgrading firmware. 8 WLAN Lit green when established.
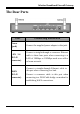
Wireless Broadband Firewall Gateway The Rear Ports Port Connecting Instruction Power (jack) Connect the supplied power adapter to this jack. LAN 1-4 (RJ-45 connector) Connect a straight-through or crossover Ethernet cable to these four ports when connecting to a LAN of 10Mbps or 100Mbps such as an office or home network. WAN (RJ-45 connector) Connect a straight-through Ethernet cable to this port when connecting to a hub.
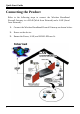
Quick Start Guide Connecting the Product Refer to the following steps to connect the Wireless Broadband Firewall Gateway to a WAN (Wide Area Network) and a LAN (Local Area Network): 7 1. Connect the Wireless Broadband Firewall Gateway as shown below. 2. Power on the device. 3. Ensure the Power, LAN, and WAN LEDs are lit.
Wireless Broadband Firewall Gateway Configuring PC in Windows XP 1. Go to Start / Control Panel (in Classic View). In the Control Panel, double-click on Network Connections. 2. Double-click Local Area Connection. 3. In the Local Area Connection Status window, click Properties. 4. Select Internet Protocol (TCP/IP) and click Properties.
Quick Start Guide 5. Select the Obtain an IP address automatically and the Obtain DNS server address automatically radio buttons. 6. Click OK to finish the configuration. Configuring PC in Windows 2000 9 1. Go to Start / Settings / Control Panel. In the Control Panel, double-click on Network and Dial-up Connections. 2. Double-click Local Area Connection. 3. In the Local Area Connection Status window, click Properties.
Wireless Broadband Firewall Gateway 4. Select Internet Protocol (TCP/IP) and click Properties. 5. Select the Obtain an IP address automatically and the Obtain DNS server address automatically radio buttons. 6. Click OK to finish the configuration.
Quick Start Guide Configuring PC in Windows 95/98/Me 1. Go to Start / Settings / Control Panel. In the Control Panel, double-click on Network and choose the Configuration tab. 2. Select TCP/IP -> NE2000 Compatible, or any Network Interface Card (NIC) in your PC. 3. Select the Obtain an IP address automatically radio button. 4. Then select the DNS Configuration tab. 5. Select the Disable DNS radio button and click OK to finish the configuration.
Wireless Broadband Firewall Gateway Configuring PC in Windows NT4.0 1. Go to Start / Settings / Control Panel. In the Control Panel, double-click on Network and choose the Protocols tab. 2. Select TCP/IP Protocol and click Properties. 3. Select the Obtain an IP address from a DHCP server radio button and click OK.
Quick Start Guide Configuring the Product To configure this device, you must have IE 5.0 or above installed in PC. 1. Open web browser and type http://192.168.1.254 in the browser’s address box. This number is the default IP address for this device. Press Enter. 2. A user name and password prompt will appear. Just click OK. There is no password protection in default. 3. Click WAN -> ISP in left pane and select one of the protocols for connecting with remote site such as ISP from the following: .
Wireless Broadband Firewall Gateway . PPPoE . Fixed IP . PPTP Client 4. Click Apply to store all configurations. The Wireless Broadband Firewall Gateway will reboot automatically.
Quick Start Guide Connecting to the Internet To see if this Wireless Broadband Firewall Gateway is visible on the local network, go to Start / Run. In the Run dialog box, type “Ping 192.168.1.254” and press OK. Open your Web browser to begin surfing the Internet.