BiPAC 7300GX ADSL2/2+ Modem/Router with 3G back-up QoS Firewall Wireless Multi-Port Switching Hub UK Quick Install Guide L This guide covers only the initial Internet set-up. Please refer to the full User Manual on the CDROM for more advanced settings. This guide is based on the Billion BiPAC 7300GX 3G/ADSL2+ Wireless Modem/Router. Screen shots in this guide may vary slightly from the actual router. www.billion.uk.
This symbol on the product or in the instructions means that your electrical and electronic equipment should be disposed at the end of its life separately from your household waste. There are separate collection systems for recycling in the EU. For more information, please contact the local authority or your retailer where you purchased the product.
QUICK INSTALL GUIDE Billion 7300GX 3G/ADSL2+ Wireless Modem/Router Installation 1.1 Starting out: Before you can establish an Internet connection through your Billion 7300GX Modem/Router make sure you have the following: 1. A Computer or Notebook with an installed Network Adaptor (sometimes called an Ethernet Adaptor, Network Card or NIC) 2. An ADSL or DSL service account and configuration information provided by your Internet Service Provider (ISP).
6. Connect the Power adaptor to the Billion 7300GX Modem/Router and plug the other end into a Power outlet. Power up the unit. 7. Turn on your computer. Please allow up to 45 seconds for your Network Adaptor to locate the Router. Please wait for the DSL light on the front of the router to turn to solid – this may take up to 1-2 mins (see 3.1 Troubleshooting the connection). 8. You are now ready to configure your ADSL and Wireless connection for the Billion 7300GX Modem/Router.
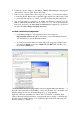
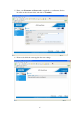
3. From the Menu on the left select Quick Start. 4. Ensure the Connect Mode is ADSL (Recommended) and click on Continue.
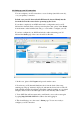
5. Enter your Username and Password as supplied by your Internet Service Provider in the relevant fields, and click on Continue. 6. Please wait while the router applies the new settings.
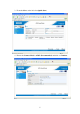
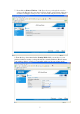
. Now click on Next to Wireless. N.B. If you do not go through the wireless setup on the Wizard, then you must click Save Config at the bottom of the page and then click Apply settings to save your username and password to Flash. 8. From the drop down menu in the Security Mode field you can choose your preferred wireless security (or keep the wireless security disabled.) Please ensure your wireless adaptor or laptop is compatible with your chosen security mode.
9. For WPA you should enter an alphanumeric password (numbers and letters) of between 8 and 64 characters in the WPA Shared Key field and click Continue. 10. Please wait while the router applies the new settings.
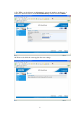
11. This completes the wireless security configuration. 12. You should now be connected to the Internet. You can check your connection on the Status page by selecting Status from the menu on the left-hand side. 13. You are now ready to set up your 3G connection. To set up your 3G connection your 3G datacard with SIM must be inserted firmly into the slot in the back of the router before powering up the device.
2.2 Setting up your 3G connection: You can configure your 3G connection to act as a backup (Autofailover mode), or as your primary connection. In both cases your 3G datacard with SIM must be inserted firmly into the slot in the back of the router before powering up the device. If your have completed your ADSL and wireless configuration and your 3G datacard was inserted when you first powered up the router, please select Status from the menu on the left-hand side and go to section 2.3 to configure your 3G.
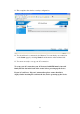
2.3 Configuration of your 3G connection in Autofailover mode: 1. From Status page, select Advanced>Configuration>WAN>WAN Interface. 2. Ensure Failover/Failback is ticked and then scroll down and click Apply at the bottom of the page. Now click the blue 3G icon in the Backup Port field.
3. Enter your APN and Username and Password as supplied by your mobile service provider and click Apply. Some standard UK settings: Vodafone APN: internet Username: web Password: web T-mobile APN: general.t-mobile.uk Username: user Password: pass 3 APN: three.co.uk Username: guest Password: guest O2 APN: mobile.o2.co.
4. Click Apply to write your settings to Flash. 5. This completes the set up of your 3G connection in backup mode. If your ADSL connection goes down, the router will automatically Failover to your 3G connection. The Status page will look like this. N.B. The time it takes to Failover is dependant on the settings in the router and the 3G signal strength. The Default settings of the router should enable Failover in around 1-2 mins.
2.4 Configuration of your 3G connection in primary mode: 1. To set the primary connection to 3G go to Advanced>Configuration>WAN> WAN Interface and select 3G from the drop down list in the Main Port field. 2. Click Apply to change the settings. Then click on Save Config at the bottom of the page and Apply to write your settings to Flash.
3. The Status page will now show 3G as the primary mode of connection. If the 3G does not automatically connect then please click on Connect to activate your 3G service in primary mode. 4. The Status page will then show your 3G connection details.
5. The default setting for your 3G connection is On Demand. This means that if there is no internet activity the 3G will disconnect after a set time. Once internet activity resumes (browsing, email etc.) the 3G will automatically reconnect. If you would prefer your 3G to be always on, you can change the settings by clicking the Always On button in the Connection field in the 3G WAN Profile and then clicking Apply, followed by Save Config and Apply again to save the settings. 6.