
Safety Information
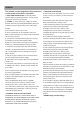


DISPLAY
TO PREVENT SERIOUS INJURY:
Assemble Charger/Starter according to Assembly
Instructions before use.
Function Select Button:
Press to cycle through below functions:
6V/12V 2A - Slow Charge.
12V 10A - Fast Charge.
6V/12V 40A Boost - Quick charge.
NOTICE: Read the vehicle operator’s manual before using
engine start.
12V 200A - Engine Start.
Start/Stop - Start or stop function.
LED Indicators:
RECONDITIONING: Comes on when Battery is deeply
discharged.
CABLES REVERSED: Comes on when battery Cables are
reversed.
MAINTENANCE: Comes on when battery is fully charged.
VOLTAGE: Comes on when voltage is being displayed.
CURRENT: Comes on when amperage is being displayed.
STATUS: Comes on when status is being displayed.
( Example : CHARG will display while battery is chargi
ng.)
Display Select: Cycles through Voltage, Current and
Status displays.
Digital Display:
XX.XX V: Voltage.
XX.XX A: Amperage.
WRONG: Cable disconnected, short circuit, low or high
voltage.
REVER: Cables reversed.
CHARG: Charging.
FULL: Charged.
XX S: Cooling countdown.
DESUL: Desulfating.
RECON: Reconditioning.
BAD: Bad battery
If necessary to remove battery from vehicle to charge,
always remove grounded terminal from battery first.
Make sure all accessories in the vehicle are off, so as
not to cause an arc.
Make sure area around battery is well ventilated while
battery is being charged.
Clean battery terminals. Be careful to keep corrosion
from coming in contact with eyes.
Add distilled water in each cell until battery acid
reaches level specified by battery manufacturer. Do
not overfill. For a battery without removable cell caps,
such as valve regulated lead acid batteries, carefully
follow manufacturer’s recharging instructions.
Study all battery manufacturer’s specific precautions
while charging and recommended rates of charge.
Determine voltage of battery by referring to vehicle
owner’s manual and make sure it matches output
rating of battery
Charger/Starter. If Charger/Starter
has adjustable charge rate, charge battery initially at
lowest rate.
A marine (boat) battery must be removed and charged
on shore. To charge it on board requires equipment
specially designed for marine use.
BATTERIES WITH HYDROMETER EYE: Do not depend
on hydrometer eye to determine battery charge level
Charger/Starter Location
Locate Charger/Starter as far away from battery as
DC cables permit.
Never place Charger/Starter directly above battery
being charged; gases from battery will corrode and
damage Charger/Starter
Never allow battery acid to drip on Charger/Starter
when reading electrolyte specific gravity or filling
battery.
Do not operate Charger/Starter in a closed-in area or
restrict ventilation in any way.
PREPARE TO OPERATION
TO PREVENT SERIOUS INJURY:
Wear ANSI-approved splash-resistant
safety goggles and heavy-duty rubber
work gloves whenever connecting,
disconnecting, or working near battery.
Battery acid can cause permanent
blindness.
3