
Safety Information


ENGINE STARTING
NOTICE: Some vehicles with onboard computers
may be damaged from the high-current starting
output. Thoroughly read the vehicle service
manual before using this procedure.
WARNING! Do not use Start setting to charge
batteries. Use to jump start only.
Note: During extremely cold weather or when battery
is severely exhausted, charge the battery at 10A for
about five minutes before attempting to start engine.
1. Unplug Charger/Starter.
2. Make sure setting of Engine Start charge rate
matches the vehicle battery. The emergency
starter function should optimally supply at least
50% of required battery CCA rating.
3. Position AC and DC cables to reduce risk of
damage by hood, door, or moving engine part.
4. Stay clear of fan blades, belts, pulleys, and other
parts that can cause injury to persons.
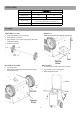
5. Determine which battery post is grounded
(connected) to the chassis. If negative post is
grounded to chassis, see a. If positive post is
grounded to the chassis, see b.
a. For negative-grounded vehicle (as in most
vehicles):
Connect POSITIVE (RED) clip from battery
Charger/Starter to POSITIVE (POS, P, +)
ungrounded post of battery.
Connect NEGATIVE (BLACK) clip to vehicle
chassis or engine block away from battery.
Do not connect clip to carburetor, fuel lines, or
sheet-metal body parts. Connect to a heavy
gauge metal part of the frame or engine block.
b. For positive-grounded vehicle:
Connect NEGATIVE (BLACK) clip from battery
Charger/Starter to NEGATIVE (NEG, N, –)
ungrounded post of battery. Connect POSITIVE
(RED) clip to vehicle chassis or engine block away
from battery. Do not connect clip to carburetor,
fuel lines, or sheet-metal body parts. Connect
to a heavy gauge metal part of the frame or
engine block.
6. Plug Charger/Starter into grounded 120V
receptacle.
7. Turn Power Switch on.
8. Press Function Select Button until 12V 200A Start
lights up.
9. Press Start/Stop button to start function.
10. Turn ignition key. If engine fails to start, charge
battery at 10A for an
additional five minutes before
attempting to start again.
11. After the engine starts, press Start/Stop button to
stop function, then turn Power Switch off.
12. Unplug power cord, remove clip from vehicle
chassis, and then remove clip from battery terminal.
13. After use clean, then store the charger out of
children’s reach.
MAINTANENCE & WARRANTY
MAINTANENCE INSTRUCTIONS
This charger requires minimal maintenance. As with any
appliance or tool, a few common sense rules will prolong the
life of the battery charger.
ALWAYS BE SURE THE CHARGER IS UNPLUGGED
BEFORE PERFORMING ANY MAINTENANCE OR
CLEANING.
1. Store in a clean, dry place
2. Coil up the cords when not in use.
3. Clean the case and cords with a slightly damp cloth.
4. Clean any corrosion from the clamps with a solution of
water and baking soda.
5. Examine the cords periodically for cracking or other
damage and have them replaced if necessary.
WARRANTY
The main unit of charger enjoys 1 Year warranty to be free
from defects in use due to materials or quality problem.
This warranty covers the cost of the defective product only
and does not cover the cost of installation. we reserves the
right to refuse credit in the event that any damage to the
product resulted from collision, improper installation, or
other customer abuses.
This policy extends only to the original purchaser of the
product and is nontransferable.
If any query or want more information, feel free to contact
our Customer Support: (888) 680 2849 or send mail to:
inquiry@bilthardusa.com.
5