
manual


Copies of the I/B. Please reproduce them without any
changes except under special instruction from Bimar (Italy).
The pages must be reproduced and folded in order to obtain
a booklet A5 (+/- 148.5 mm width x 210 mm height). When
folding, make sure you keep the good numbering when you
turn the pages of the I/B. Don’t change the page numbering.
Keep the language integrity.
8
/
25
Assembly page 8/16
Fax +32 030 9904733
section of the wires of the outlet is appropriate for the absorbed power of the heater. In general,
the use of adapters or extension cords is not recommended; if their use is indispensable, they must
conform to existing safety standards and their current capacity (amperes) must not be less that the
maximum of the appliance.
• The power socket must be easy to reach so the plug can be removed quickly in case of
emergency.
• To not place the appliance near sinks or other container of liquids (minimum distance of 2 meters)
to avoid the risk of it falling in.
• Do not place the appliance near an open flame, cooking or other heating appliance.
• Keep the fan far away from fabrics (curtains, etc.) or unstable materials that could obstruct the air
intake grille; make sure that the front is free of unstable materials (dust, etc.).
• Make sure that the electric cord is not touching rough, hot or moving surfaces and not twisted or
wrapped around the appliance.
• Stand the appliance on a horizontal, flat surface or table; do not stand on a inclined plane (the
appliance could upset).
• Do not use the appliance with a timer or a programmer or with a system that can switch on the
appliance automatically, to avoid risk of fire, since a fire risk exists if the heater is covered or
positioned incorrectly.
• Stand the appliance on a horizontal, flat surface or table; do not stand on a inclined plane (the
appliance could upset).
• In the event of a breakdown or poor operation, turn the fan heater off and ask for professionally
qualified help: repairs made by unqualified persons can be dangerous and render void the
warranty.
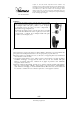
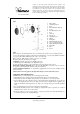
ASSEMBLY
Attention: the fan can be used only when completely and correctly assembled, that is complete with
its base and support and protection grid. If in doubt, have the appliance checked or assembled by a
qualified professional person
Attention: always unplug the appliance before you assemble.
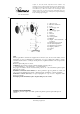
. For assembly, refer to fig. 1.
Upright
1) Cross the two feet (7) and fasten them to the fixed rod (9) using the 4 screws provided, cover the
joint between the feet and the fixed rod using the cover (5).
2) Lengthen the adjustable rod (10) to the required height and lock tightly using the rod fixing ring
nut (4).
Ventilator
3) Fasten the rear grid (16) to the motor casing, positioning the corresponding pins and holes, and
lock using the appropriate ring nut (15).
4) Insert the fan (17) on the motor shaft (1) and lock with the appropriate ring nut (13) turning it
tightly anti-clockwise.
5) Couple the front grid (12) with the rear grid (16) and lock with the plastic ring and ensure the
fastening with the appropriate locking screw (14), (the screw must be in the lower part). Having
done this, check that the protection grid is firmly coupled and fastened to the motor.
6) Fasten the fan to the upright, inserting the lower hole on the adjustable rod of the upright. Make
sure that the fastening holes correspond: the passage is close to the feed cable, the nut screw (for
fastening) is more or less at the top of the rod. Lock the special screw (18) in the hole describe and
tighten normally. Cover the hole with the plug provided.