User’s Guide BLINK Buddy VIDEO BABY MONITOR WARNING! Use only the power adapter and battery pack provided in the box. Before operating this set, please read these instructions carefully.
Welcome... to your Video Baby Monitor! Please retain your original dated sales receipt for your records. For warranty service of your product, you will need to provide a copy of your dated sales receipt to confirm warranty status. Registration is not required for warranty coverage. For product-related questions, please call: US 1-866-779-1632 Multifunctional Device • 3.2" Diagonal Capacitive Touch Screen • Resolution: 400 x 240 Pixels • Wi-Fi® 802.
This User's Guide provides you with all the information you need to get the most from your Buddy Video Baby Monitor. Before you make your first call or use the Internet, you will need to set up your device. Follow the simple instructions in 'Getting Started' on the next few pages.
1. 2. 3. 4. 5. 6. 7. Safety Instructions ........................................................ 1 Getting to know your Buddy ........................................ 2 2.1 Overview of the Parent Unit ................................. 2 2.2 Parent Unit LCD Display ...................................... 3 2.3 Parent Unit Notifications Panel ............................. 3 2.4 Parent Unit Range ................................................ 3 2.5 Parent Unit Signal Strength ............................
11. 12. 13. 14. 10.13 Mark Message as Unread .................................. 23 10.14 Delete an Email Account .................................... 23 Take Photos and Record Videos ............................... 24 11.1 Open Camera ..................................................... 24 11.2 Switch Between Camera and Camcorder Mode .............................................................................. 24 11.3 Take Picture ........................................................ 24 11.
1. Safety Instructions WARNING! • STRANGULATION HAZARD - Keep cables out of baby's reach. • NEVER place parent unit within the crib. • Secure the cables some distance away from baby's reach. • Do not place the Parent unit in the bathroom or other humid areas. • Never use extension cords with AC Adapters. Only use the AC Adapters provided. PARENT UNIT SETUP & USE: • Avoid sources of noise and heat, such as motors, fluorescent lighting, microwave ovens, heating appliances and direct sunlight.
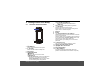
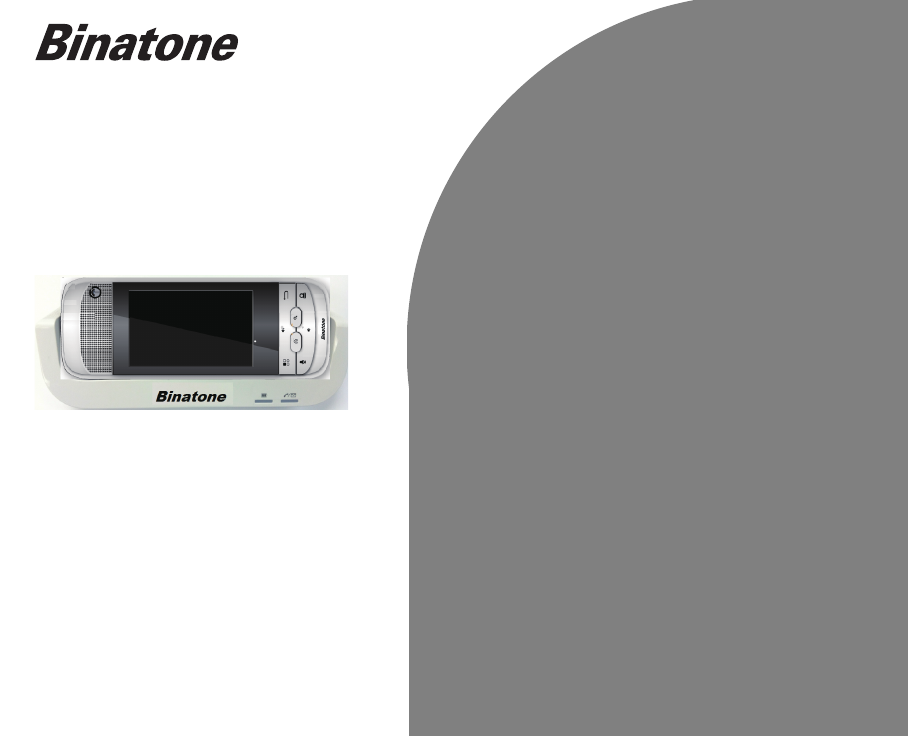
+/- VOLUME UP/DOWN keys 2. Getting to Know Your Buddy 2.1 Overview of the Parent Unit 6 5 4 1 2 3 H MENU key 2 T TALK key 3 4 Microphone FUNCTION buttons Press once to access the menu options Press and hold to talk to the Baby Unit. < > BABY key Press once to launch "Baby Monitor" application. 6 B BACK key 7 8 9 Earpiece Camera L Lock/Unlock/Power On & Off key 10 E Earphone Jack 8 7 1 Press to increase/decrease media volume. 5 Press to return to the previous screen.
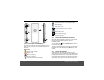
Wireless connection on, with signal strength 9 Signal strength 10 Alarm clock is set Headset / Earphones are connected 13 Media volume is off 11 Music or radio is playing 1 2.3 12 2.2 Parent Unit LCD Display 14 The status bar at the top of the screen displays the time, status of your parent unit, and notifications that you’ve received.
range, and large metal objects, such as refrigerators, mirrors or filing cabinets, or other electrical equipment may cause interference and/or affect the range. 2.5 Parent Unit Signal Strength The icon on your parent unit indicates when you are in range of the docking station. When out of range of the docking station, the signal strength indicator will show no bars. Move back within range. The parent unit will automatically re-connect to the docking station. • The last screen you were viewing opens. 2.
2.11 Recalibrate the Touch Screen Your parent unit uses a built-in G-Sensor that changes the screen orientation based on the way you hold the parent unit. If you feel that the screen orientation does not respond properly to the way you hold the parent unit, you can recalibrate the screen as follows: Press H and then tap Settings > Display > G-Sensor Calibration, and follow the on-screen instructions. 2.
3. Setting Up 3.1 Connecting the Buddy Parent Unit Docking Station 3.2 Installing and Charging the Parent Unit Battery Pack IMPORTANT The docking station must be plugged into an electrical outlet at all times. Only use the adapter supplied with the product. Power cable 1. Hold the parent unit with both hands and the front panel facing down. Gently press the back cover with your thumbs, and then slide it down until it disengages from the parent unit. 2. Remove the back cover completely. 3.
4. Align the back cover tabs with the notches located at the edges of the exposed back panel. 5. Slide up the back cover until it clicks into place. 6. Place the parent unit on the docking station to charge for at least 6 hours. When the parent unit is fully charged, is displayed. Note If the Red Charging LED did not light up, you need to realign the parent unit to get a good charging contact with the docking station.
3.3 Insert and Mount the Memory Card Your parent unit supports micro SD cards, of up to 32GB. You can store music, pictures, files and applications on a memory card and access them on the parent unit. (Remark: No SD card is attached) Insert the memory card by pushing the card firmly into the slot with the metal contacts facing down, and in the direction as indicated in the handset picture above. • The parent unit will prepare the SD card for mounting and perform media scanning.
4. Using the Touchscreen Action Function Operations Tap Select on-screen items such as applications and settings icons. Gently tap an item on the screen to select the item that you wish to activate. Select on-screen buttons. Type using the on-screen keyboard. Tap and hold Open the available options for an item, for Tap an item on the screen and hold in place for example, tap and hold a contact or a link on a 2 ~ 3 seconds. web page. Think of this as using the right-click button on a mouse.
5. Using the On-screen Keyboard Your parent unit features a Qwerty keyboard, which has the same key arrangement as that of a standard computer keyboard. The on-screen keyboard lets you enter text, such as email messages. It appears automatically when you launch certain applications or when you tap on a text or number field. To hide the on-screen keyboard, press B. 5.1 Enter Text and Numbers Tap on a text or number field to bring up the keyboard.
5.7 Edit Text Tap and hold on the word you have typed to activate Edit text options and tap to select an option. 6.
BMS_4 BMS_5 BMS_6 • Key in the Wi-Fi ® password (picture BSM_4) • Click on ‘Next Step’ to ‘Create/login Account’. Tap on ‘Create Account’ (picture BSM_5, 6). BMS_7 BMS_8 BMS_9 BMS_10 • And email address ‘User name’, password, confirm password, email and ‘term of condition’ (picture BMS_ 7,8,9 and 10), then tap "Sign in". The Terms & Conditions appear. Please read them and then tap "I agree" to confirm the sign up, and move on to the next stage of adding a camera.
7. Personalising Your Buddy Parent Unit 7.1 Display Settings 7.1.1 Set Wallpaper 1. From the home screen, press H. 2. Tap Wallpaper. 3. Tap to select Gallery, Live wallpapers or Wallpapers. Tip If you select Live wallpapers or Wallpapers, simply tap to select a wallpaper from the list and tap Set wallpaper. 4. If you select Gallery, tap to select your desired picture. • An image position box will appear at the centre of the picture.
7.1.5 Add Apps to Your Home Screen 7.1.8 Rename a Folder 1. Tap 1. 2. 3. 4. to open the launcher and view all your Tap the folder to open it. Tap and hold the folder’s title bar. Enter a new name in the dialog box that appears. Tap OK. applications. 2. Tap and hold an application icon until it expands. • The application icon will be placed on the home screen.
7.2.2 Set Volume 7.2.4 Enable or Disable Audible Selection This option enables you to set the Ringtone, Media and Alarm volumes on your Buddy parent unit. This option lets you enable or disable the playing of sounds on your parent unit when making screen selection. 1. From the home screen, press H. 2. Tap Settings > Sound > Volume. 3. Drag the slider to the left or right to decrease or increase each of the volumes and tap OK to confirm.
8. Connect Your Buddy Parent Unit to a Wi-Fi ® Network 1. Press H. 2. Tap to select Settings > Wireless & networks. • Tap Wi-Fi to activate the Wi-Fi ® function. • ✓ appears to indicate that it is activated. 3. Tap Wi-Fi settings > Network notification to activate notification. • ✓ appears to indicate that it is activated. • The screen displays a list of available Wi-Fi ® networks. 4. Tap the Wi-Fi ® network that you want your Buddy parent unit to be connected to.
8.1 Select Wi-Fi ® Sleep Policy You can specify when to put the Wi-Fi ® connection to sleep, but the Buddy parent unit cannot switch to mobile data. 1. Press H. 2. Tap to select Settings > Wireless & networks > WiFi settings. 3. Press H. 4. Select Advanced > Wi-Fi sleep policy. 5. Select When screen turns off, Never when plugged in or Never. 8.
9. Using the Web Browser YOU MUST JOIN A WI-FI® NETWORK THAT IS CONNECTED TO THE INTERNET BEFORE YOU CAN SURF THE WEB VIA THE BROWSER APPLICATION. SEE PAGE 16 ON HOW TO JOIN A WI-FI® NETWORK. You can use the Browser to surf the web. The Browser is fully optimised and comes with advanced features that let you enjoy Internet browsing on your Buddy parent unit. 9.1 Open a Browser Tap > Browser. 9.2 Set the Home Page 1. In the Browser window, press H and tap More. 2. Tap Settings > Set home page. 3.
9.7.2 Close a Browser Window 1. In the Browser window, press H and tap Windows. 2. Tap the X against the browser window you wish to close. 9.8 Finding Text Within a Webpage 1. When viewing a webpage, press H and tap More > Find on page. 2. Enter the text in the input box using the on-screen keyboard and tap Next. • Matching texts are highlighted on the screen. 3. Tap < or > to go to the previous or next matching text. 4. Tap x to close the search box. 9.9 Selecting Links in Webpages 9.9.
3. Tap Add and OK to confirm, or edit the bookmark name and tap Next. 4. Edit the location if needed, tap Done and OK. 9.12.2 Open a Bookmark 1. In the Browser window, press H and then tap Bookmarks. • The bookmark window opens. 2. Tap to select the bookmark to open it. 9.13 Customise Browser Options You can customise the Browser to suit your browsing preferences by setting the display, privacy, and security options. 1.
information for the email account such as incoming/ outgoing server settings before you proceed. For example, you need to enter the following to set up a Gmail account: POP3 server = pop.gmail.com Port = 995 Security = SSL (if available) SMTP server = smtp.gmail.com Port = 465 Security = SSL (if available) Authentication = Yes 5. Tap OK. • The email application will check your incoming and outgoing server settings. It might take a few minutes. 6. Enter the Account name (optional) and tap Done. 7.
10.6 Compose and Send Email Messages You can send an email message to anyone who has an email address. You can send the message to one person or to a group of people. 1. Tap > Email. 2. Tap to select an email account from the Accounts window. 3. Press H and tap Compose. 4. Enter the message recipient's email address in To field. Tip If you are sending the email to several recipients, separate the email addresses with a comma. You can add as many message recipients as you want.
3. Tap to select the folder you want to check. • The messages are displayed. 4. Tap to select the message you want to reply to. 5. Tap Reply or Reply all. 6. Compose your message and tap Send. 10.11 Delete an Email Message 1. Tap > Email. 2. In the Accounts window, tap on the folder icon next to the email account you want to access. • The available folders are displayed. 3. Tap to select the folder you want to check. • The messages are displayed. 4. Tap to select the message you want to delete. 5.
11. Take Photos and Record Videos 11.4 Camera Options Note To get clear photographs, wipe the lens clean with a soft, dry cloth before you take a photo. Drag up to switch to camcorder 11.1 Open Camera Tap > Camera. 11.2 Switch Between Camera and Camcorder Mode Drag slider to camera or camcorder icon to switch mode. 11.3 Take Picture Tap . • A thumbnail of the photo you have just taken is shown. • Tap on the thumbnail to view it in full screen. Delete photo Tap Delete > Confirm Delete.
11.6 Record Video 1. Drag slider to camcorder icon. 2. Tap to start/stop video recording. • A recording timer appears on the top left of the screen. • A thumbnail of the video you have just recorded is shown. • Tap on the thumbnail to view it in full screen. • Tap > and tap Movies to play it. • Tap Delete to delete the video. • Tap Share to send the video via email • Tap More for other video options. Press B to return to the video recorder screen.
12. Music The Music application lets you play digital audio files stored in a memory card. You must copy your audio files to a memory card and insert it into the Buddy parent unit before you launch the music application. See “Insert and Mount the Memory Card” on page 8. 12.1 Listen to Music on your Buddy Parent Unit 12.1.1 Using Earphones You can insert earphones (not included) into the earphone jack of your Buddy Parent unit to listen to music. 12.1.
12.5 Party Shuffle All Songs Press H and tap Party shuffle. 12.6 Turn Party Shuffle Off Press H and tap Party shuffle off. 12.7 Create Playlists • A pop-up options menu appears. 3. Tap Add to playlist. 4. Tap to select the playlist. • The song is added to the selected playlist. 12.8 Add Songs to Current Playlist 1. In the playback window, press H. 1. From the main music library, tap Playlists. 2. Tap and hold the playlist that you wish to delete. • A pop-up options menu appears. 3.
12.15 Delete Current Song 1. In the Playback window, press H and then tap Delete. 2. Tap OK to confirm. WARNING! The song will be permanently deleted from the SD card. 13. Gallery The Gallery application lets you view photos and videos on the parent unit. It presents the pictures and videos on your SD card, including those you have taken with your camera and those you have downloaded from the web or other locations. 13.1 Open Gallery Tap > Gallery.
13.2.1 View Pictures in Full Screen 14. Clock Tap on a thumbnail to view the picture in full screen. Tap on the picture in full screen to launch the navigation and zoom controls. Tap The zoom control buttons appear when you view a picture in full screen. When viewing pictures in full screen, you can: • The screen shows the currently set time and date, and the next due alarm time if one is set. • Tap [day/night icon] to dim the display, if required.
14.3 Activate an Alarm Setting 14.6 Other Alarm Clock Settings 1. Tap > Clock. 2. Tap . • A list of alarm settings is displayed. 3. Tap on the alarm icon to activate an alarm setting. • The alarm icon is underlined in green. Note When the alarm rings, tap Snooze or Dismiss to snooze or dismiss the alarm. 1. Tap > Clock. 2. Tap . 3. Press H and tap Settings. 14.4 Deactivate an Alarm Setting 1. Tap > Clock. 2. Tap . • A list of alarm settings is displayed, with any set alarms underlined in green. 3.
15. Calendar Select ringtone Select a ringtone and tap OK. You can use the Calendar to create and manage events, meetings, and appointments. Default reminder time 15.1 Open the Calendar Tap > Calendar. Note The last Calendar view opens by default. 15.2 View Agenda for the Day In any Calendar view, press H and tap Agenda. 15.3 Go to Today's Date In any Calendar view, press H and tap Today. 15.4 Change Calendar View You can display the Calendar in daily, weekly, monthly, or agenda view.
15.7 View, Dismiss, or Snooze a Reminder 16. Performing Calculations 1. Tap on the status bar, then slide your finger down the screen to open the Notifications panel. 2. Tap the upcoming event name to display the event. Note If you have other pending event reminders, these events will also appear on the screen. 16.1 Open the Calculator 3. Tap Snooze all to snooze all event reminders for five minutes. 4. Tap Dismiss all to dismiss all event reminders. 5.
17. ES FILE EXPLORER 17.4 Create a New Folder ES File Explorer is a free file manager for Devices for AndroidTM. It allows you to browse files and folders stored on your Buddy parent unit, memory card, LAN and FTP. You can also copy/paste, rename, delete, create folder, send file as email attachment features using ES File Explorer. > ES File Explorer. Tap to browse the files and folders in your Buddy parent unit or memory card. Tap to go to the root directory. Tap to search for files or folders.
17.8 Delete a File 1. Tap and hold the file you wish to delete. • A pop-up menu appears. 2. Tap Delete and tap OK to delete the file. 17.9 Compress a File 1. Tap and hold the file you wish to compress. • A pop-up menu appears. 2. Tap Compress. 3. Enter a name for the compressed file, select the compression mode and tap OK. 2. You can then modify the follow settings: • Theme Settings • Layout Settings • File Settings • View • Size • Sort By • Home Directory • App Backup Directory and "the others". 17.
18. Install Apps 19. ES Task Manager You can install the Apps (usually in .apk format) into your Buddy parent unit with a Micro-SD Card. This AndroidTM program helps you free memory, kill tasks, close all the running applications, and speed up your Buddy. 1. Copy the Apps files onto a Micro-SD card. 2. Insert the Micro-SD card into the card slot of the parent unit. 3. Run ES File Explorer. 4. Select the Apps inside the SD card and double-click to run the Installation.
20. Settings From the home screen, press H and then tap Settings. You can modify the different settings of your Buddy parent unit. Wireless & Networks Sound Display Location & Security Configure the device's wireless connections, such as Wi-Fi®. Set notification and ring tones, silent mode, etc. Set screen calibration, brightness and screen timeout, auto-rotate, etc. Set screen unlock pattern or manage the device's credential storage lock. Applications Manage applications and install new programs.
21.2 Factory Data Reset 22. Help This erases all data from the device's memory, and sets it back to original factory settings. Make sure you have backed up any important application-specific data to the SD card. It does not erase data stored in the SD card, unless the "Erase SD card" box is ticked. How to get optimum connectivity and reception between the parent unit and camera. 1. Press H and tap Settings > Privacy > Factory data reset. 2. Tap Reset device.
The parent unit cannot find the camera unit in the registered account. • Check if the camera has been turned on. • Tap the Search Camera button again. The parent unit cannot log in to the registered account. • Check if the account name and password are correct. • Check if there is any problem with the Wireless Router or Internet Service. • Go to the home screen. Press H and then tap Settings > Wireless & networks. Tap the Wi-Fi® menu on the first row to turn it off and then tap again to turn it on.
My parent unit does not recognise the memory card. • Make sure that you have inserted a certified memory card. • Make sure that you have inserted the memory card correctly. See page 8 on how to insert a memory card. Noise interference on your radio or television. • Your base may be too close. Move it as far away as possible. My parent unit shows a low-battery warning. • The parent unit is low on power and needs to be charged before you can use it. See page 7 on how to charge your parent unit.
23. General Information If your product is not working properly... 1. Read this User's Guide. 2. Contact Customer Service at US 1-866-779-1632 Important Safety Instructions Follow these safety precautions when using your device to reduce the risk of fire, electric shock, and injury to persons or property: 1. Keep all vents and openings of the device unblocked. Do not set the device on a heating register or over a radiator. Ensure that proper ventilation is provided at the installation site. 2.
Installation Guidelines Battery Safety Instructions 1. Read all instructions and save them for future reference. 2. Follow all warnings and instructions marked on the product. 3. Do not install this product near a bath tub, sink, or shower. 4. Operate this device using only the power source that is indicated on the marking label. If you are unsure of the power supply to your home, consult with your dealer or local power company. 5. Do not place this product on an unstable cart, stand, or table.
Consumer Products and Accessories Limited Warranty ("Warranty") Thank you for purchasing this product manufactured under license by Binatone Electronics International LTD ("BINATONE"). What Does this Warranty Cover? Subject to the exclusions contained below, BINATONE warrants that this product ("Product") or certified accessory ("Accessory") sold for use with this product that it manufactured to be free from defects in meterials and workmanship under normal consumer usage for the period outlined below.
Products Covered Length of Coverage Consumer Products One (1) year from the date of the products original purchase by the first consumer purchaser of the product. Consumer Ninety (90) days from the date Accessories of the accessories original purchase by the first consumer purchaser of the product. Consumer Products The balance of the original and Accessories that warranty or for ninety (90) days are Repaired or from the date returned to the Replaced consumer, whichever is longer.
How to Obtain Warranty Service or Other Information? To obtain service or information, please call: US 1-866-779-1632 You will receive instructions on how to ship the Products or Accessories at your expense and risk, to a BINATONE Authorised Repair Centre.
the equipment. This device complies with Part 15 of the FCC rules. Operation is subject to the following two conditions: (1) this device may not cause harmful interference, and (2) this device must accept any interference received, including interference that may cause undesired operation. To ensure safety of users, the FCC has established criteria for the amount of radio frequency energy that can be safely absorbed by a user or bystander according to the intended usage of the product.
Technical Specifications Parent Unit Wi-Fi Frequency 2.412 GHz - 2.462 GHz Supported Memory Card Type Micro-SD (No micro-USD card attached) Operating Temperature 0ºC to 40ºC Micro-USB Port Included Headphone 3.5mm jack Storage Temperature -20ºC to 60ºC Wi-Fi® Connection 802.11b/g/n Power Adapter Base Adapter Sunstrong international industrial ltd Input: 100-120VAC 60Hz 0.3A Output 1: 5.8VDC 600mA Output 2: 5.8VDC 1000mA WARNING! Use only with provided power supply.