USER GUIDE e820 System Digital Cordless Telephone with Caller Display and Answering Machine THIS EQUIPMENT IS NOT DESIGNED FOR MAKING EMERGENCY TELEPHONE CALLS WHEN THE POWER FAILS. ALTERNATIVE ARRANGEMENTS SHOULD BE MADE FOR ACCESS TO DIAL EMERGENCY SERVICES. Aus Ver 1, Jan, 05 BINATONE “ e820 System ” User Guide - Back Page Before operating this set, please read these instructions carefully.
Color profile: Generic CMYK printer profile Composite Default screen Important note — emergency calls The e820 is not designed for making emergency calls when the mains power fails. So you should make alternative arrangements for access to Emergency Services. (This means that you should also have a basic phone that does not need mains power, connected to your line so that you can make calls during a power failure.) If you need help … The Binatone service Line is available from 9.00 am to 5.
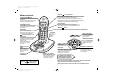
Color profile: Generic CMYK printer profile Composite Default screen Where to find it HANG UP / C (Cancel) button Press to hang up at the end of a call. Press and hold for 1 second to lock the keypad. Press and hold for 3 seconds to turn the handset on and off. While dialling or programming, press BRIEFLY to delete digits from the display; or press and HOLD to clear the display. UP and DOWN buttons Press during a call to adjust the volume in the earpiece.
Color profile: Generic CMYK printer profile Composite Default screen Symbols on the display The time is shown if you’ve set the handset’s clock The handset’s number (1 if you have a single system, 1, 2 or 3 if you have a Twin or Triple system) The base unit’s number (1, unless you have registered your handset to more than one base unit) The duration of each call is shown on the display from 20 seconds after you press the PHONE button for a line, until 5 seconds after you end the call.
Color profile: Generic CMYK printer profile Composite Default screen Contents Read these notes first 4 Choosing a site for the base unit and charger pod 4 Radio signals between handset and base unit 4 Mains power connection 4 Battery safety 5 Connection and conditions for use 5 Installation and set-up 6 Before you start 8 Electrical safety 8 Interference 8 ‘Out of range’ warning 8 9 To switch the handset on and off 9 To lock the keypad 9 10 To make a call 10 To answer a call 10 To end a call 10 Ear
Color profile: Generic CMYK printer profile Composite Default screen Contents To reset the handset 38 Answering machine buttons and lights 25 Setting up the answering machine 26 To set the clock 26 To check the clock 26 Outgoing messages (OGMs) 27 To record OGM1 27 To record OGM2 28 To set the number of rings 28 Using the answering machine 29 To switch on and off 29 To switch between OGMs 29 To record a memo 29 To play back your messages 30 To intercept a call 31 To delete messages 32 To go back to
Color profile: Generic CMYK printer profile Composite Default screen Read these notes first Choosing a site The base unit and charger pod(s) should be placed on a for the base level surface, in a position where: unit and ■ the mains adapter plug will reach an easily accessible charger pod 230-V AC switched mains supply socket — never try to lengthen the mains power cable ■ the base unit’s telephone line cable will reach your telephone line socket or extension socket (the charger pod does not have a telepho
Color profile: Generic CMYK printer profile Composite Default screen Read these notes first Battery safety Only use the rechargeable batteries supplied with the handset. DON’T use non-rechargeable batteries — they may burst, causing damage. Connection and conditions for use You can connect your e820 to a direct exchange line (DEL) — a line connected to a local exchange, with its own phone number; to an extension socket connected to a DEL; or to an extension on an approved compatible PBX.
Color profile: Generic CMYK printer profile Composite Default screen Installation and set-up 1 Choose a suitable site for the base unit See page 4 2 Connect the mains power lead and the telephone line cord into the back of the base unit Use the telephone line cord supplied with your e820 — do not use any other telephone line cord 3 4 Plug the mains adapter into a 230 V AC, 50 Hz mains socket, with the switch on the socket set to OFF See the note on page 4 If you have one or more charger pods … Plug
Color profile: Generic CMYK printer profile Composite Default screen 6 Fit the rechargeable batteries in each handset A. Fit the three batteries as shown, making sure you match the + and – ends to the markings in the battery compartment B. Fit the battery compartment cover, sliding it into place and pressing firmly to make sure it is secure DON’T use non-rechargeable batteries in the handset.
Color profile: Generic CMYK printer profile Composite Default screen Before you start Electrical safety ◆ DO NOT let the base unit or charger pod get wet. Electrical equipment can cause serious injury if used while you are wet or standing in water. ◆ If the base unit or charger pod ever falls into water, DO NOT retrieve it until you have unplugged the power lead from the mains and the telephone line plug from the telephone socket (base unit only); then pull it out by the unplugged cables.
Color profile: Generic CMYK printer profile Composite Default screen Switching on and off To switch the handset on and off To switch the handset off and save battery power: ◗ Press the HANG UP/C button and hold it for 3 seconds until the display goes blank To switch the handset back on: To lock the keypad ◗ Briefly press the HANG UP/C button ◗ Press the HANG UP/C button and hold it for 1 second until the ‘key’ symbol and a group of dashes appear on the display To lock the keypad: To unlock the ke
Color profile: Generic CMYK printer profile Composite Default screen Making and answering calls To make a call 1 Key in the telephone number If you make a mistake, press the HANG UP/C button to clear digits one by one from the display. 2 Press the PHONE/OK button (You can dial the number after you press the PHONE/OK button to get Dial tone if you prefer, but you won’t be able to correct any mistakes if you do it this way.
Color profile: Generic CMYK printer profile Composite Default screen Making and answering calls Last Number Redial (LNR) To make a repeat call to the last number you dialled (up to 24 digits): 1 Press the Redial/CDS button 2 Press the PHONE/OK button To make a repeat call to one of the the last five numbers you dialled: 1 Press the Redial/CDS button 2 Press the or button if necessary until the number you want is displayed 3 Press the PHONE/OK button To clear a number from the Last Number Re
Color profile: Generic CMYK printer profile Composite Default screen Using the base unit’s speakerphone You can answer calls using the base unit as a speakerphone. But you cannot make outgoing calls using the base unit. ! To answer a call When the phone rings, to answer it using the base unit’s speakerphone: ◗ To end a speakerphone call Speakerphone calls using the base unit are ‘one way at a time’ — while the other person is talking, s/he can’t hear you. So try not to interrupt each other.
Color profile: Generic CMYK printer profile Composite Default screen Memory dialling You can store up to 20 phone numbers in memory. Each number can have up to 24 digits. The 20 memory locations are numbered 01 to 20. To store a number To make a memory call Chain dialling 1 Key in the phone number If you make a mistake, press the HANG UP/C button to clear one digit at a time from the display.
Color profile: Generic CMYK printer profile Composite Default screen Memory dialling To change a stored number To delete a stored number 1 Press the PROG button 2 Press the MEMORY button 3 Press the or button until the number you want to change is displayed 4 Press the HANG UP/C button to delete digits one by one; then key in the new digits 5 Press the PHONE/OK button 1 Press the MEMORY button 2 Press the or button until the number you want to delete is displayed 3 Press and hold
Color profile: Generic CMYK printer profile Composite Default screen Memory dialling To use the notebook You can store a number in memory while you are busy on a call.
Color profile: Generic CMYK printer profile Composite Default screen Caller Display If you subscribe to this feature from your service provider, you can see the phone numbers of your callers on the display, before you answer. If a caller withholds their number , or if they are calling from a network that does not transmit the number, no number will be shown on the display when the phone rings.
Color profile: Generic CMYK printer profile Composite Default screen Caller Display To return a call To ring back someone who’s called you: 1 Follow steps 1 to 3 on page 16 to display the number 2 Press the PHONE/OK button to dial the number To delete Caller Display 1 records 2 To store a Caller Display number in 1 memory To delete a Caller Display record: Follow steps 1 to 3 on page 16 to display the number Press and hold the HANG UP/C button until you hear a tone; OR press and hold the HANG UP/
Color profile: Generic CMYK printer profile Composite Default screen Using a multi-handset system If you have an e820 multi-handset system, you already have up to six handsets registered to your base unit. You can register additional handsets — altogether, up to six handsets per base unit.
Color profile: Generic CMYK printer profile Composite Default screen Using a multi-handset system To answer an intercom call The ringing tune for intercom calls is different from that for outside calls. When someone makes an intercom call to you INT appears on your handset’s display, with the number of the handset calling you.
Color profile: Generic CMYK printer profile Composite Default screen Using a multi-handset system To shuttle between two calls When you have both an outside call and an intercom call in progress, you can shuttle from one to the other, like this: ◗ Press the Ø/INT button for one second to speak to each in turn, putting the other on hold You can transfer the outside call to the other handset by pressing the HANG UP/C button while you’re connected to the intercom call If you press the HANG UP/C button whi
Color profile: Generic CMYK printer profile Composite Default screen Using a multi-handset system New Call tone To page all handsets from the base unit When you are on an intercom call and an outside call comes in, you will hear New Call tone over your conversation to tell you that someone is calling you.
Color profile: Generic CMYK printer profile Composite Default screen Handset registration The handset(s) supplied with your base unit are already registered; you shouldn’t need to re-register them. But if you’ve bought extra handsets separately, you will need to register them. Each handset can be registered to up to four base units, numbered 1 to 4.
Color profile: Generic CMYK printer profile Composite Default screen Handset registration To de-register a handset You may need to do this in order to replace a faulty handset. 1 Press the PROG button then 2 6 u The display shows the numbers of all handsets registered to the base unit. 2 Key in the number of the handset to be de-registered u The display flashes, and the handset is de-registered.
Color profile: Generic CMYK printer profile Composite Default screen Handset registration To register to a different brand of base unit Your e820 can be registered to any GAP-compatible base unit; or your can register other GAP-compatible handsets to your e820 base unit. But we do not guarantee that all features or display messages will be available using other manufacturers’ equipment.
Color profile: Generic CMYK printer profile Composite Default screen Answering machine buttons and lights ANSWER/MESSAGE light Comes on when the machine is switched on. Flashes when you have new messages. MEMO/Forward button Press to record a memo. Press to skip forward during message playback. (This is also the SPEAKERPHONE button.) PLAY/PAUSE button Press to play back messages and memos. Press to pause during message playback. MEMO OGM OGM/Rewind button Press to record your outgoing message.
Color profile: Generic CMYK printer profile Composite Default screen Setting up the answering machine Note — if you pause too long between the steps listed below, the machine will time out and you’ll need to start again. To set the clock 1 Press and hold the CLOCK button until the machine says ‘set day’ u When you release the button, the machine tells you the current day setting.
Color profile: Generic CMYK printer profile Composite Default screen Setting up the answering machine Outgoing messages (OGMs) An OGM is what callers hear when the machine answers. The e820 has two OGMs; it is supplied with pre-recorded messages, but you can record your own versions: ■ OGM1 — this invites callers to leave a message. The default is “Sorry — we cannot answer your call now. Please leave your message after the beep”.
Color profile: Generic CMYK printer profile Composite Default screen Setting up the answering machine To record OGM2 1 If necessary, press and hold the ON–OFF/STOP button to switch the machine on 2 Briefly press the ON–OFF/STOP button so that the machine says: “Please call later” 3 Press and hold the OGM (REWIND) button until you hear a ‘beep’ 4 Record your OGM into the base unit’s microphone 5 As soon as you have finished speaking, press the ON–OFF/STOP button to stop recording u The machine pl
Color profile: Generic CMYK printer profile Composite Default screen Using the answering machine To switch on and off ◗ Press and hold the ON–OFF/STOP button to switch the machine on and off When the machine is first switched on, OGM1 is selected, so callers will be able to leave messages. When the machine is switched off, it will answer after 10 rings and play OGM2. You can switch it on using remote operation (see page 33).
Color profile: Generic CMYK printer profile Composite Default screen Using the answering machine To play back your messages When there are new messages and/or memos waiting, the base unit’s ANSWER/MESSAGE light flashes. Memos are counted as messages. Playback and Pause ◗ Press the PLAY/PAUSE button to play all new messages and memos u The machine tells you how many messages you have altogether; then how many new messages.
Color profile: Generic CMYK printer profile Composite Default screen Using the answering machine Stop playback ◗ To stop message playback, press the ON–OFF/STOP (STOP) button Volume control To adjust the volume of the loudspeaker during playback: ◗ Press the VOLUME – or + button There are ten volume levels altogether, including ‘off’.
Color profile: Generic CMYK printer profile Composite Default screen Using the answering machine To delete messages To delete the current message: ◗ Briefly press the DELETE button during playback u If this is a new message, it will carry being played, and will be deleted after you’ve listened to all new messages. If it’s an old message (one you’ve listened to before), it will stop and be deleted immediately.
Color profile: Generic CMYK printer profile Composite Default screen Remote operation This is the three-digit code you need if you dial home to check your messages. Unless you set a different code (any three digits), it is 321. To set a remote security code 1 Press and hold the CODE button (on the underside of the base unit) for about 2 seconds until the machine says ‘Set security code’.
Color profile: Generic CMYK printer profile Composite Default screen Remote operation Keys to press during remote operation Interrupt and bypass the outgoing message (OGM) ✱ Play new messages (after playing back new messages, you can press this again to hear all recorded messages) 2 Pause and restart during message playback 2 Skip forward to the next message 3 Repeat the current message 1 Skip back to the previous message Switching on remotely 1 1 Stop playback or recording 6 Delete the m
Color profile: Generic CMYK printer profile Composite Default screen Customising your handset General points Auto-answer You can customise the settings of your e820 handset, using a menu which is shown on the handset’s display. Please note that: ■ If you don’t press any button for about 25 seconds, the handset will time out and the display will return to standby mode. ■ When you confirm any setting you have made, you’ll hear a confirmation tone. If you make a mistake, you’ll hear a warning tone.
Color profile: Generic CMYK printer profile Composite Default screen Customising your handset Ringer volume and melody The handset has eight ringer volume levels, including 0 for off; and eight ringer melodies. With the volume set to 0, the handset will not ring for an incoming call, but the display will show call or the phone number.
Color profile: Generic CMYK printer profile Composite Default screen Customising your handset Direct Call With Direct Call turned on, when you press any key except the PROG button, the handset will automatically make a call to a number you have programmed in. This feature is sometimes called babysitter’s call. ! With Direct Call turned on, it is not possible to make emergency calls, unless you have programmed an emergency number such as 000 as the Direct Call number.
Color profile: Generic CMYK printer profile Composite Default screen Customising your handset To clear all memories This is a way of clearing all stored numbers at once, from the memory locations and the Last Number Redial memories. If you have set a Direct Call number, it will be cleared too. 1 Press the PROG button then 1 9 2 Press the PHONE/OK button to confirm Note: Caller ID memories are cleared by resetting the base unit (see page 43).
Color profile: Generic CMYK printer profile Composite Default screen Customising your base unit General points Emergency numbers You can customise the settings of your e820 base unit, using a menu which is shown on the handset’s display. Please note that: ■ If you don’t press any button for about 25 seconds, the handset will time out and the display will return to standby mode. ■ When you confirm any setting you have made, you’ll hear a confirmation tone.
Color profile: Generic CMYK printer profile Composite Default screen Customising your base unit Ringer volume and melody The base unit has ten ringer volume levels, including 0 for off; and eight ringer melodies. With the volume set to 0, the base unit will not ring for an incoming call.
Color profile: Generic CMYK printer profile Composite Default screen Customising your base unit To bar calls to specific numbers 1 Press the PROG button then 2 2 2 2 Key in the handset number (1 to 6) 3 Press 1 1 4 Key in the first barred number 5 Press the PHONE/OK button to confirm 6 7 8 9 10 Press 2 2 Key in the handset number (1 to 6) Press 1 2 Key in the second barred number Press the PHONE/OK button to confirm 1 To turn specific number barring ON and OFF: Press the PROG button then 2 2
Color profile: Generic CMYK printer profile Composite Default screen Customising your base unit To turn barring of certain types of call ON and OFF 1 Press the PROG button then 2 2 1 2 Key in the handset number (1 to 6) 3 Use the or button to set: 0 no outside calls (intercom calls only) 1 no international calls 2 all calls allowed (call barring OFF) 4 Press the PHONE/OK button to confirm Date and time You need to set the date and time if they are to be shown correctly on the handsets’ displ
Color profile: Generic CMYK printer profile Composite Default screen Customising your base unit To clear all Caller Display memories This is a way of clearing all stored numbers from the Caller Display memories.
Color profile: Generic CMYK printer profile Composite Default screen Indirect Network You can use this feature if you make some of your calls via a different network from the one that supplies your exchange line. By using indirect access to an alternative network, you may be able to save money on longdistance and international calls.
Color profile: Generic CMYK printer profile Composite Default screen Indirect Network To set 1 additional ‘local’ dialling codes 2 Key in the first dialling code (up to 6 digits) 3 Press the PHONE/OK button to confirm 4 To turn Indirect Network on and off Press the PROG button then 2 4 1 Press 4 2 5 Key in the second dialling code (up to 6 digits) 6 Press the PHONE/OK button to confirm You need to do this on each handset.
Color profile: Generic CMYK printer profile Composite Default screen Troubleshooting ! ALWAYS check first that: The e820 must be serviced by trained engineers. NEVER attempt any repairs or adjustments yourself — you could make the problem worse and invalidate the Warranty.
Color profile: Generic CMYK printer profile Composite Default screen Troubleshooting “I cannot make a call.” The handset’s keypad may be locked (see page 9). Unlock it before you make a call. Call barring to specific numbers may have been set and turned on (see page 41). Barring of certain types of call (international, or all outside calls) may have been turned on (see page 42). “When I press keys, nothing happens.” Make sure the batteries are fitted in your handset.
Color profile: Generic CMYK printer profile Composite Default screen Troubleshooting “My call was cut off when I went out of range. Now I can’t use my handset.” Move the handset closer to the base unit before you try again to make a call. “There is interference and noise on the line.” Move the handset closer to the base unit, or to a different position. Try moving the base unit so that it’s not near other electrical equipment, such as a television or a computer.
Color profile: Generic CMYK printer profile Composite Default screen Troubleshooting “The volume in the earpiece is low when I’m on a call.” Make sure you’re holding the earpiece correctly over your ear. Adjust the volume using the or button. Using a multi-handset system “I can’t transfer a call.” Make sure the other handset is in range of the base unit. Make sure you’re dialling the correct number for the other handset (1 to 6, or 9 for all registered handsets).
Color profile: Generic CMYK printer profile Composite Default screen Troubleshooting The answering machine “The machine won’t record messages.” The machine’s memory may be full. You need to delete enough recorded messages to free at least one minute’s recording time. Or you can delete all recorded messages to make room for new ones (see page 32). Make sure the machine is switched on — the ANSWER/MESSAGE light on the base unit should be on.
Color profile: Generic CMYK printer profile Composite Default screen Troubleshooting PBX use You may need to press and hold the R button for a “The Recall function doesn’t couple of seconds, rather than pressing it briefly. Try this and see if it works. seem to work.” When you first make a call, press the Redial/CDS/P button for a pause between the outside line access code (e.g. 9) and the telephone number. You should later be able to redial the number.
Color profile: Generic CMYK printer profile Composite Default screen Troubleshooting If the fault persists … Disconnect all other instruments connected to the same line as the e820 and see whether you can make a call. Disconnect the base unit from the telephone line and plug a different phone into the master telephone socket. Try making a call. If this works, the line is OK. If the call does not work, and you are using a two-way socket adapter, remove it and plug a telephone directly into the socket.
Color profile: Generic CMYK printer profile Composite Default screen SHRIRO AUSTRALIAN WARRANTY You may have rights implied by State of Federal Law. Nothing in the terms of this warranty is to be taken to exclude condition or warranties implied by State or Federal Law, which cannot be excluded or modified.
Color profile: Generic CMYK printer profile Composite Default screen Technical details Standard Digital Enhanced Cordless Telecommunications (DECT) Frequency range 1.88 to 1.9 GHz (bandwidth = 20 MHz) Channel bandwidth 1.728 MHz Operating range up to 300 m outdoors; up to 50 m indoors Operating time standby: 100 hours approx. talking: 9 hours approx.
Color profile: Generic CMYK printer profile Composite Default screen Index A storing LNR numbers in memory, 17 answering a call, 10 base unit speakerphone, 12 chain dialling, 13 answering an intercom call, 19 answering machine, 26–34 date and time, 26 intercepting calls, 31 message playback, 30 outgoing messages, 27–28, 32 recording a memo, 29 remote operation, 33–34 security code, 33 setting the number of rings, 28 switching on and off, 29 cleaning and care, 52 clock answering machine, 26 conference
Color profile: Generic CMYK printer profile Composite Default screen Index installation, 6–7 R radio signals, 4, 9 intercepting calls, 31 recall type, 54 intercom calls, 18–19 registering handsets, 22–24 interference, 4, 8 K REN (ringer equivalence number), 5 key tone, 36 resetting the base unit, 43 L Last Number Redial, 11 on a PBX, 51 storing LNR numbers in memory, 15 locking the keypad, 9 M resetting the handset, 38 ringer volume and melody base unit, 40 handset, 36 S selecting a base