User’s Guide MBP16 Baby Monitor The features described in this user's guide are subject to modifications without prior notice.
Welcome... to your new Motorola Baby Monitor! Thank you for purchasing the MBP16. Now you can hear your baby sleeping in the other room. Please retain your original dated sales receipt for your records. For warranty service of your Motorola product, you will need to provide a copy of your dated sales receipt to confirm warranty status. Registration is not required for warranty coverage. For product-related questions, please call: UK 0845 218 0890 ROI 08187 62092 On the Web: www.motorola.
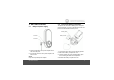
Overview of your Parent unit 1 3 GREEN and 2 RED LEDs turn on and off in real time to indicate the noise level in baby's room. When audio is being picked up by microphone of baby unit, the LEDs light up to in indicate audio level with reference to the sensitivity setting. The more LEDs light up, the stronger the sound is. If no LED lights up it means the sound level in baby's room does not exceed the thresholds set through the parent unit.
6 Down / Volume - Parent Unit Display In idle mode: Press to decrease the speaker volume. In menu mode: Press to view the next menu item. 7 Talk In idle or menu mode: Press and hold to talk back with baby unit. Release to quit the talk mode. 8 Menu / OK In idle mode: Press to access the main menu. In menu mode: Press to access the sub-menu, or confirm the settings. 9 Power In idle or menu mode: Press and hold to power on/off the parent unit. 10 Charging Indicator On steadily when in charging mode.
Menu Structure of Parent Unit MAIN MENU SUB MENU LANGUAGE ENGLISH DEUTSCH FRANÇAIS ITALIANO ESPAÑOL PORTUGUÊS SOUND ALERT ON? (if the current setting is off) or OFF? (if the current setting is on) Overview of your Baby unit 1 2 8 3 4 5 1 6 2 7 3 4 6 5 7 8 NIGHTLIGHT RESET ON? (if the current setting is off) CONFIRM? or OFF? (if the current setting is on) Power Indicator On when the baby unit is switched on. Off when the baby unit is switched off.
Important guidelines for installing our Baby Monitor • To use your baby unit and parent unit together, you must be able to establish a radio link between them, and the range will be affected by environmental conditions. • Any large metal object, like a refrigerator, a mirror, a filing cabinet, a metallic doors or reinforced concrete, between the baby and parent unit may block the radio signal.
1. SAFETY INSTRUCTIONS ..................................8 2. GETTING STARTED...........................................9 2.1 Baby unit power supply.....................................9 2.2 Parent unit battery installation...........................9 2.3 Belt clip on parent unit and baby unit..............10 3. USING YOUR BABY MONITOR.......................11 3.1 3.2 3.3 3.4 Power on/off the parent unit............................11 Power on/off the baby unit ..............................
1. SAFETY INSTRUCTIONS WARNING: STRANGULATION HAZARD - Keep the adapter cord out of baby's reach. NEVER place the baby monitor or its cord within the cot. Secure the cord some distance away from baby's reach. Never use extension cords with AC Adapters. Only use the AC Adapters provided. This baby monitor is compliant with all relevant standards regarding electromagnetic fields and is, when handled as described in the User's Guide, safe to use.
2. GETTING STARTED 2.1 Baby unit power supply 2.2 Parent unit battery installation The parent unit comes with a battery pack. Charge the parent unit before you use it for the first time or when the parent unit indicates that the battery is low. Battery JACK DC JACK Battery PLUG DC PLUG 1. Insert the small plug of the power adapter into the side of the baby unit. 2. Connect the other end of the power adapter to the mains socket. NOTE Only use the provided power adapter. GETTING STARTED 1.
5. Insert the small plug of the power adapter into the side of the parent unit. 2.3 Belt clip on parent unit and baby unit 6. Connect the other end of the power adapter to the mains socket. 7. The Charging Indicator comes on. NOTE Only use the provided power adapter. 1. Belt clip mode: applicable for parent unit only. 2. Support stand mode: lift up and turn the belt clip by half turn to convert into support stand mode.
3. USING YOUR BABY MONITOR Please read these instructions carefully, and be reminded that this baby monitor is just intended as an aid. It is not a substitute for responsible, correct parental supervision. 3.1 Power on/off the parent unit 1. Provided the parent unit is off, press and hold 0 until the Link Indicator is on. The parent unit is now powered on and the parent unit will search for and link itself to the baby unit. 2.
NOTE The lullaby will stop playing when talkback is activated. 3.5 Temperature 4. PARENT UNIT SETTINGS 4.1 Set the language 1. Press 9 to access main menu. The baby unit constantly monitors the temperature in your baby's room and alerts you if it gets too hot (higher than 102ºF) with text display "HI TEMP" or too cold (lower than 57ºF) with "LOW TEMP". 2. Press 9 and + or - to select your desired language. The temperature is displayed clearly on the parent unit in idle screen. 4.2 3.
4.4 Reset You can restore all the adjustable settings back to their original factory settings. 1. Press 9 to access main menu. 2. Press + or - to select RESET. 3. Press 9 and display will show CONFIRM?. 4. Press 9 to confirm. The unit will then return to idle state. 5. DISPOSAL OF THE DEVICE (ENVIRONMENT) At the end of the product lifecycle, you should not dispose of this product with normal household waste.
6. CLEANING 7. TROUBLESHOOTING Clean MBP16 with a slightly damp cloth or with an antistatic cloth. Never use cleaning agents or abrasive solvents. Link light on the parent unit does not come on Cleaning and care • Do not clean any part of the product with thinners or other solvents and chemicals - this may cause permanent damage to the product which is not covered by the warranty. • Keep your MBP16 away from hot, humid areas or strong sunlight, and don't let it get wet.
• Battery pack in parent unit is running low. Connect the parent unit to the mains power with the supplied power adaptor for recharging. 8. GENERAL INFORMATION If your product is not working properly... • The volume level in the parent unit may be set too low, increase the volume level of the parent unit. Refer to section 3.3 for volume level settings. • The parent unit and the baby unit may be out of range with each other. Reduce the distance between the units, but not closer than 1.5 metre. 1.
What will BINATONE do? BINATONE or its authorized distributor at its option and within a commercially reasonable time, will at no charge repair or replace any Products or Accessories that does not conform to this Warranty. We may use functionally equivalent reconditioned/ refurbished/ pre-owned or new Products, Accessories or parts.
Exclusions Normal Wear and Tear. Periodic maintenance, repair and replacement of parts due to normal wear and tear are excluded from coverage. Batteries. Only batteries whose fully charged capacity falls below 80% of their rated capacity and batteries that leak are covered by this Warranty. Abuse & Misuse. Defects or damage that result from: (a) improper operation, storage, misuse or abuse, accident or neglect, such as physical damage (cracks, scratches, etc.
include: (a) the Product or Accessory; (b) the original proof of purchase (receipt) which includes the date, place and seller of the Product; (c) if a warranty card was included in your box, a completed warranty card showing the serial number of the Product; (d) a written description of the problem; and, most importantly; (e) your address and telephone number.
ENGLISH BINATONE TELECOM PLC 1 Apsley Way London NW2 7HF,United Kingdom. Tel: +44(0) 20 8955 2700 Fax: +44(0) 20 8344 8877 e-mail: binatoneuk@binatonetelecom.co.uk ________________________________________ . EC Declaration of Conformity We the manufacturer / Importer : Binatone Telecom Plc 1 Apsley Way London NW2 7HF, United Kingdom.
Manufactured, distributed or sold by Binatone Electronics International LTD., official licensee for this product. MOTOROLA and the Stylized M Logo are trademarks or registered trademarks of Motorola Trademark Holdings, LLC. and are used under license. All other trademarks are the property of their respective owners. © 2011 Motorola Mobility, Inc. All rights reserved. Version 5.