Installation Manual & Operating Instructions pC b ilo d a rPag N eumbre
B IO B ID E T WARNING A3 Do Not over-tighten plumbing connections. Over-tightening plumbing connections can damage parts and cause leaks.
B IO B ID E T A 3 CONTENTS Functions and Characteristics Parts list ............................. 4 .................................................................. 5 Configuration .......................................................... 6 Final Assembly 7 ...................................................... .............................. Installation Instruction 8-9 Operation .............................................................. 10 Maintenance ................................
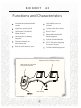
B IO B ID E T A3 Functions and Characteristics Ambient temperature bidet model Adjustable pressure Control Ingenious splash guard Quality silver brass parts Continuous Controlled Water Stream Brass T valve Retractable nozzle for better hygiene No electricity or battery required Splash Guarded Nozzle Connects directly to fresh water line P.S.P.
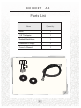
B IO B ID E T A3 Parts List Name Quantity Bidet 1 7/8” T Adapter 1 Braided Metal Hose 1 Protective O rings 2 Owner’s Manual 1 5
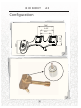
B IO B ID E T A3 Configuration 7.88" 6.69" 4.88" 4.33" 5.
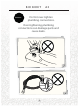
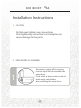
B IO B ID E T A 3 Tighten connections while checking for leaks. Do not over tighten.
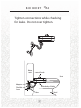
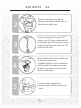
B IO B ID E T A 3 Installation Instructions 1. CAUTION Do Not over tighten any connections. Over tightening connections and adaptor can cause damage to the parts. 2. PROCEDURES OF ASSEMBLY 31 Shut water supply off by turning it to the right and disassemble the water hose. Flush toilet to drain water inside of toilet water tank before disassembling the water hose.
B IO B ID E T Remove existing seat and lid. Release the bolts on both sides of the existing toilet seat. 2 Connect supplied universal 7/8” T valve to the fill valve underneath of toilet water tank and connect water supply hose between universal 7/8” and shut off valve 3 Seat 43 53 A3 Mount bidet and toilet seat/lid over toilet mounting holes. Supplied rubber O-rings should be placed under the bidet mounting bracket to protect and secure the bidet on the toilet.
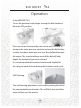
B IO B ID E T A 3 Operation Using BIO BIDET A3 To use the posterior wash begin turning the dial clockwise from the OFF position. 3 Pressure can be controlled by how far the dial is turned. To increase the water pressure continue to turn the dial further, in order to reduce water pressure turn the dial back towards the center. The visual markings around the dial will help depict the amount of pressure selected.
B IO B ID E T A3 Maintenance To clean the nozzle, gently pull down on the head of the nozzle and use a toothbrush or soft cloth and mild detergent to clean the nozzle. Do not use any harsh, abrasive products to clean A3, which may damage the surface of the product.
B IO B ID E T A 3 Warranty Your Bio-Bidet, Is warranted against defects in materials or workmanship for one (1) year from the Date of original purchase. Defective parts or a defective product returned to BBC innovation will be repaired with new or comparable rebuilt parts or exchanged for a Refurbished Bio-Bidet as determined by BBC innovation in their sole discretion.
B IO B ID E T A 3 5. Any and all damages to plumbing, walls, floors, ceiling and personal properties resulting from water leaks or breakage. The product must be used at the user’s own risk. Therefore, the owner hereby releases the manufacturer and distributor from any and all claims for damages where the above condition exists.
B IO B ID E T A 3 Thankyou Technical support / Customer Service Bio Bidet 204 Berg ST Algonquin, IL 60102 T : 847.458.2334 U.S Toll Free : 877.339.5214 support@biobidet.com www.biobidet.