Spacious Operating Instruction Manual A7 * Thank you for purchasing this SPA bidet seat. » You ave kine fly requested to carefully reed this operation. mans for proper vss of tis appliance. = Please see this manual and place if in an smelly accessible cation. * Please register warranty for proper service.
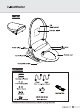
READ ALL OPERATING INSTRUCTIONS BEFORE INSTALLATION. Notes 1. This product should be installed according fo this manual. 2 Read this manual carefully and install properly. 3. Keep this instruction manual in an easily accessible place. 4. Do not pattern fo service this appliance yourself. Doing so will void the warranty. Table of Connie PREPARATION 1. IMPORTANT SAFEGUARDS 2. CAUTIONS BEFORE INSTALLATION 3. IDENTIFICATION 4. SAFETY INFORMATION (DANGER) 5. SAFETY INFORMATION (WARNING) INSTALLATION 6.
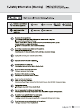
1. Important Safeguards 1. READ ALL INSTRUCTIONS BEFORE USING DANGER ~ To reduce the risk of electric shock: 1. Do not place or store this appliance in a location where if can fall or be peculiar into a tub or sink. 2. Do not place in, or drop into walker or other liquids. 3. Do not touch a product that has fallen into water. Unplug immediately. WARNING To reduce the risk of burns, electric shock, fire or injury. 1.
2. Cautions before installation 2 WIRING REQUIREMENTS 1, After installation all other servicing should be performed by authorized service representatives. 2. GROUNDING INSTRUCTIONS This product should bs grounding. In the event of an electrical short circuit, grounding reduces the crisis of chicle shock by providing an escapes wire for the cleric current. This product is equipped with a cord having a grounding wire and grounding plug.
4. Safety Information (Danger) Rlovteshanmcin we Indicates a prohibited ; 3 Hon and use of the appliance. Seven Evwimnn fg S00 Aries Indicates a [required] Stop in se of tis £] navies BB euclidean appliance. S Do net splash water or cleansers on the product's plug. Doing so may result in fire or dialectic shock. Dio not plug or unplug with wet hands. i nary result in injury or semicircle shook. Regularity wipe off the plug and electric cutie with a dry, soft doth to prevent electric shook or fire.
5. Safety Information (Naming) [lou teebedcinauctons acne incinerates a feathered] Sustain Bio wt handle. imtwepmnn | Or @uue—e OI GI indites a required] 48 pin out Geo Ebonics appliance. Be aware of 2 low grads bum. ray result in a ewe-grade bum §sighing on the heated seat for a long me.
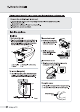
6. How to install #1 electric work is needed, please contact a qualified electrician or serviceman only, in the back of the toilet. 3 Keep thees in case you reed them, Move the existing toilet id and seat 1. November the nuts washers, and core packing from the toilet set and mounting bolts 2 Remove the toilet seat. id and mounting boll. Install the appliance installation ow fo mount the plate & Place the mounting plate over each mounting hole. Insert tha mounting bolls through the plate and mounting holes.
Connecting the water hose £3 Close the shutoff valve by gaming It cockeyed. #3 Fish the walrus tank completely i empty. £3 Remove the existing water supply hose from the tan £3 Install he T-valve on the Sop of stop valve. £4 Connect ong end of the Textile hose from the Revive to the waver tank. £5 Connect the other and of the flexible hose from the Valve fo the main appliance. £3 Conn gut the water hose to the main unit £2 Open the shutoff valve by Ming it counter clockwise.
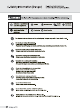
# Caution 7 HOW TO LSE 4 unctions oll be subornation) when Se seat lo scrupled except Nola Closing. © Before interesting, suture Bal water Clinicians Rind up compositely. Stop Press “Stop” fo stop currant operation. When a user stands up, all operations will stop automatically. Press “Stop” for 3 seconds fo fum the main unit off. Cleansing Press Gleanings {0 clean your posterior. The function will slop in 1 minute automatically. Press this button again to activate oscillation.
LED bar All functions will show ifs duration or selling on LED bar. Sound Press “Sound” to snails the beeping sound. To disable, press the bunion again. LED Crass the bunion to activate LED fight. Silicate light wil help user to use tolls without fuming the light on during right ime. Nozzle position Nozzle position can be adjusted by pressing FR or BI bunions fo 5 levels. Nozzle position will remain.
USER SETTING Each button can save 2 settings. (Cleansing, Bidet) Press User 1 button with seat sensor , and Cleansing or Bidet consecutively. Then choose nozzle position and water pressure level by pressing (FRY{BK}, (SILO) buttons. Press User 1 again will save the setting with beep. (The same applies to saving User 2 setting} BIDET Press User 1 or User 2 While using Cleansing or Bidet will operate saved settings.
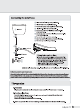
8. How to clean i Son fool push a qi 0 NCAA, o tonne Kitty mau bln. Nozzle cleaning 4), ploblsdsEiisan mii fr EB MANUAL CLEANING £5 Make sure the upload sensor Is not shanghaied. {Do not sit on the sat or place hands on the seat sensor) £3 Press” bunion for 3 seconds tn extract the nozzle. £% Use a toothbrush or soft cloth fo Nisan the nozzle. £5 Press “Stop” bunion to refract the nozzle.
9 Maintenance Draining water while not using over extended period of teems. {ii Unplug the power supply cord. 7% Close the shutoff valve. = Not doing 90 may cause fire. {Uphold the appliance snd thoroughly drain he water by unswerving the drain bolt. #3 Unscrew the mounting bots. {beware of losing the drain bol) # Refer to the installation meted The flowing figure is only to redhead the lotion of Drain Bok! To prevent dysfunction, do not pace the vertices ‘potion or tht the product.
10.