
Instruction manual


33
Maintenance and Troubleshooting
2. From the Image menu’s Acquire Options, select Make New Bright Field File.
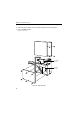
Follow the on-screen instructions, directing you to insert the Bright Field Plate. After the Bright field
image is acquired, remove the plate.
3. Save the Bright Field file.
After selecting OK at the prompt to save, the file is stored as se1000.brt.
The Bright Field file is stored in the directory specified by the line shown below, written in the glyco.ini
Glyco DOC initialization file:
DefaultBrightFileDir=c:\glycodoc\data\
The text to the right of the equals sign is determined during installation and should not be changed
unless the Bright Field file is moved.
The text to the left of the equal sign should always indicate the location of the Bright Field file. (Refer to
the appendix on the Glyco DOC system file structure.)
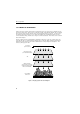
4. Inspect the image display for scratches and other artifacts.
Open the Bright Field file, which is stored as the file se1000.brt.
View the entire image.
• If scratches are seen in the bright field image, then a new Bright Field image must be acquired
using a new clean, scratch free Bright Field Plate. Replacement Bright Field Plates can be ordered
from Bio-Rad.
• If blotches, smudges or film are seen, then try to clean the plate.