
Instruction manual


34
Maintenance and Troubleshooting
4.5 IMAGER TROUBLESHOOTING
Try all appropriate actions in the chart below for the imaging problem you are experiencing, before calling a
Bio-Rad technical representative (Appendix D).
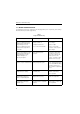
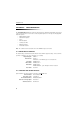
Table 3
Imager Troubleshooting
Indication Problem Action
Image is solid black in normal Imager is turned off. Turn on imager.
palette and the acquire time is
approximately 4 seconds. UV light has burned out. Replace UV light.
Image is solid black in normal Loose or disconnected cable. Check for secure cable
palette and the acquire time is connections at the computer
0 seconds. and the imager.
Image is mostly black in normal Filter Switch is between Check that the Filter Switch
palette and the acquire time is positions. is at either 10 o’clock or 2
approximately 20 seconds. o’clock. The switch should
Neither Filter light is on, easily stop at these two
but the power light is. positions. Forcing the switch
should never be necessary.
Image is mostly black in normal Gel was left in imager Remove gel when prompted
palette, except for saturated areas. during background acquire. by the software during acquire.
Do not select OK in the dialog
box until the gel has been
removed and the compartment
closed.
Acquired image is unusually Imager and/or camera board is Turn on Imager and PC a
bright and of poor quality. not warmed up. minimum of two minutes
prior to operation.
Acquired image appears to Acquire time is too long. Reduce the acquire time.
have a “snowy” background.
Acquired image has bright Gel glass has lint or acrylamide Clean gel glass to remove all
blob-like spots. particles. lint or acrylamide.