MULTIPLEX SUSPENSION ARRAYS Bio-Plex Data Pro™ Software Getting Started
BIO-RAD TECHNICAL SUPPORT DEPARTMENT The Bio-Rad Technical Support Department in the U.S. is open Monday through Friday, 5:00 a.m. to 5:00 p.m., Pacific Standard Time. Worldwide technical support is available on the Web at www.consult.biorad.com. Phone: 1-800-424-6723, option 2 Fax: 1-510-741-5802 Email: LSG.TechServ.US@Bio-Rad.com (U.S.) LSG.TechServ.Intl@Bio-Rad.com (International) Web: www.consult.bio-rad.
Table of Contents Welcome . . . . . . . . . . . . . . . . . . . . . . . . . . . . . . . . . . . . . . . . . . . . . . . . . . . . . 4 1 Installing Bio-Plex Data Pro™ 1.0 Software . . . . . . . . . . . . . . . . . . . . . . . . . . 5 2 Changing Your Screen Resolution . . . . . . . . . . . . . . . . . . . . . . . . . . . . . . . . . 6 3 Bio-Plex Data Pro™ Software Licensing. . . . . . . . . . . . . . . . . . . . . . . . . . . . . 8 4 An Overview of Bio-Plex Data Pro™ Software . . . . . . . . . . . . .
Bio-Plex Data Pro Software Getting Started Guide Welcome Thank you for purchasing Bio-Rad Bio-Plex® software. Bio-Plex Data Pro™ software meets your multiplex data analysis needs. Bio-Plex Data Pro software is a data management and data visualization tool designed to allow you to quickly draw conclusions about your biological study. It allows researchers to get answers to the complex questions that are at the heart of their research.
1 Installing Bio-Plex Data Pro™ 1.0 Software Install Bio-Plex Data Pro™ software as described in the following sections. Bio-Plex Data Pro System Requirements The following are the minimum and recommended system requirements for Bio-Rad Data Pro. Component Minimum Recommended Operating system Processor Hard disk space System memory Windows XP Service Pack 3 Core 2, 2.6 GHz or higher 160 GB 2 GB Not applicable Windows 7 (32-bit or 64-bit) Core 4, 3.
Bio-Plex Data Pro Software Getting Started Guide 2 Changing Your Screen Resolution Your computer screen resolution must be set to the minimum settings to correctly display the Bio-Plex Manager™ and Bio-Plex Data Pro™ interfaces. The status bar and some dialog boxes will not display properly at lower resolutions. If your display is currently set to a lower resolution, then follow the procedure for your operating system.
4. Click the Resolution drop-down list and move the slider until it displays the desired setting. Figure 2. Screen Resolution Dialog Box (Windows 7) 5. Click OK.
Bio-Plex Data Pro Software Getting Started Guide 3 Bio-Plex Data Pro™ Software Licensing This section describes the terms of the Bio-Plex Data Pro™ evaluation period, the Bio-Plex Data Pro license, and how to activate your license online or offline. Evaluation Period There is a 30-day evaluation period with Bio-Plex Data Pro. During the evaluation period, you have full access to all Bio-Plex Data Pro Plus product features.
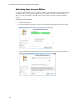
The 18-digit activation code can be found in the Bio-Plex Data Pro software product folder pocket. Once the license is activated, the following window is displayed. 4. Click Exit. Note: You can activate your license while the application is being run in evaluation mode. Start Bio-Plex Data Pro in evaluation mode. To activate your license, select Manage License from the Help menu and follow the prompts.
Bio-Plex Data Pro Software Getting Started Guide Activating Your License Offline If you do not have Internet access or you want to activate your license offline, contact Bio-Rad Support at 1-800-424-6723 or LSG.TechServ.US@Bio-Rad.com (email) to request an activation certificate. Once you receive the activation certificate, follow the procedure to activate your Bio-Plex Data Pro license. To active your license offline: 1. Start Bio-Plex Data Pro. 2.
4. Create a text file and copy and paste the Installation ID number from the Import Activation Certificate window into the file. Include the 18-digit activation code, which is found in the Bio-Plex Data Pro software product folder in the text file. Attach the text file in an email to Technical Support with the subject line: Request to Activate Bio-Plex Data Pro License. Technical Support will process your email request and reply with a certificate and instructions for completing the activation process. 5.
Bio-Plex Data Pro Software Getting Started Guide 4 An Overview of Bio-Plex Data Pro™ Software This section introduces you to Bio-Plex Data Pro™. It takes you through and gives you an overview of the product. 1. Start Bio-Plex Data Pro. The Home view appears. In this view, you can create a new project or open an existing project. The navigation bar in the left pane displays the project workflow, starting at the top with Manage Data Sets and ending with Perform Analysis/Create Charts. Figure 3.
3. Select one of the data sets and right-click to open the context menu. • You can choose Edit Data Set to open the Edit Dataset dialog box, where you can edit the description of your data set. • You can choose Delete Data Set to remove a data set from your project. Figure 5. Data Sets Context Menu 4. Click Perform Analysis/Create Charts in the navigation bar. In this view, you visualize your results and view the results of common calculations. Figure 6.
Bio-Plex Data Pro Software Getting Started Guide DATA OUTPUTS There are six types of data outputs. Click on the buttons in the toolbar to display your data in the desired output. Scatter Plot — shows the results by biological replicates using the parameter you choose to draw your comparisons. The scatter plot allows you to view one analyte at a time. Figure 7. Scatter Plot Box and Whisker Plot — shows the results by biological replicates using the parameter you choose to draw your comparisons.
Bar Graph — shows the results by biological replicates using the parameter you choose to draw your comparisons. You can select as many analytes as you like from the Analyte Table for comparison. Figure 9. Bar Graph Summary Table — displays common calculations for your biological replicates. Figure 10.
Bio-Plex Data Pro Software Getting Started Guide Export to Statistics Software — displays the sample information used to generate the other outputs in a format that is convenient for import into statistical software packages. Figure 11. Export to Statistics Software Sample List — represents the data in the Results Table section. This can be used to reproduce the scatter plots in Microsoft Excel. Figure 12.
5. Notice the “Compare by” and Control drop-down lists. Compare by — changes how samples are grouped on the x-axis of the graphs and grouped for analysis in the summary table. Control — chooses the biological replicate group for your experiment. This group is plotted on the left side of the graphs and results in the P-value for the pair-wise statistical tests being presented in the relevant views. Compare by and Control drop-down lists Figure 13.
Bio-Plex Data Pro Software Getting Started Guide 6. Click Edit Samples/Add Columns in the navigation bar. In this view, you see a list of every sample in your project. Each sample is created from samples identified in Bio-Plex Manager™ software. In this view, you add specific information from your experiment. Figure 14.
7. Click View Results/View Heat Map in the navigation bar. In this view, you can do the following and view your results: • Filter your results by removing samples that meet specific criteria. • Sort your data and export tables. • Create heat maps of your results or custom tables. Figure 15. View Results/View Heat Map View Sample Projects Bio-Plex Data Pro comes with two sample projects. Use these sample projects to familiarize yourself with Bio-Plex Data Pro.
Bio-Plex Data Pro Software Getting Started Guide SAMPLE PROJECT 2 The samples in Sample Project 2 were labeled as Normal, Breast Cancer, Lung Cancer, Colon Cancer, Ovarian Cancer, and Prostate Cancer. In the Perform Analysis/Create Charts view, “Compare by” is set to Description. Labeling samples with informative descriptions in Bio-Plex Manager can eliminate the need to label samples in Bio-Plex Data Pro if the experiment is relatively simple.
5 Analyzing Your Data This section describes how to take data from Bio-Plex Manager™ and analyze it using Bio-Plex Data Pro™. Analyze Your Data in Bio-Plex Manager Software Before you use Bio-Plex Data Pro, first analyze the results of your run in Bio-Plex Manager. Bio-Rad recommends you do the following: 1. Run the Curve Fit Optimizer for all curves. This algorithm optimizes most curves to create as broad a dynamic range as possible. 2. Review the messages in your optimization report. 3.
Bio-Plex Data Pro Software Getting Started Guide Filtering Your Data You can control the samples that are included in your analysis by filtering your data. Filters can be cleared at any time by clicking the Clear All Analysis Filters button. Viewing Your Data in the Results Table 1. Navigate to the View Results/View Heat Map view. 2. In the Results table, click the triangle in the column header to open the drop-down list. The drop-down list displays a list of the different sample types for that column.
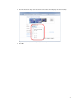
The Perform Analysis/Create Charts View When you select a parameter in the “Compare by” drop-down list, a list of sample types is displayed. You can include or exclude the sample types from the Filter list. Select a column in the “Compare by” drop-down list Then select and clear check boxes to include and exclude samples. Figure 16. Filtering Samples in the Perform Analysis/Create Charts View Analyzing Your Data in Bio-Plex Data Pro Software 1. Click Perform Analysis/Create Charts. 2.
Bio-Plex Data Pro Software Getting Started Guide 3. If you have a control in your experiment, select this group from the Control drop-down list. Select a group in the Control drop-down list 4. Review the results using the different display options. TIP: When you use the bar graph, you may select as many analytes for comparison as you like.
6 Deactivating Bio-Plex Data Pro™ Software Licenses Once the license is deactivated, you may continue to use Bio-Plex Data Pro™ on any existing projects. However, you will not be able to create new projects or import additional data into existing projects. You can deactivate your license online or offline. To deactivate Bio-Plex Data Pro licenses online: 1. From the Help menu, click Manage License. 2. Click Yes and click Continue. A message confirms that the license has been successfully removed. 3.
Bio-Plex Data Pro Software Getting Started Guide 4. Copy the contents of the text box into a text file. Attach the file to an email to Technical Support with the subject line: Request to Deactivate Bio-Plex Data Pro License. Note: The number of available licenses will not be updated until Technical Support processes the deactivation request. Technical Support will send a confirmation once the license is deactivated.
7 Installing Bio-Plex Manager™ 6.1 Software If you purchased Bio-Plex Manager 6.1™, follow the instructions in this section for installing the software. Install, or reinstall, Bio-Plex Manager 6.1 software as described in the following sections. If you need to upgrade your software from a previous version, see the Bio-Plex Manager 6.1 Software Upgrade and Configuration Guide to determine the part number of your upgrade kit.
Bio-Plex Data Pro Software Getting Started Guide BIOPLEXDATA.MDB FILE During installation, you will be prompted to save the application database file (bioplexdata.mdb) to a location on your hard drive or a file server. This database file contains logs of calibration, validation, and instrument operations activity for your instrument. You can save the bioplexdata.mdb file to any folder on your computer. The default location is the Bio-Plex Manager application folder.
8 Installing the NetHASP Network License Manager If you ordered Bio-Plex Manager™ 6.1, the product folder will include the Bio-Plex Manager Software CD and an envelope containing the hardware protection key, also known as a HASP key. You may install Bio-Plex Manager on as many computers as you like. The HASP key supports five (5) users at any one time. Work with your information technology group or the person who manages your network to install the HASP key and related software.
Bio-Plex Data Pro Software Getting Started Guide 3. In the Welcome window, click Next. 4. Accept the license agreement and click Install. 5. In the Installation Type window, Service is selected. Accept this default and click Next. 6. In Choose Destination Location, accept the default location, or click Browse and choose a different location where the HASP License Manager will be installed. Click Next. 7. In Select Program Manager Group, accept the default or choose another program group. Click Next. 8.
Configuring Clients to run Bio-Plex Manager Software Note: System administrators may want to edit the NETHASP.ini file once and have their end users copy the file to the correct location on their client machines. Start Bio-Plex Manager using the desktop shortcut. Often no additional configuration is required and you will be able to start the application successfully. If you get a message saying that the HASP cannot be found, then follow the procedure to configure the client.
Bio-Plex Data Pro Software Getting Started Guide NH_SERVER_ADDR = DD-dell551.genes.bio-rad.com Note: The default port setting for the License Manager is 475. If the server on which the License Manager is installed is firewall enabled, then port 475 must be reserved for the License Manager. Contact Bio-Rad Technical Support if this conflicts with your existing network configuration.
9 Uninstalling Bio-Rad Products Follow the procedure for your operating system to uninstall Bio-Plex Manager™ or Bio-Plex Data Pro™ from your computer. WARNING! Uninstalling does not remove an active license from the active license count. Therefore, if you have an active Bio-Plex Data Pro license on a computer and you want to uninstall Bio-Plex Data Pro, first deactivate the license. Once the software is uninstalled, you will not be able to access the license.
Bio-Plex Data Pro Software Getting Started Guide 34
Bio-Rad Laboratories, Inc. Web site www.bio-rad.