
Owner's manual
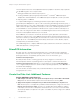

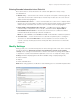
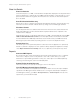
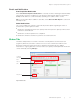
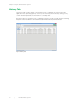
Table Of Contents
- CFX Automation System II Installation
- Using the CFX Automation System II
- Starting an Automation Run
- Adding Plates after Starting an Automation Run
- Canceling an Automation Run
- Pausing or Canceling a Single Plate Run in a CFX System
- Emptying the Waste Rack
- LIMS Information
- PrimePCR Information
- Create the Plate List: Additional Features
- Barcode Controls: Advanced Features
- Modify Settings
- Status Tab
- History Tab
- Resources
- Ordering Information

| 27CFX Automation System II
Chapter 2: Using the CFX Automation System II
| 27
■n
Add multiple LIMS or PrimePCR files to a plate list at once. Select Browse, select
all desired LIMS or PrimePCR files, and select Open. Each LIMS or PrimePCR file will be
automatically added as a unique row on the plate list
■n
Add multiple rows with the same protocol file but different plate files. Select the desired
protocol file using the dropdown menu or browse button. Select Browse in the plate file field
and open the folder that contains multiple plate files of interest. Select all desired plate files
and select Open. Each plate file will be paired with the protocol file and automatically added
to the plate list
■n
Add multiple rows with the same plate file but different protocol files. Select the desired
plate file using the dropdown menu or browse button. Select Browse in the protocol file field
and open the folder that contains multiple protocol files of interest. Select all desired protocol
files and select Open. Each protocol file will be paired with the plate file and automatically
added to the plate list
Note: The maximum number of rows that can be added to a plate list is 1,000.
Edit a Plate List
Select the row to be modified by clicking on the selection box for that row (Figure 19). Multiple
rows may be selected by using the shift and control keys. After selecting the desired rows,
you may:
■n
Modify the protocol, LIMS, PrimePCR, or plate file using the dropdown menu or browse options
■n
Modify the order of the selected row by selecting Move up or Move down
■n
Delete a row by selecting Delete
■n
Clear an entire plate list by selecting Clear
Enter in notes for any row by selecting the desired notes cell in the plate list. All notes typed
in the automation software will be stored in the CFX Manager Software data file.
Save a Plate List
By default, new plate lists are named “Untitled_rackX”. Save a plate list
by selecting File > Save. The default directory for saved plate lists is:
C:\Users\Public\Documents\Bio-Rad\CFXAutomationSystem\UserData. The saved
plate list file also stores the selected CFX System(s) and barcode selections. However,
the information specified under the Settings selection is not saved with the file.
You may load a previously saved plate list file by selecting File > Open and choosing the
desired plate list file. Modifications to the plate list file can be saved by selecting File > Save.
Modifications can be saved as a new plate list by selecting File > Save As and giving the
plate list file a unique name.
Note: When loading a saved plate list file, remember that although CFX System(s) and barcode
selections are stored within the file, the information stored under Settings is not associated with
the plate list file. Carefully review the Settings each time a plate list file is loaded.
Barcode Controls: Advanced Features
Define If the System Should Scan Barcodes and/or Match Barcodes
Each plate list tab contains a barcode controls section (Figure 19) that permits you to modify
how the system applies barcode information. Table 10 provides an overview of system
response for the various options selected.