™ USER’S GUIDE 30K4 SERIES 220-240v 2 Consumer Services 3 Safety Instructions 4 Product View 4 Assembly 5-6 Operation 6 Maintenance and Care 7 Troubleshooting 7 Replacement Parts 8 Warranty
Thank you for buying a BISSELL Little Green We’re glad you purchased a BISSELL Little Green. Everything we know about floor care went into the design and construction of this complete, high-tech home cleaning system. By purchasing this product you are helping BISSELL with our commitment to reducing our impact on the environment through an expanding range of sustainable design efforts. Your Little Green is well made, and we back it with a limited one-year warranty.
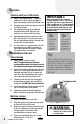
IMPORTANT SAFETY INSTRUCTIONS When using an electrical appliance, basic precautions should be observed, including the following: Read all instructions before using your Little Green™. Always connect to a properly Earthed outlet. Unplug from outlet when not in use and before conducting maintenance or troubleshooting. WARNING: To reduce the risk of fire, electric shock, or injury: ■ ■ ■ ■ ■ ■ ■ ■ ■ ■ ■ ■ ■ ■ Do not expose to rain.
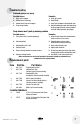
Product view Power Switch Tank Release Latch Solution/Clean Tank PCV free Collection/ Dirty Tank PCV free Vacuum Flex Hose PCV free Flex Hose Clip Tough Stain Brush™ Brush Block Made of 100% Post Consumer Recycled Plastic Quick Release™ Cord Wrap Vacuum Flex Hose Storage Bracket Power Cord Bracket Latch Hose Grip Assembly 1 Assembling your Little Green is a simple process. 1. Take the flex hose clip and slide the back plate into the opening on the front of the unit.
Operation Getting ready 1. 2. To fill the solution/clean tank. A. Remove the tank by lifting it straight up and then away from the unit. B. Unscrew the black cap at the bottom of the solution/clean tank and remove bottle insert. C. Add BISSELL Little Green formula to the FORMULA fill line on the solution/clean tank. Fill the solution/clean tank with hand hot (NOT boiling) tap water to the WATER fill line. Replace the bottle insert and tighten the black cap. D.
Operation Cleaning with your Little Green 1. Hold the tool approximately 1” above the soiled surface. Press the spray trigger to apply the cleaning solution to the soiled area. 2. Using the brush on the tool, gently scrub the area to be cleaned. 3. For thorough cleaning, spray additional cleaning solution while the brush and suction are in contact with the surface. 4. Apply downward pressure on the tool and pull it toward you. The suction will remove the dirt and cleaning solution.
Troubleshooting Reduced spray or no spray Possible causes 1. 2. 3. 4. Remedies Spray nozzle clogged 1. Solution/clean tank empty 2. Solution/clean tank insert clogged 3. Pump needs priming 4. Clean spray nozzle Check/fill tank Clean insert at bottom of clean/solution tank Gently lift solution/clean tank while depressing the spray trigger OR gently squeeze solution/ clean tank while depressing spray trigger Deep cleaner won't pick up cleaning solution Possible causes Remedies 1.
Warranty This warranty gives you specific legal rights, and you may also have other rights which may vary from country to country. If you need additional instruction regarding this warranty or have questions regarding what it may cover, please contact BISSELL Consumer Services by telephone, or regular post as described below, or contact your local in country distributor. Limited One Year Warranty Subject to the *EXCEPTIONS AND EXCLUSIONS identified below, BISSELL Homecare, Inc.