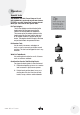
Pet Hair Eraser™ Compact USER’S GUIDE 12R8 SERIES 220-240V 3 Safety Instructions 4 Product View 5 Assembly 6-9 10-12 Operations Maintenance and Care 13 Troubleshooting 14 Consumer Services 15 Replacement Parts 16 Warranty
Thanks for buying a BISSELL Pet Hair Eraser Compact™ Canister Vacuum We’re glad you purchased a BISSELL Pet Hair Eraser Compact canister vacuum. Everything we know about floor care went into the design and construction of this complete, high-tech home cleaning system. Your BISSELL canister vacuum is well made, and we back it with a limited one year warranty.
IMPORTANT SAFETY INSTRUCTIONS When using an electrical appliance, basic precautions should be observed, including the following: READ ALL INSTRUCTIONS BEFORE USING YOUR CANISTER VACUUM. WARNING: To reduce the risk of fire, electric shock, or injury: ■ ■ ■ ■ ■ ■ ■ ■ ■ ■ ■ ■ ■ ■ ■ ■ Use indoors only. For dry pick up only. Do not leave machine when it is plugged in. Do not use with damaged cord or plug.
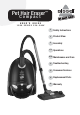
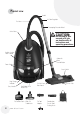
Product view Handle Air Flow Regulator Flex Hose Telescoping Extension Wand Swivel Hose CAUTION: Do not plug in your vacuum until you are familiar with all instructions and operating procedures. Variable Suction Power Control Automatic Cord Rewind Button Power Button Brush Switch Bag Change Indicator Carry Handle Post-Motor HEPA Media Filter Pet Contour Tool™ Wide Pet TurboBrush™ 4 www.bissell.
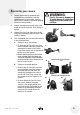
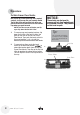
Assembling your vacuum 1. 2. WARNING: Plastic film can be dangerous. Connect swivel hose by squeezing both locking buttons and inserting it into the suction opening on the canister. Once the swivel hose is inserted in the suction opening, release the locking buttons. Connect telescoping extension wand to the handle end of the flex hose. Twist slightly to tighten. 3. Connect Pet Hair Eraser floor nozzle to the end of the telescoping extension wand. Twist slightly to tighten. 4.
Operations Power cord The power cord is located at the rear of the vacuum. Gently pull out the power cord, watching for the yellow line. Stop pulling the power cord once the yellow line is visible. There is also a red line, which indicates the end of the usable cord. Do not pull the power cord out beyond the red line. Automatic cord rewind Automatic Cord Rewind Button Your vacuum is equipped with an automatic cord rewind.
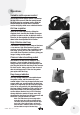
Operations Special tools Your BISSELL Pet Hair Eraser Compact is not only a powerful carpet and rug vacuum cleaner, it’s also a versatile above floor vacuum cleaner when you select one of the special tools. Pet Tool Adapter: The Pet Tool Adapter must be attached to the handle end of the flex hose to use the Pet Contour Tool and the Wide Pet TurboBrush. The narrow end of the adapter attaches to the handle end of the flex hose and the wide end of the adapter attaches to the pet tool of your choice.
Operations Pet Hair Eraser Floor Nozzle NOTICE: Use to pick up pet hair from rugs and carpeted surfaces. Just vacuum like you normally would. The Pet Hair Lifter will grab pet hair when you pull back and it will release the hair and suction it up when you push forward. These tools are designed to remove pet hair from upholstered or carpeted surfaces. They should not be used on pets. NOTE: Turn the vacuum off before you flip up or flip down the Pet Hair Lifter. 1. 2.
Operations Variable suction power control The variable suction power control is located on the top of the vacuum. Slide the control toward the larger dots for maximum suction. Slide the control toward the smaller dots to minimize suction for lightly soiled areas or delicate fabrics. Air flow regulator Open the air flow regulator by sliding the regulator back towards the handle to an open position to reduce suction for delicate fabrics.
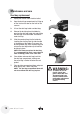
Maintenance and care Dust bag replacement 1. Unplug the vacuum from electrical outlet. 2. Open the dust bag compartment by lifting up on the latch on the door on the front of the vacuum. 3. Lift out the dust bag holder and dust bag. 4. Release the dust bag from the holder by pressing the dust bag holder clip and pulling the dust bag out of the holder. Discard the used dust bag. 5. 3. Slide the new dust bag into the holder by inserting the dust bag into the tabs located at the bottom of the holder.
Maintenance and care Cleaning the pre-motor filter The pre-motor filter protects the motor from dirt and dust particles. 1. Unplug the vacuum from electrical outlet. 2. Open the dust bag compartment by lifting up on the latch on the door at the front of the vacuum. Lift out the dust bag holder and dust bag. 3. Remove the filter frame from the filter holder by grasping the lip of the frame and pulling up. 4. Remove the filter from the filter frame and clean by hand washing in warm water.
Maintenance and care Replacing the post-motor HEPA media filter The post-motor HEPA media filter assists in the filtration process to return clean air to the room. 1. Unplug the vacuum from electrical outlet. 2. Remove the filter door (located on the rear of the vacuum) by pulling up on the filter door latch. 3. Remove the post-motor HEPA media filter by grasping the lip of the filter frame and pulling up. 4. Replace the post-motor HEPA media filter with a new filter.
Troubleshooting Vacuum cleaner won’t run WARNING: To reduce the risk of electric shock, turn power OFF and disconnect plug from electrical outlet before performing maintenance or troubleshooting. Possible causes Remedies 1. Vacuum cleaner is not plugged in 1. Check electrical plug 2. Power button is not pressed down 2. Press power button down Vacuum cleaner won’t pick up or low suction Possible causes Remedies 1. Tools, flex hose and/or telescoping extension wand are blocked 1.
42 Rocco Drive Scoresby 3179 Victoria Australia 0844-888-6644
Replacement parts - BISSELL Pet Hair Eraser Compact Item Part No.
mpact anister 42 Rocco Drive Scoresby 3179 Victoria Australia 0844-888-6644