® USER'S GUIDE 1425 SERIES 2 Thank You 3 Safety instructions 4 Product view 5 Product features 6 Assembly 6-7 Operations 8 Maintenance and care 9 Troubleshooting 10 Replacement parts 10 Accessories 11 Warranty 12 Product registration 12 Consumer services
Thanks for buying a Pawsitively Clean Yikes!® Compact deep cleaner We’re glad you purchased a Yikes! Compact deep cleaner. Everything we know about floor care went into the design and construction of this complete, high-tech home cleaning system. Your Yikes! Compact deep cleaner is well made, and we back it with a limited one-year warranty. We also stand behind it with a knowledgeable, dedicated Consumer Services department, so, should you ever have a problem, you’ll receive fast, considerate assistance.
IMPORTANT SAFETY INSTRUCTIONS When using an electrical appliance, basic precautions should be observed, including the following: Read all instructions before using your Yikes! compacT deep Cleaner WARNING: To reduce the risk of fire, electric shock, or injury: ■ Do not use for any purpose other than described in this User’s Guide. ■ Use only BISSELL cleaning products intended for use in this appliance. ■ Use only manufacturer’s recommended attachments. ■ Do not expose to rain, store indoors.
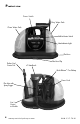
Product view Power Switch Dirty Water Tank Clean Water Tank Built-In Heater Switch Heat Indicator Light Flex Hose Flex Hose Clip Deluxe 2-in-1 Crevice Tool 4" Stain Brush Quick Release™ Cord Wrap Power Cord Flex Hose with Spray Trigger 2-in-1 Crevice tool holder 4 www.pawsitivelycleanpet.com 800.237.
Product Features Built-in-Heater switch (red) The Yikes! compact deep cleaner gives you the ability to raise the water temperature for improved cleaning performance based on your cleaning needs. Heat indicator light After turning the built-in heater switch on, the heat indicator light will illuminate, indicating the heater has reached the correct temperature. Flex hose clip The clip guides the storage of the vacuum flex hose around the unit.
Assembly 2. Assembling your Yikes! compact deep 1. cleaner is a simple process. The only thing you will need to assemble your cleaner is a Phillips head screwdriver. 1. Slide the back plate of the flex hose clip into the opening on the front of the unit. You will hear a “snap” when it is locked in place. 2. Take the flex hose storage bracket and slide the lower plate into the opening on the back of unit. Make sure the screw holes line up. 3. 4. 3. Insert screw and tighten with a screwdriver. 4.
Operations Getting ready (continued) 5. 4. Power Heater Switch Switch 4. Twist the quick release cord wrap clockwise to unwrap the power cord completely from onboard cord storage and plug into 120 Volt, 60 Hz grounded outlet as described in Important safety Instructions, page 3. 5. Press power switch to ON position. Press the red heater switch to “ON”. Within 30 seconds, the heat indicator light will illuminate, indicating the heater has reached the proper temperature. 6.
Maintenance and care After cleaning 1. Turn power switch to OFF position. 2. Unplug power cord from outlet. 3. Retainer Lever Note: If a significant amount of formula and clean water remains, it is all right to leave it in the clean water tank for your next cleaning task. 3. Empty and rinse the dirty water tank after each use, OR when dirty water reaches the indicated maximum fill line. To remove the tank, lift up the dirty water tank retainer lever and remove the tank from the unit. 4.
Troubleshooting Reduced spray or no spray Possible causes Remedies 1. Tank release latch is not closed properly 1. Lift up the tank release latch and press down firmly to make sure it is in place 2. Spray nozzle clogged 2. Clean spray nozzle 3. Clean water/solution tank empty 3. Check/refill tank 4. Clean water/solution insert clogged 4. Clean insert at bottom of clean water/solution tank 5. Pump needs priming 5.
Replacement parts Item Part No. 1 203-7158 2 203-7144 3 203-5011 4 203-5012 5 203-5013 6 203-5014 1 2 Part Name Clean Water Tank (includes cap and insert assembly) Dirty Water Tank (includes the airstack and float assembly) Quick Release Cord Wrap 2-in-1 Crevice Tool Holder Flex Hose Clip Cap & Insert Assembly 3 4 5 6 Accessories parts Item 1 2 3 4 5 6 1 10 Part No.
Warranty - Pawsitively Clean Yikes! compact deep cleaner This warranty gives you specific legal rights, and you may also have other rights which may vary from state to state. If you need additional instruction regarding this warranty or have questions regarding what it may cover, please contact BISSELL Consumer Services by E-mail, telephone, or regular mail as described below.
Don't forget to register your product! Registering is quick, easy and offers you benefits over the lifetime of your product. You’ll receive: BISSELL Rewards Points Automatically earn points for discounts and free shipping on future bissell.com purchases. Faster Service Supplying your information now saves you time should you need to contact us with questions regarding your product. Product Support Reminders and Alerts We’ll contact you with any important product maintenance reminders and alerts.