PROHEAT 2X® LIFT-OFF® Deep Cleaner ___________ USER GUIDE 1560, 1564, 1565 SERIES
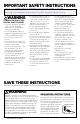
IMPORTANT SAFETY INSTRUCTIONS READ ALL INSTRUCTIONS BEFORE USING YOUR DEEP CLEANER. When using an electrical appliance, basic precautions should be observed, including the following: WARNING TO REDUCE THE RISK OF FIRE, ELECTRIC SHOCK, OR INJURY: » Connect to a properly grounded outlet only. See grounding instructions. Do not modify the 3-prong grounded plug. » Do not leave appliance when it is plugged in. Unplug from outlet when not in use and before servicing. » Do not expose to rain, store indoors.
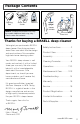
Package Contents BISSELL Cleaning Tool Quick Start Guide Pod Base Formula Upper Handle NOTE: Standard accessories may vary by model. Additional tools may vary – check carton for contents. Base Unit Thanks for buying a BISSELL deep cleaner We’re glad you purchased a BISSELL deep cleaner. Everything we know about floor care went into the design and construction of this complete, high-tech home cleaning system. Your BISSELL deep cleaner is well made, and we back it with a limited three-year warranty.
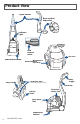
Product View Upper Handle Upper Handle Base and Pod Separated Base and Pod Separated Base andBase Podand Pod Separated Separated Upper Handle Upper Handle Indicator Light Indicator Light Indicator Indicator Light Light Pod Release Pedal Pod Pod Release Release Removeable NozzlePod Pedal Pedal Release Quick Release PedalCord Wrap Nozzle Removeable Removeable Nozzle Quick Release Quick Release Removeable Nozzle Cord Wrap CordRelease Wrap Quick Flex Hose Flex Hose Flex Hose Flex Hose Cord Wrap Spe
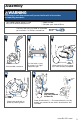
Assembly WARNING Do not plug in your deep cleaner until you are familiar with all instructions and operating procedures. Your deep cleaner comes in two easy-to-assemble components: • Upper handle • Portable spot cleaner/Base The only tool you will need to assemble your cleaner is a Phillips screwdriver. 1 2 3 On the back, insert 4 screws in a slight upward angle Slide handle into base 4 Wrap cord. Unit may come with cord already wrapped.
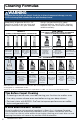
Cleaning Formulas WARNING To reduce the risk of fire and electric shock due to internal component damage, use only BISSELL cleaning fluids intended for use with the deep cleaner. Keep plenty of genuine BISSELL 2X* formula on hand so you can clean and protect whenever it fits your schedule. Always use genuine BISSELL deep cleaning formulas. Non-BISSELL cleaning solutions may harm the machine and may void the warranty.
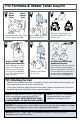
Fill Formula & Water Tank: EasyFill 1 2 3 Locate the Clean Water Tank on back side of the Pod. Pull handle up and lift Clean Water Tank. Remove Cap, fill with hot tap water (140F/60°C) to Water Line. 4 5 Clean Water Tank Dirty Water Tank SE BIS LL + With Trial Size Antibacterial Formula: After adding hot water, pour the antibacterial formula into the clean tank up to the EasyFill line. Twist the cap back onto the tank. Place the tank back on the unit.
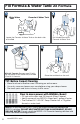
Fill Formula & Water Tank: 2X Formula 1 2 Dirty Water Tank Formula & Water Tank Locate the Formula & Water Tank on the back side of the Pod 3 Pull handle up and lift Formula & Water Tank 4 LL SE BIS la mu r Fo 2x + With 2X Formula: Remove cap, fill with hot tap water to the water line, and add 1.5 oz of 2X formula. Place the tank back on the unit. TIP: Before Carpet Cleaning • Move furniture to another area if cleaning an entire room.
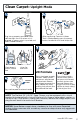
Clean Carpet: Upright Mode 1 2 Power Button Plug into a properly grounded outlet After confirming Formula & Water Tank is filled properly, press the power button, located on the Cord Wrap side Indicator light turns on when unit is plugged in, power switch is pushed and Pod is seated correctly. 3 “C lic k” 5 k” lic “C If light doesn’t turn on, reseat Pod Listen for two clicks 2X Formula 4 Recline Pedal Press recline pedal to release handle. Press the trigger to apply solution.
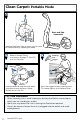
Clean Carpet: Portable Mode 1 Lift Base and Pod Separated Press Pedal Separate Pod from Base to clean stairs or work on stained areas by stepping on pedal 2 3 Refer to Upright Filling instructions on pages 7 (EasyFill) or 8 (2X Formula) 4 Cleaning Tool Trigger Power Button Unwrap cord and plug Pod into outlet Press the trigger to apply cleaning fluid Unwrap the hose and press Power Button to turn unit ON Tilt handle slightly up to remove fluids TIP: Pod Placement • When cleaning stairs, avoid t
Maintenance: Empty Dirty Water Tank WARNING To reduce the risk of fire, electric shock or injury, turn power OFF and disconnect plug from electrical outlet before performing maintenance or troubleshooting.
Maintenance: Cleaning Machine After Use WARNING To reduce the risk of electric shock, turn power switch off and disconnect plug from electrical outlet before performing maintenance or troubleshooting checks.
Maintenance: Replacing Small Belt 1 2 3 Screw 1 Small Belt Screw 2 Pod Release Pedal To replace Small Belt, flip the Base Unit to the side with the Pod Release Pedal on the bottom Small Belt Pivot Arm End Cap Roller Screw 3 Using Phillips screwdriver, remove three screws from the End Cap and set to side Remove the end cap first.
Troubleshooting WARNING To reduce the risk of electric shock, turn power switch off and disconnect plug from electrical outlet before performing maintenance or troubleshooting checks.
Warranty This warranty gives you specific legal rights, and you may also have other rights which may vary from state to state. If you need additional instruction regarding this warranty or have questions regarding what it may cover, please contact BISSELL Consumer Care by E-mail, telephone, or regular mail as described below.
Register your product today! Registering is quick, easy and offers you benefits over the lifetime of your product. You’ll receive: BISSELL Rewards Points Product Support Reminders and Alerts Automatically earn points for discounts and free shipping on future purchases. Faster Service We’ll contact you with any important product maintenance reminders and alerts. Supplying your information now saves you time should you need to contact us with questions regarding your product.