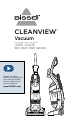
CLEANVIEW® Vacuum ___________ USER GUIDE 1813, 1823, 1825 SERIES More of a video person? Look for this icon and go online for an instructional how-to video at www.BISSELL.
IMPORTANT SAFETY INSTRUCTIONS READ ALL INSTRUCTIONS BEFORE USING YOUR UPRIGHT VACUUM. Always connect to a polarized outlet (one slot is wider than the other). Unplug from outlet when not in use and before conducting maintenance. When using an electrical appliance, basic precautions should be observed, including the following: WARNING TO REDUCE THE RISK OF FIRE, ELECTRIC SHOCK, OR INJURY: » Do not leave vacuum cleaner when it is plugged in. Unplug from outlet when not in use and before servicing.
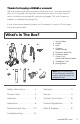
Thanks for buying a BISSELL vacuum! We love to clean and we’re excited to share one of our innovative products with you. This guide has important instructions on how your new vacuum works, including using (page 6), maintaining (pages 7-9), and if there is a problem, troubleshooting (page 10). In just a few simple assembly steps, you’ll be ready to vacuum. Flip to page 5 and let’s get started! What’s In The Box? 1. 5. 2. 6. 7. 3. 8. 1. Vacuum Base 2. Handle 3. Hose 4.
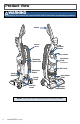
Product View WARNING Do not plug in your vacuum until you are familiar with all instructions and operating procedures. Handle Stretch Hose Tank Release Button Carry Handle Extension Wand Clip Pre-Motor Filter (not shown) Dirt Tank Extension Wand Cord Rewind Power Pedal Recline Pedal Post-Motor Filter Height Adjustment NOTE: The Crevice Tool is stored inside the Extension Wand. 4 www.BISSELL.
Assembly The only tool you will need to assemble your vacuum is a Phillips screwdriver. 2 1 Place handle on vacuum base and press down firmly. Insert screws in back of unit. Tighten by rotating the screw clockwise until tightened. 3 Place extension wand clip on back of unit, twist clockwise to lock in. 5 4 Line up tabs on hose end to vacuum base and twist clockwise to lock in. 6 Store TurboBrush® on front of handle. 7 Store dusting brush above hose wrap in holder.
Operations: Power On & Settings 1 Push the Red Power Switch Pedal once to turn the unit ON and once again to turn the unit OFF. Power Pedal 2 Press the recline pedal and pull handle back towards you. TIP: For optimal carpet cleaning performance, adjust to the lowest practical setting. If your vacuum is difficult to push, adjust to the next higher setting. 3 Turn the dial on the foot of the vacuum to the desired setting.
Maintenance: Clean Dirt Tank WARNING To reduce the risk of electric shock, turn power switch off and disconnect polarized plug from electrical outlet before performing maintenance or troubleshooting checks. 2 1 Press tank release button and remove dirt tank. Empty once tank is full. 3 Hold the dirt tank over a trash container. 4 Press the lid release button to empty. Once empty, close the lid. Twist cyclone counter clockwise and pull down to remove from tank.
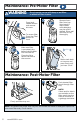
Maintenance: Pre-Motor Filter WARNING 1 Do not operate vacuum with damp or wet filters or without all filters in place. Press tank release button and remove dirt tank. 2 To access filter, Press the Filter button on front. 3 Make sure filter is completely dry before placing back into the tank lid. Remove foam filter from tray. Hand wash in warm water; mild detergent may be used if desired. Rinse well and then air dry thoroughly. 4 click Close the lid to return the tank to the vacuum.
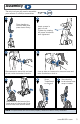
Maintenance: Brush & Belt 1 Clean debris from brush roll. Inspect by placing it on its end and spin. The brush roll should spin freely, multiple times by one flick. If it doesn’t, replace brush roll. 2 Check belt for wear or cuts and replace if necessary. Unplug vacuum, turn over and unscrew six (6) Philips head screws to remove the bottom cover. 3 Thread belt and line up End Cap to reassemble roller. Replace bottom cover and 6 screws.
Troubleshooting WARNING To reduce the risk of electric shock, turn power switch off and disconnect plug from electrical outlet before performing maintenance or troubleshooting checks.
Warranty This warranty gives you specific legal rights, and you may also have other rights which may vary from state to state. If you need additional instruction regarding this warranty or have questions regarding what it may cover, please contact BISSELL Consumer Care by E-mail, telephone, or regular mail as described below.
Register your product today! Registering is quick, easy and offers you benefits over the lifetime of your product. You’ll receive: BISSELL Rewards Points Product Support Reminders and Alerts Automatically earn points for discounts and free shipping on future purchases. Faster Service We’ll contact you with any important product maintenance reminders and alerts. Supplying your information now saves you time should you need to contact us with questions regarding your product.