POWERFRESH® SLIM STEAM MOP _______________ USER GUIDE 2075 SERIES
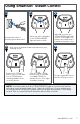
IMPORTANT SAFETY INSTRUCTIONS READ ALL INSTRUCTIONS BEFORE USING YOUR STEAM MOP. When using an electrical appliance, basic precautions should be observed, including the following: Always connect to a polarized outlet (left slot is wider than right). Unplug from outlet when not in use and before conducting maintenance.
Thanks for buying a BISSELL PowerFresh® Slim Steam Mop Your steam mop needs a little assembly before you can put it to work, so flip to page 5 and let’s get started! Safety Instructions . . . . . . . . . . 2 Troubleshooting . . . . . . . . . . . . 14 Product View . . . . . . . . . . . . . . . 4 Warranty . . . . . . . . . . . . . . . . . . . 15 Assembly . . . . . . . . . . . . . . . . . . . 5 Service . . . . . . . . . . . . . . . . . . . . . 15 Operations . . . . . . . . . . . . . . .
Getting to Know Your Steam Mop 1 8 7 2 3 6 LOW Steam HI Steam 4 11 PAUSE 5 12 9 10 1 SmartSet Steam Control 7 Steam Trigger 2 Easy Fill Water Tank 8 Wall Mount Storage Clip Area 3 Handheld Pod Release Button 9 Extension Wand Release Pedal 4 Power Cord with Wrap Strap 10 Mop Pad Foot 5 Extension Wand 11 6 Handheld Pod 12 Tool Box Wall Mount NOTE: Tool Box stores Green Bristle Brush, Angle Concentrator Tool, Grout Tool, and Flat Scraper Tool. 4 www.BISSELL.
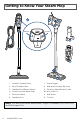
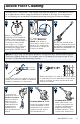
Assembly WARNING Do not plug in your PowerFresh® Slim Steam Mop until you are familiar with all instructions and operating procedures. Your BISSELL PowerFresh® Slim Steam Mop assembles quickly and easily. It is packaged with the following items: 1 Attach the Extension Wand to the Mop Pad Foot by snapping it into place. click • Handheld Pod • Extension Wand • Mop Pad Foot 2 click Then, insert the Handheld Pod to the Extension Wand until it clicks into place.
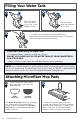
Filling Your Water Tank 2 1 The clean water tank is located on the top of the Handheld Pod. 3 Pull the water tank cap straight up to open. Use water cup provided and fill with distilled or demineralized water, recommended in place of tap water. Close the water tank cap after filling. A few notes about filling the Water Tank: • The Water Tank’s capacity is 350 mL (12 oz). DO NOT USE CHEMICALS IN THE WATER TANK OF YOUR POWERFRESH® SLIM STEAM MOP.
Using SmartSet™ Steam Control 1 2 3 Plug machine into a properly grounded outlet. When the unit is plugged in, the STEAM READY light will start to blink. After 30 seconds, the STEAM READY light will turn to a solid light. This means the steam mop is heated and ready to use. 4 Now, select a desired steam level based on your cleaning needs. Push the HI STEAM button once to turn ON. Use HI STEAM when cleaning durable floors or sticky messes. Push the LOW STEAM button once to turn ON.
Cleaning Your Hard Floors NOTE: Before you clean, thoroughly sweep or vacuum floor prior to cleaning with the PowerFresh® Slim Steam Mop. YOUR STEAM MOP IS DESIGNED TO CLEAN HARD FLOORING SUCH AS CERAMIC TILE, LAMINATE, MARBLE, STONE AND SEALED HARDWOOD FLOORS. USE OF YOUR STEAM MOP ON WAXED OR SOME UNWAXED FLOORS MAY RESULT IN A DIMINISHED GLOSSINESS. THE STEAM MOP IS NOT FOR USE ON UNSEALED FLOORS.
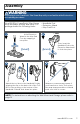
Above Floor Cleaning Your BISSELL PowerFresh® Slim Steam Mop has the ability to clean above floors or in tight spaces when using the Extension Wand. It also has the convenience of converting into a handheld steamer when removing the Extension Wand. 2 1 3 30 Before changing from mopping to the handheld feature or disconnecting a tool from the handheld pod or extension wand, make sure steam is no longer coming from the nozzle by releasing the trigger and pressing the PAUSE button.
Above Floor Cleaning (continued) 8 Based on your cleaning needs, connect desired tool to the end of the Extension Wand or the Handheld Pod. Select cleaning tools are included with this model. Use the Flat Scraping Tool to steam and scrape off those sticky messes on floors, countertops, etc. Use the Grout Tool to remove dirt and grime from grout. Use the Mop Pad Foot to steam larger areas such as shower walls, countertops, stairs, etc.
Cleaning Your Steam Mop WARNING To reduce the risk of fire, electric shock or injury, turn power OFF and disconnect plug from electrical outlet before performing maintenance or troubleshooting. 1 Turn machine OFF and unplug from the grounded outlet. 2 3 Carefully remove mop pad using the Quick Grip Release Tab from the mop head. NOTE: Mop pad and lower assembly may be hot. 4 Wrap the cord around the palm of your hand into a circle.
Setting Up The Wall Mount WARNING To reduce the risk of fire, electric shock or injury, turn power OFF and disconnect plug from electrical outlet before performing maintenance or troubleshooting. A Phillips Head Screwdriver is needed to install the wall mount. If installing onto drywall, use plastic anchors with provided screws. 1 Place the wall mount against the wall in the area where you’ve determined you would like to store your machine.
Using The Wall Mount Storage WARNING To reduce the risk of fire, electric shock or injury, turn power OFF and disconnect plug from electrical outlet before performing maintenance or troubleshooting. Your BISSELL PowerFresh® Slim Steam Mop can be stored in 2 different ways using the Wall Mount. OPTION 1: 1 Find the opening on the back of the Handheld Pod and hook it onto the top lip of the Wall Mount. 2 3 Bend the Mop Pad Foot downward in a slanted position.
Troubleshooting WARNING To reduce the risk of electric shock, turn power switch off and disconnect plug from electrical outlet before performing maintenance or troubleshooting checks. Problem Reduced steam OR no steam Possible causes Remedies Water tank empty. Refill tank. Steam level not selected. Select steam level by pushing steam level button. Wand not installed properly. Push the wand all the way into the handheld pod until you hear a click. Foot not installed properly.
Warranty This warranty gives you specific legal rights, and you may also have other rights which may vary from state to state. If you need additional instruction regarding this warranty or have questions regarding what it may cover, please contact BISSELL Consumer Care by E-mail, telephone, or regular mail as described below.
Register your product today! Registering is quick, easy and offers you benefits over the lifetime of your product. You’ll receive: BISSELL Rewards Points Product Support Reminders and Alerts Automatically earn points for discounts and free shipping on future purchases. Faster Service We’ll contact you with any important product maintenance reminders and alerts. Supplying your information now saves you time should you need to contact us with questions regarding your product.