STAINEXPERT 6 Carpet & Upholstery Washer _______________ USER GUIDE 21235 More of a video person? Look for this icon and go online for an instructional how-to video at www.BISSELL.
IMPORTANT SAFETY INSTRUCTIONS READ ALL INSTRUCTIONS BEFORE USING YOUR APPLIANCE. Unplug from outlet when not in use and before conducting maintenance.
Thanks for buying a BISSELL carpet cleaner! We love to clean and we’re excited to share one of our innovative products with you. This guide has important instructions on how your new carpet cleaner works, including using (pages 6-8), maintaining (pages 9-10), and if there is a problem, troubleshooting (page 11). In just a few simple assembly steps, you’ll be ready to deep clean. Flip to page 5 and let’s get started! What’s In The Box? 1. 2. 1. 2. 3. 4. 5. 6. 3.
Getting to Know Your Deep Cleaner 8 6 7 1 9 11 10 12 2 13 3 14 15 4 5 1 Tough Stain Tool 2 ReadyTools™ Dial 3 Belt Access Door 4 DirtLifter® PowerBrush (under nozzle) 5 Floor Nozzle 6 Spray Trigger 7 Cord Clip 8 Upper Handle 9 Quick Release™ Hose Wrap 10 Ready-to-Use Hose 11 Extra Long Power Cord 12 Lower Hose Wrap 13 2-in-1 Tank 14 Recline Pedal 15 Power Switch *Tools included may vary 4 www.BISSELL.
Assembly WARNING Do not plug in your deep cleaner until you are familiar with all instructions and operating procedures. The only tool you will need to assemble your deep cleaner is a Phillips screwdriver. Your deep cleaner comes in four easy-to-assemble components and an accessory bag. - Upper Handle - Base - Upper Hose Wrap - Lower Hose Wrap 1 2 2 1 Attach upper hose rack to back of upper handle by pushing into open slots and sliding down until it snaps into place.
Before You Clean: Prepare Your Machine 1 1 2 1-Press the recline pedal to access the 2-in-1 tank. Remove the tank from the base of the machine by lifting the tank carry handle. 2-Carry the tank like a bucket to the sink. Rotate the carry handle forward to unlatch the lid. Remove the lid and turn it over to locate the measuring cup. 2 3-Fill with BISSELL 2X formula to the indicated fill line on the built in measuring cup and pour it into the bladder.
Carpet Cleaning TIP: Remove loose dirt and impediments before cleaning. 1 Plug the power cord into a properly grounded outlet. Set the ReadyTools Dial to “FLOOR CLEANING”. 4 Recline the machine by pressing the gray release switch with your foot. 5 3 2 Turn the power on by pressing the red Power Switch on the back of the machine with your foot. NOTE: Do not overwet the carpet. Also take care not to run over loose objects, edges of area rugs, or the power cord.
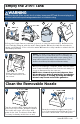
Upholstery & Spot Cleaning IMPORTANT: Check upholstery tags for any special care instructions. If possible, check for colored stuffing as it is possible the color could bleed through. Check for colorfastness in a hidden area - like the back or underside of the furniture. 1 2 Set the Ready Tools Dial to the Tools setting. This will allow the machine to divert the spray and suction to the hose. Fill the tank according to page 6 to prepare your machine.
Empty the 2-in-1 Tank WARNING To reduce the risk of fire, electric shock or injury, turn power OFF and disconnect plug from electrical outlet before performing maintenance or troubleshooting. 1 1 3 2 4 1-Press the Power Switch Pedal with your foot to turn the machine OFF. 2-Remove the 2-in-1 Tank by lifting up with the tank’s Carry Handle. 3-Carry the tank like a bucket to where you’ll dispose of the collection water. 4-Rotate the carry handle to unlatch the lid and empty the tank.
Machine Care A few simple steps can assure your machine is well maintained after your cleaning is complete. LINT SCREEN 1 2 Turn power OFF and unplug the machine. Always wrap the power cord and make sure the hose is securely wrapped. The final empty of the 2-in-1 tank should always get an extra rinse-out. Rinse under and around the bladder as well as the lint screen. Belt Replacement 1 3 10 Brush Belt Insert a Flat Head Screwdriver to remove the belt access door.
Troubleshooting WARNING To reduce the risk of electric shock, turn power switch OFF and disconnect plug from electrical outlet before performing maintenance or troubleshooting checks. Problem There is no power to the machine. Reduced spray or no spray DirtLifter® PowerBrush does not turn Machine does not have suction ReadyTools dial becomes difficult to turn. Possible causes Remedies The machine power switch is not turned ON ( I ).
Consumer Guarantee This Guarantee only applies outside of the USA and Canada. It is provided by BISSELL International Trading Company BV (“BISSELL”). This Guarantee is provided by BISSELL. It gives you specific rights. It is offered as an additional benefit to your rights under law. You also have other rights under law which may vary from country to country. You can find out about your legal rights and remedies by contacting your local consumer advice service.