CROSSWAVE® PET _______________ USER GUIDE 2225F SERIES
IMPORTANT SAFETY INSTRUCTIONS READ ALL INSTRUCTIONS BEFORE USING YOUR MULTI-SURFACE CLEANER. When using an electrical appliance, basic precautions should be observed, including the following. WARNING ALWAYS CONNECT TO A PROPERLY EARTHED ELECTRICAL SOCKET. WARNING TO REDUCE THE RISK OF FIRE, ELECTRIC SHOCK, OR INJURY: » Unplug from electrical socket when not in use and before cleaning, maintaining or servicing the appliance.
Thanks for buying a BISSELL CrossWave® Pet We love to clean and we’re excited to share one of our innovative products with you. We want to make sure your multi-surface cleaner works as well in two years as it does today, so this guide has tips on using (pages 6-8), maintaining (pages 9-13), and if there is a problem, troubleshooting (page 14).
Getting to Know Your CrossWave® Pet 1 2 9 10 11 6 12 3 7 4 13 5 1 8 Upper Handle 8 Foot 2 SmartClean™ Fingertip Controls 9 Solution Spray Trigger 3 Strainer 10 Quick Release Cable Wrap 4 Float Stack 11 Clean Water Tank 5 Easy Remove Brush Window 12 Lower Cable Wrap 6 Integrated Carry Handle 13 Rinse Cup 7 Dirty Water Tank 14 Rinse and Storage Tray Your BISSELL CrossWave® Pet machine comes in three easy to assemble components and does not require any tools to assemble.
Assembly WARNING Do not plug in your CrossWave® Pet until you are familiar with all instructions and operating procedures. 1 Insert Handle into body of unit until you hear a click. Then, on the back of the machine, align Clean Water Tank with the grooves and slide tank into place until you hear a click. 2 click 3 Wrap the cable around the Quick Release Cable Wrap and the Lower Cable Wrap.
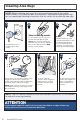
Filling the Clean Water Tank 1 The Clean Water Tank is located on the back of the machine. 2 3 Clean Water Tank Dirty Water Tank Unscrew the cap from the Clean Water Tank. Lift the Clean Water Tank straight up to remove from the machine. The Clean Water Tank has two measuring volumes depending on the amount of space you would like to clean. 4 For large area cleaning (up to 65 sq m) For small area cleaning (<32.5 sq m) a. Fill Clean Water Tank with warm tap water to the second water fill line.
Cleaning Hard Floors 1 2 3 Select cleaning mode: Plug machine into a properly grounded outlet. To start cleaning your hard floors, turn the machine ON pressing the HARD FLOOR button. Once the setting is selected, the dry vacuum will turn ON. To turn OFF, press the HARD FLOOR setting a second time. 4 Before each use, hold the Solution Spray Trigger for 10 seconds to prime the system with cleaning solution. LED lights illuminate when holding the trigger.
Cleaning Area Rugs NOTE: Before cleaning area rugs, test an inconspicuous area of the rug for colourfastness. Also, please check manufacturer’s tag before cleaning area rugs for any specialised cleaning instructions. Not for use on silk or delicate area rugs. 1 2 3 Select cleaning mode: Plug machine into a properly grounded outlet. To start cleaning your rugs, turn the machine ON pressing the RUG button. Once the setting is selected, the dry vacuum will turn ON.
Using the Rinse and Storage Tray WARNING To reduce the risk of fire, electric shock or injury, turn power OFF and disconnect plug from electrical outlet before performing maintenance or troubleshooting. 2 1 Place unit on Rinse and Storage Tray. 4 3 Fill Rinse Cup with water. 6 5 Turn the machine ON by pressing the Hard Floor button. Pour water into Rinse Funnel to fill the MAX line of the Rinse and Storage Tray. Recline the machine while in storage tray.
Using the Rinse and Storage Tray (cont.) WARNING To reduce the risk of fire, electric shock or injury, turn power OFF and disconnect plug from electrical outlet before performing maintenance or troubleshooting. 9 Replace Brush Roll by inserting the Brush Roll end into the right side of the foot. Then lock the pull tab into place by pressing downward. 10 Replace the Brush Window by first lining up the Brush Window tabs with the edges of the foot.
Empty Dirty Water Tank WARNING To reduce the risk of fire, electric shock or injury, turn power OFF and disconnect plug from electrical outlet before performing maintenance or troubleshooting. 2 1 To release Dirty Water Tank, press down on recessed button on the top of the tank. 3 Grab the front handle while pressing down on button and pull Dirty Water Tank away from the unit. Grasp top of Dirty Water Tank in recessed areas on each side of the filter and pull upward to remove the top of the tank.
Empty Dirty Water Tank WARNING To reduce the risk of fire, electric shock or injury, turn power OFF and disconnect plug from electrical outlet before performing maintenance or troubleshooting. 10 9 If the inside area where the Dirty Water Tank sits is dirty, wipe it clean with a rag or towel. Leave parts out to dry before reassembling. 11 Place Vacuum Filter back into the top of the Dirty Water Tank.
Clean Brush Roll and Chamber WARNING To reduce the risk of fire, electric shock or injury, turn power OFF and disconnect plug from electrical outlet before performing maintenance or troubleshooting. 1 Grasp Brush Window at the front and pull upward to remove. 3 With warm water, rinse your Brush Window and Brush Roll. 2 4 Pull Brush Roll out by grabbing the Brush Roll tab and pulling upward. 5 If your Brush Roll Chamber is dirty, clean with a rag or towel.
Troubleshooting WARNING To reduce the risk of electric shock, turn power switch OFF and disconnect plug from electrical outlet before performing maintenance or troubleshooting checks.
Consumer Guarantee This Guarantee gives you specific legal rights, in addition to rights you may have under the Australian Consumer Law. If you need additional instruction regarding this Guarantee or have questions regarding what it may cover, please contact your local BISSELL Consumer Services on the details set out below.
©2018 BISSELL Homecare, Inc Grand Rapids, Michigan All rights reserved. Printed in China Part Number 161-4108 04/18 RevB Visit our website at: www.BISSELL.