CLEANVIEW® SWIVEL REWIND PET DELUXE ___________ USER GUIDE 2258 SERIES More of a video person? Look for this icon and go online for an instructional how-to video at www.BISSELL.
IMPORTANT SAFETY INSTRUCTIONS READ ALL INSTRUCTIONS BEFORE USING YOUR UPRIGHT VACUUM. Always connect to a polarized outlet (one slot is wider than the other). Unplug from outlet when not in use and before conducting maintenance. When using an electrical appliance, basic precautions should be observed, including the following: WARNING TO REDUCE THE RISK OF FIRE, ELECTRIC SHOCK, OR INJURY: » Do not leave vacuum cleaner when it is plugged in. Unplug from outlet when not in use and before servicing.
Thanks for buying a BISSELL vacuum! We love to clean and we’re excited to share one of our innovative products with you. This guide has important instructions on how your new vacuum works, including using (page 6), maintaining (pages 7-9), and if there is a problem, troubleshooting (page 10). In just a few simple assembly steps, you’ll be ready to vacuum. Flip to page 5 and let’s get started! What’s In The Box? 1. 2. 3. 4. 5. 6. 7. 8. 9. 10. 11. 1. Vacuum Base 2. Handle 3. Hose 4.
Product View WARNING Do not plug in your vacuum until you are familiar with all instructions and operating procedures.
Assembly The only tool you will need to assemble your vacuum is a Phillips-head screwdriver. 2 1 Place the Upper Handle onto the base and push it down. Then attach the handle with the 2 screws taped to the handle in a plastic bag. 4 3 Insert the Extension Wand base and turn it to the right to lock in place. Insert the Stretch Hose end into the back of the vacuum and twist right to lock in place. 6 5 click Wrap Hose up and around the Hose Wrap on the handle. Slide end of hose into vacuum base.
Power On & Settings WARNING To reduce the risk of injury from moving parts while the vacuum is turned on, always move the vacuum via the rolling wheels by using the upper handle at the back of the vacuum. Do not carry the vacuum while it is running. Always place vacuum on floor with handle in upright position when using tools. 1 Press the red power button with your foot to turn the vacuum ON and once again to turn your vacuum OFF . 2 Press the recline pedal and pull handle back towards you.
Empty the Dirt Tank WARNING To reduce the risk of electric shock, turn power switch off and disconnect polarized plug from electrical outlet before performing maintenance or troubleshooting checks. 2 1 Empty once Dirt Tank is full. 3 Hold the Dirt Tank over a trash container. Press the bottom release button to empty. Once empty, close the lid. 5 Clean Cyclone with warm water and mild detergent. Let Cyclone dry completely before replacing. To replace, fit into place and twist to the right.
Clean the Pre-Motor Filter WARNING To reduce the risk of electric shock, turn power switch off and disconnect plug from electrical outlet before performing maintenance or troubleshooting checks. WARNING Do not operate vacuum with damp or wet filters or without all filters in place. 2 1 Press the tank release button and pull out to remove Dirt Tank. Remove Foam Filter from lid. Hand wash in warm water and rinse well; mild detergent may be used if desired.
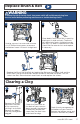
Replace Brush & Belt WARNING To reduce the risk of electric shock, turn power switch off and disconnect plug from electrical outlet before performing maintenance or troubleshooting checks. 1 2 Unplug vacuum, turn over and unscrew six (6) Philips-head screws to remove the bottom cover. Lift brush straight out. Clean debris from Brush Roll. Inspect by placing on its end and spin. The brush roll should spin freely, multiple times by one flick. If it doesn’t, replace Brush Roll.
Troubleshooting WARNING To reduce the risk of electric shock, turn power switch off and disconnect plug from electrical outlet before performing maintenance or troubleshooting checks.
Warranty This warranty gives you specific legal rights, and you may also have other rights which may vary from state to state. If you need additional instruction regarding this warranty or have questions regarding what it may cover, please contact BISSELL Consumer Care by E-mail, telephone, or regular mail as described below.
Register your product today! Registering is quick, easy, and offers you benefits over the lifetime of your product. You’ll receive: BISSELL Rewards Points Automatically earn points for discounts and free shipping on future purchases. Faster Service Supplying your information now saves you time should you need to contact us with questions regarding your product. Product Support Reminders and Alerts We’ll contact you with any important product maintenance reminders and alerts.
ASPIRADORA CLEANVIEW® SWIVEL REWIND PET DELUXE ___________ GUÍA DEL USUARIO SERIE 2258 ¿Prefiere los videos? Busque este ícono y conéctese para ver un video instructivo en www.BISSELL.
INSTRUCCIONES IMPORTANTES DE SEGURIDAD LEA TODAS LAS INSTRUCCIONES ANTES DE USAR SU ASPIRADORA VERTICAL. Conéctela siempre a un tomacorriente polarizado (una ranura es más ancha que la otra). Desenchúfela del tomacorriente cuando no esté en uso y antes de realizarle mantenimiento. Al usar electrodomésticos, debe respetar las siguientes medidas de precaución básicas: ADVERTENCIA » No lo utilice si el enchufe o el cable están dañados.
Gracias por comprar una aspiradora BISSELL. Amamos la limpieza y estamos ansiosos por compartir uno de nuestros innovadores productos con usted. Esta guía tiene importantes instrucciones sobre cómo funciona tu nueva aspiradora, lo que incluye el uso (página 6), el mantenimiento (páginas 7 a 9) y si hay un problema, solución de problemas (página 10). En tan solo unos pasos de ensamblaje, estará todo listo para que pueda aspirar. Vaya a la página 5 y comencemos. Contenido de la caja 1. 2. 3. 1. 2. 3. 4.
Vista del producto ADVERTENCIA No enchufe la aspiradora hasta que no comprenda todas las instrucciones y los procedimientos de funcionamiento.
Ensamblaje La única herramienta que necesitará para ensamblar la aspiradora es un destornillador Phillips. 2 1 Coloque la manija superior sobre la base y presiónela hacia abajo. A continuación, conecte la manija con los 2 tornillos que vienen en una bolsa de plástico pegada a la manija. 4 3 Inserte la base del tubo de extensión y gírelo hacia la derecha para fijarlo en su lugar.
Encendido y ajustes ADVERTENCIA Para reducir el riesgo de lesiones provocadas por las piezas en movimiento mientras la aspiradora está encendida, siempre transporte la aspiradora con las ruedas utilizando la manija superior en la parte posterior de la aspiradora. No transporte la aspiradora mientras está funcionando. Siempre coloque la aspiradora en el piso con la manija en posición vertical cuando utilice los accesorios.
Vaciado del tanque de suciedad ADVERTENCIA Para reducir el riesgo de descarga eléctrica, coloque el interruptor de encendido en la posición de apagado y desconecte el enchufe polarizado del tomacorriente antes de realizar mantenimiento a la unidad o solucionar problemas. 2 1 Vacíe el tanque de suciedad cuando esté lleno. 3 Sostenga el tanque de suciedad sobre un contenedor de basura. Presione el botón de liberación inferior para vaciarlo. Una vez que esté vacío, cierre la tapa.
Limpieza del filtro premotor ADVERTENCIA Para reducir el riesgo de descarga eléctrica, lleve el interruptor de encendido a la posición de apagado y desconecte el enchufe del tomacorriente antes de realizar mantenimiento o solucionar problemas en la unidad. ADVERTENCIA No use la aspiradora con filtros húmedos o mojados o si los filtros no están en su lugar. 2 1 Presione el botón de liberación del tanque y jale para retirar el tanque de suciedad. Retire el filtro de espuma de la tapa.
Reemplace el cepillo y la correa ADVERTENCIA Para reducir el riesgo de descarga eléctrica, lleve el interruptor de encendido a la posición de apagado y desconecte el enchufe del tomacorriente antes de realizar mantenimiento o solucionar problemas en la unidad. 2 1 Desenchufe la aspiradora, voltéela y desatornille los seis (6) tornillos con cabezal Phillips para retirar la cubierta inferior. Levante el cepillo en forma recta y sáquelo. Limpie los residuos del cepillo giratorio.
Solución de problemas ADVERTENCIA Para reducir el riesgo de descarga eléctrica, lleve el interruptor de encendido a la posición de apagado y desconecte el enchufe del tomacorriente antes de realizar mantenimiento o solucionar problemas en la unidad.
Garantía Esta garantía le otorga derechos legales específicos, pero podría tener también otros derechos que varían según el estado. Si necesita instrucciones adicionales con respecto a esta garantía o tiene preguntas sobre lo que esta cubre, póngase en contacto con Atención al Consumidor de BISSELL por correo electrónico, teléfono o correo regular, como se describe a continuación.
¡Registre su producto hoy! Registrarse es rápido, fácil y tiene beneficios para todo el período de vida útil del producto. Usted recibirá: Puntos de recompensa BISSELL Obtenga puntos de manera automática para descuentos y entregas a domicilio gratis en compras futuras. Servicio más rápido Si envía la información ahora, ahorrará tiempo por si necesita ponerse en contacto con nosotros con preguntas relacionadas con el producto.