CLEANVIEW® Vacuum ___________ USER GUIDE 2488, 2492, 2486 Series More of a video person? Look for this icon and go online for an instructional how-to video at www.BISSELL.
IMPORTANT SAFETY INSTRUCTIONS READ ALL INSTRUCTIONS BEFORE USING YOUR UPRIGHT VACUUM. Always connect to a polarized outlet (one slot is wider than the other). Unplug from outlet when not in use and before conducting maintenance. When using an electrical appliance, basic precautions should be observed, including the following: WARNING TO REDUCE THE RISK OF FIRE, ELECTRIC SHOCK OR INJURY: » Do not leave vacuum cleaner when it is plugged in. Unplug from outlet when not in use and before servicing.
Thanks for buying a BISSELL® vacuum! We love to clean and we’re excited to share one of our innovative products with you. This guide has important instructions on how your new vacuum works, including using, maintaining, and if there is a problem, troubleshooting. In just a few simple assembly steps, you’ll be ready to vacuum. Flip to page 5 and let’s get started! What’s In The Box? 1. 2. 3. 4. 5. 6. 7. 8. 1. Vacuum Base 2. Handle 3. Hose 4. 2 Screws (taped to Handle) 5. Lower Cord Wrap 6.
Product View WARNING Do not plug in your vacuum until you are familiar with all instructions and operating procedures. Handle TurboBrush® Tool Stretch Hose Tank Release Button Carry Handle Pre-Motor Filter Extension Wand (not shown) Dusting Brush Holder Dirt Tank Post-Motor Filter Recline Pedal Height Adjustment Power Pedal NOTE: The Crevice Tool is stored inside the Extension Wand. 4 www.BISSELL.
Assembly The only tool you will need to assemble your vacuum is a Phillips-head screwdriver. 1 Place the upper handle onto the base and push it down. Then attach the handle with the 2 screws taped to the handle in a plastic bag. 4 Wrap hose up and around the hose wrap on the handle. Slide end of hose into vacuum base. 2 3 Insert the lower cord wrap and turn it to the right to lock in place. 5 Insert the hose end into the back of the vacuum and twist right to lock in place.
Power ON & Settings 2 1 Press the red power button with your foot to turn the vacuum ON and once again to turn your vacuum OFF . 3 Press the recline pedal and pull handle back towards you. Turn the dial on the foot of the vacuum to the desired setting. If the dial is difficult to turn, tilt the vacuum back slightly to take the weight off the foot while turning. Lowest setting – For low pile carpet or bare floors. To pick up debris, it may be necessary to move up one setting.
Empty the Dirt Tank WARNING To reduce the risk of electric shock, turn power switch OFF and disconnect polarized plug from electrical outlet before performing maintenance or troubleshooting checks. 2 1 Empty once tank is full. 3 Hold the Dirt Tank over a trash container. Press the bottom release button to empty. Once empty, close the lid. 5 Clean cyclone with warm water and mild detergent. Let cyclone completely dry before replacing. To replace, fit into place and twist to the right.
Clean the Pre-Motor Filter WARNING »»To reduce the risk of electric shock, turn power switch OFF and disconnect plug from electrical outlet before performing maintenance or troubleshooting checks. »»Do not operate vacuum with damp or wet filters or without all filters in place. 1 Press the tank release button and pull out to remove Dirt Tank. 2 Remove foam filter from lid. Hand wash in warm water and rinse well; mild detergent may be used if desired.
Maintain the TurboBrush® Tool 1 3 2 Twist gray collar counter-clockwise, until slot appears, then separate faceplate. To reassemble, align two clips on each end of Paddle Wheel with Belt on and pop back into place. Place Brush Roll with belt back in. Faceplate will not close properly if all parts are not aligned correctly. Remove Brush Roll, Belt and Paddle Wheel. Inspect for damages and replace if necessary.
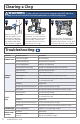
Clearing a Clog WARNING To reduce the risk of electric shock, turn power switch OFF and disconnect plug from electrical outlet before performing maintenance or troubleshooting checks. 2 1 Remove the hose from the back of the vacuum by twisting it to the left. Remove any debris that may have gotten clogged. 3 Check the foot hose on the back of your vacuum down towards the bottom. If necessary, remove the screw from the foot hose and check for clogs.
Warranty This warranty gives you specific legal rights, and you may also have other rights which may vary from state to state. If you need additional instruction regarding this warranty or have questions regarding what it may cover, please contact BISSELL Consumer Care by E-mail or telephone as described below. It may be necessary to obtain some of your personal information, such as a mailing address, to fulfill terms of this warranty.
Register your product today! Registering is quick, easy and offers you benefits over the lifetime of your product. You’ll receive: BISSELL® Rewards Points Automatically earn points for discounts and free shipping on future purchases. Faster Service Supplying your information now saves you time should you need to contact us with questions regarding your product. Product Support Reminders and Alerts We’ll contact you with any important product maintenance reminders and alerts.