CleanView® B A G L E S S USER’S GUIDE 3575/3593/6590/8975 SERIES 3 Safety Instructions 4 Product View 4-5 Assembly 6-8 Operations / Special Tools 8-11 12 13 13 14 15 Troubleshooting Replacement Parts Consumer Services Warranty Reorder Form Maintenance
Thanks for buying a BISSELL CleanView® We’re glad you purchased a BISSELL CleanView Vacuum. Everything we know about floor care went into the design and construction of this powerful, high-tech home vacuuming system. Your BISSELL CleanView is well made, and we back it with a limited comprehensive one-year warranty. We also stand behind it with a knowledgeable, dedicated Consumer Services department, so, should you ever have a problem, you’ll receive fast, considerate assistance.
IMPORTANT SAFETY INSTRUCTIONS Keep hair, loose clothing, fingers, and all parts of body away from openings and moving parts. ■ Turn off all controls before plugging or READ ALL INSTRUCTIONS unplugging vacuum cleaner. BEFORE USING YOUR ■ Use extra care when cleaning stairs. UPRIGHT VACUUM. ■ Do not pick up flammable materials (lighter Always connect to a polarized outlet (left slot is fluid, gasoline, kerosene, etc.) or use in the wider than right).
Hose Clip Stretch Hose Handle Quick Release Cord Wrap Carrying Handle Crevice Tool Quick Reach Handle Upper Tank Knob Power Switch Extension Wand Dusting Brush Louvers Hose Wand Hose Wand Base Power Cord Dirt Container CleanView Window Pre-Motor Filter Headlight Furniture Protection Guard Height Adjustment Knob Upper Tank Post-Motor Filter Optional Hepa Media Filter (Select Models Only) Lock ’n Seal™ Lever Handle Release Pedal Power Trak™ Power Trak™ Models Powerfoot C AUTION: Do not plug in y
How To Use This Guide This User’s Guide has been designed to help you get the most satisfaction from your BISSELL CleanView. You’ll find assembly and operating instructions, safety precautions, as well as maintenance and troubleshooting instructions. Please read this Guide thoroughly before assembling your vacuum cleaner. Pay particular attention to the product diagram, assembly instructions, and part names. Locate and organize all parts before assembly.
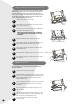
Attach Vacuum Hose and Tools Continued 4. 5. Slide the Extension Wand and the Crevice Tool together into the storage clip as shown. Slide the Dusting Brush Tool into the storage clip as shown. How To Use Your BISSELL CleanView Handle Positions Press the Handle Release Pedal with your foot to place your CleanView into one of three cleaning positions. 1. Upright- For storage and above floor cleaning with tools. 2. Normal Cleaning- Press Handle Release Pedal once.
Transporting Cleaner 1. To move your cleaner from room to room, put the Handle in the upright position, tilt the cleaner back on its rear wheels and push forward. 2. The cleaner can also be moved by using the Carrying Handle. Carrying Handle Special On-Board Tools Your BISSELL CleanView is not only a powerful carpet and rug vacuum cleaner, it’s also a versatile above floor vacuum cleaner when you select one of the special tools. 1.
Power Cord Storage When you are done using your BISSELL CleanView, return it to the Upright position and store the Power Cord. 1. Turn vacuum cleaner off. 2. Unplug Power Cord by grasping the polarized plug (NOT the cord) and disconnect from outlet. 3. Loop Power Cord around Cord Wraps on side of vacuum cleaner. 4. NOTICE: While vacuuming, certain carpets and low humidity conditions may generate small static discharges.
Cleaning The Upper Tank & Filter Use only BISSELL Replacement Filters in your BISSELL Cleanview. Upper Tank Filter 203-1085 Unplug the cleaner from electrical outlet. 1. 2. 3. 4. The Upper Tank Filter can be reached by removing the Dirt Container, reaching underneath the Upper Tank and turning the rim of the Filter Frame to unlock. Pull straight down to remove. Brush the dirt off the Louvers and Upper Tank Filter.
Check Rotating Floor Brush and Drive Belt You should check your vacuum cleaner’s Rotating Floor Brush and Drive Belt regularly for wear or damage. You should also clean the brush and brush ends of strings, hair, and carpet fibers. These can wrap around the brush and hamper its ability to effectively clean your carpet. Also remove any debris that has accumulated under the brush cover. 1. 2. 3. 4. Unplug cleaner from electrical outlet.
Replace Lightbulb Use only BISSELL Replacement Bulb (#203-1007) in your BISSELL CleanView. 1. 2. 3. 4. Unplug cleaner from electrical outlet Using a screwdriver, remove the two screws as shown and lift off the lens. Remove the bulb from the socket by pushing in gently and turning it counterclockwise. Install the new bulb by pushing it gently into the socket and turning clockwise. Reposition lens and secure with the two screws.
Troubleshooting Vacuum cleaner won't run. Possible Causes 1 2 Remedies Power cord not firmly plugged in Blown household fuse or breaker 1 2 Check electrical plug Check/replace fuse - Reset breaker Vacuum cleaner won't pick up dirt.
Replacement Parts – BISSELL CleanView Series You may purchase replacement parts from your retailer, by using the order form in this User’s Guide, by calling BISSELL Consumer Services or by visiting our website. To locate a retailer near you, or to place an order using Visa, MasterCard, Discover or American Express, call 1 2 3 4 5 6/7/8 9 10 11 12 13 14 BISSELL Consumer Services 1-800-237-7691 Monday - Friday 8 a.m. — 10 p.m. ET Saturday 9 a.m. — 8 p.m. ET Or visit our Website - www.bissell.
Warranty This warranty gives you specific legal rights, and you may also have other rights which may vary from state to state. If you need additional instruction regarding this warranty or have questions regarding what it may cover, please contact BISSELL Consumer Services by E-mail, telephone, or regular mail as described below. Limited One Year Warranty Subject to the *EXCEPTIONS AND EXCLUSIONS identified below, upon receipt of the product BISSELL Homecare, Inc.
BISSELL CleanView Order Form Order Information 1 3 Item Part No. Part Name Qty. 1 32074 Style 7 Drive Belt (2 pack) ______ $2.99 ______ ______ 2 203-1007 Headlight Bulb ______ $1.95 ______ ______ 3 203-1063 Crevice Tool ______ $2.99 ______ ______ 4 203-1083 Dusting Brush ______ $1.70 ______ ______ 5 203-1084 Extension Wand ______ $1.50 ______ ______ 6 203-1164 Vacuum Hose ______ $8.95 ______ ______ 7 203-1036 Wire Reinforced Vacuum Hose Gray ______ $12.