USER'S GUIDE 14U6, 37Y8 SERIES 220-240V 2 Thank You 3 Safety Instructions 4 Product View 5 Assembly 6-10 Operations 11 Maintenance and Care 12 Troubleshooting 13 Replacement Parts 14 Accessories 15 Warranty 16 Consumer Services
Thanks for buying a BISSELL CleanView® Reach We’re glad you purchased a BISSELL CleanView® Reach. Everything we know about floor care went into the design and construction of this complete, high-tech home cleaning system. Your BISSELL CleanView® Reach is well made, and we back it with a limited two year warranty. We also stand behind it with a knowledgeable, dedicated Consumer Services department, so, should you ever have a problem, you’ll receive fast, considerate assistance.
IMPORTANT SAFETY INSTRUCTIONS When using an electrical appliance, basic precautions should be observed, including the following: Read all instructions before using your deep cleaner. Always connect to a properly Earthed outlet. Unplug from outlet when not in use and before conducting maintenance or troubleshooting.
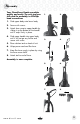
Product view Spray Trigger Quick Release Cord Wrap Tough Stain Tool Handle Assembly Hose Wrap Power Cord Hose Upper Body Collection Tank Vent Cover ( Foam Filter) Removable Nozzle Collection Tank Latch Warning: To reduce the risk of fire and electric shock due to internal component damage, use only BISSELL cleaning formulas intended for use with the deep cleaner.
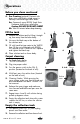
Assembly Your CleanView® Reach assembles quickly and easily. The only tool you will need for assembly is a Phillips head screwdriver. 1. 2. 3. 4. 5. 6. 7. 8. 1. Slide upper body onto lower body. 2. Secure with screws. 3. Attach hose wrap to upper handle by sliding it up the bottom of the handle until it snaps firmly in place. 4. Slide upper handle into upper body, until it will not go any further and secure with screw. 5. Place solution tank on back of unit. 6. Wrap power cord and flex hose. 7.
Operations Special features Your BISSELL CleanView® Reach is a home cleaning system that uses a combination of hand hot tap water, BISSELL cleaning formula, brush agitation and suction to safely clean carpets. DirtLifter™ Powerbrush The DirtLifter PowerBrush is designed to enhance cleaning performance. The bristle pattern safely lifts out the deep down dirt while gently grooming carpet fibers. The floating suspension self-adjusts to all carpet heights.
Operations Before you clean continued 4. Pre-Treating (optional) Pre-treat stubborn stains and highly soiled carpet in hallways and other high-traffic areas. 4a. Generously spray BISSELL Tough Stain Precleaner evenly over soiled area. Caution: DO NOT OVER WET CARPET 4b. Wait 3-5 minutes before deep cleaning. Fill the tank 1. 1. Remove the solution tank by lifting it straight up, then away from the lower body. 2. 2. Unscrew the black cap at the bottom of the solution tank. 3.
Operations Empty the collection tank continued 2a. Release collection tank latches (on each side) by pulling up from the bottom 2a. of latch and then out. 2b. 2b. Carefully remove the top of the tank by lifting up on the tank handle. 3. Carry collection tank to a toilet or sink. To empty, pour out contents using opening at back of tank. 4. Rinse collection tank thoroughly and replace 3. on unit. 5. Refill solution tank and continue cleaning.
Operations Cleaning with Attachments continued 6. Clean by pressing the spray trigger to spray solution onto the area to be cleaned. Slowly move the tool back and forth over the soiled surface. Release the spray trigger to suction dirty water. Continue to clean in the area, working in small sections, until dirt is removed. Caution: Do Not Overwet. 7. When finished cleaning, remove and rinse tool(s) in clean, running water. 8. It is recommended that you suction clean water from a bowl to rinse out the hose.
Operations Hard floor cleaning (Select models only) 1. Remove the collection tank (refer to steps 2a and 2b on page 8). 2. 4. 2. Attach the hard floor tool by hooking it into the front of the removable nozzle and rotate until it snaps firmly in place. 3. Replace the collection tank. Be sure to attach the two latches. WARNING: 4. Fill the solution tank with warm tap water to the WATER fill line. Fill the rest with BISSELL 2X Hard Floor Solutions™ to FORMULA fill line.
Maintenance and care Machine storage For best results, a few simple steps can assure your machine is well maintained after your cleaning is complete. 1. Wrap power cord around Quick Release Cord Wrap™ on side of the machine. 2. Wipe all surfaces with a soft cloth. Store cleaner upright in a protected, dry area. NOTE: You may have cleaning solution remaining in the solution tank. You may store your machine this way for the next cleaning task, but never keep dirty water in the collection tank.
Troubleshooting Reduced Spray OR No Spray in Upright Mode Possible causes Remedies 1. Solution tank empty 1. Refill tank with water and formula 2. Lint screen on solution tank cap clogged 2. Soak solution tank cap in warm water and then rinse under running water Reduce Spray or No Spray Attachment Possible causes Remedies 1. Solution tank empty 1. Refill tank with water and formula 2. Spray nozzle clogged 2. Clean spray nozzle by rinsing tool under water 3. Pump needs priming 3.
Replacement parts Below please find a list of common replacement parts. While not all of these parts may have come with your specific machine, all are available to you for purchase, if desired. Item 1 2 3 4 5 6 7 8 9 10 Part No.
Accessories and formula Item Part No. Part Name 1 203-6651 2 203-6652 3 203-6653 4 203-6654 5 203-6655 6 203-8113 7 203-5548 8 81L5-E 9 66W9-E 10 92F4-E 11 12W4-E 12 33D2-E 13 56L9-E 14 0400-E *Not all parts are 3” Tough Stain Tool Powered TurboBrush™ Hand Tool 4” Upholstery Tool 6” Stair Tool Spraying Crevice Tool Deep Reach™ Tool Hard Floor Tool, 1.5 L 2X Wash & Protect Professional Formula w/ Scotchgard™ Protector 1.5 L 2X Wash & Protect Pet Stain & Odour Formula w/ Scotchgard™ Protector 1.
Warranty - BISSELL CleanView® Reach This warranty gives you specific legal rights, and you may also have other rights which may vary from country to country. If you need additional instruction regarding this warranty or have questions regarding what it may cover, please contact BISSELL Consumer Services by telephone, or regular post as described below, or contact your local in country distributor. Limited Two Year Warranty Subject to the *EXCEPTIONS AND EXCLUSIONS identified below, BISSELL Homecare, Inc.
BISSELL consumer services If your BISSELL product should require service: Call BISSELL Consumer Services at the numbers below and we will give you the location of a BISSELL Authorized Service Center in your area. If you have questions about your warranty or need replacement parts please contact the numbers below. For UK inquiries: Monday - Thursday 9 am — 5 pm Friday 9 am — 4 pm BISSELL Homecare (Overseas) Inc.