USER'S GUIDE 48F3 SERIES 220-240V 2 Thank You 3 Safety Instructions 4-5 6 6-12 13-15 Product View Assembly Operations Maintenance and Care 16 Troubleshooting 17 Replacement Parts 18 Accessories 19 Warranty 20 Consumer Services
Thanks for buying a BISSELL Deep Cleaner Thanks for buying a BISSELL Big Green deep cleaning machine. Everything we know about floor care went into the design and construction of this complete, high-tech home cleaning system. Your BISSELL Big Green deep cleaning machine is well made, and we back it with a limited one year warranty. We also stand behind it with a knowledgeable, dedicated Consumer Services department, so, should you ever have a problem, you’ll receive fast, considerate assistance.
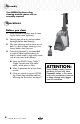
IMPORTANT SAFETY INSTRUCTIONS When using an electrical appliance, basic precautions should be observed, including the following: WARNING Read all instructions before using your Big Green Deep Cleaning Machine. WARNING: To reduce the risk of fire, electric shock, or injury: Operators shall be adequately instructed on the use of the machine. This machine is not suitable for picking up hazardous dust. This machine shall be stored indoors only.
Product view Spray Trigger Power Cord Adjustable Handle Tank Carry Handle Hose Latch Flow Indicator Solution Hose Connection Dirty Water Tank Front Carry Handle 4 www.bissell.
Product view Spray Trigger Power Switch Timer Upper Handle Release Back Carry Handle Handle Detent WARNING: To reduce the risk of fire and electric shock due to internal component damage, use only BISSELL cleaning fluids intended for use with the deep cleaner. Non-BISSELL cleaning solutions may harm the machine and void the warranty. Cleaning fluid Keep plenty of genuine BISSELL 2X formula on hand so you can clean and protect whenever it fits your schedule.
Assembly Your BISSELL Big Green deep cleaning machine comes with no assembly required! Operations Before you clean 1. Move furniture to another area if cleaning the entire room (optional.) 2. Vacuum area with a dry vacuum cleaner thoroughly before deep cleaning. 3. Plan your cleaning route to leave an exit path. It is best to begin cleaning in the corner farthest from your exit. 4.
Operations Carpet cleaning 1. 1. 2. 2A. 1. Remove dirty water tank. Pull dirty water tank handle to upright position and lift up to remove dirty water tank. 2. Lift clean water/solution tank from the base of machine. A. Unscrew cap on top of the clean water tank. Fill tank to FILL line with clean, hand hot tap water. B. Measure BISSELL formula using cap on tank. Fill cap to line twice for each full tank of water.
Operations Carpet cleaning continued 7. Cleaning strokes. Release the trigger and make one slow forward and backward pass over the same area to remove any residual dirty water and aid in drying. Repeat cleaning passes until solution being pulled up appears clean. Continue passes without pressing the trigger until you can’t see any more water being pulled up. 8. Remove the dirty water tank by pulling the handle to the upright position and lift up.
Operations Cleaning with attachments 2. Fill the clean water/solution tank. Lift clean water/solution tank from the base of machine. A. Unscrew cap on top of the clean water/solution tank. Fill tank to FILL line with clean, hand hot tap water. B. Measure BISSELL formula using cap on tank. Fill cap to line twice for each full tank of water. Always use genuine BISSELL formulas to maximize cleaning and for the safety of your machine. C.
Operations Cleaning with attachments continued 3. Attach Hose A. Connect solution hose to the hose connection point on unit, next to flow indicator. Insert hose and turn clockwise until locked into place. B. Open hose latch on the front of the unit and insert hose into place. Turn clockwise until locked into place. 3A. 4. Attach the cleaning tool to the end of the 3B. hose. 5. Clean by pressing the red trigger to spray solution onto the area to be cleaned.
Operations Cleaning with Oxy Gen2™ tool Select models only 1. Follow instruction on page 10 to attach hose to machine. 2. To pretreat heavy traffic areas: A. Pour Oxy GEN2 formula into the Oxy GEN2 Tool and attach tool to your machine’s hose. B. Hold tool 2-4 inches above the floor and press red trigger to spray onto carpet. C. Wait for 3-5 minutes then clean as normal using your machine 3. To use as a spot and stain tool on carpet: A.
Operations Stain Removal Do Not Delay! Attending to an accident soon after it occurs ensures the most optimal clean. Leaving it for an extended period of time may cause it to set and become permanent 1. Blot up liquids with an absorbent cloth or paper towels. White materials are recommended because certain dyes may bleed and make the stain worse. 2. Gently scrape up any semi-solids with a spoon or spatula. Do not use a knife or other utensil with sharp edges because it could damage the carpet or upholstery.
Maintenance and care Machine storage Once your cleaning is complete, make sure both the dirty and clean water/ solution tanks are emptied, rinsed out and dried before the next use. Note: Store cleaner in a protected, dry area. Since this product uses water, it must not be stored where there is a danger of freezing. Freezing will damage internal components and void the warranty. Machine care For best results, a few simple steps can assure your machine is well maintained after your cleaning is complete 1.
Maintenance and care Belt removal and replacement WARNING: To reduce the risk of fire, electric 1. Turn off the machine and unplug it from the outlet. shock, or injury,turn power OFF and disconnect plug from electrical outlet before performing maintenance or troubleshooting. 2. Remove the dirty and clean water/solution tanks from the base of the machine. 3. While standing behind the unit, lay the unit on its’ side (cord side up) 3. 4.
Maintenance and care 3. Brush removal and replacement 1. Turn OFF (0) the machine and unplug from the outlet. 2. Remove the dirty and clean water/solution tanks from the base of the machine. 4. 3. While standing behind the unit, lay the unit on its’ side (cord side down). 4. Looking at the bottom of the unit, find the center of the brush carriage where the carriage latch is located. It is between the brush assembly and wheels. 5. Pull the brush carriage towards you with one hand until it stops.
Troubleshooting WARNING: To reduce the risk of fire, electric shock, or injury,turn power OFF and disconnect plug from electrical outlet before performing maintenance or troubleshooting. Reduce Spray or No Spray Possible causes Remedies 1. Water tank may be empty 1. Fill clean water/solution tank with hand hot tap water 2. Tank may not be seated completely 2. Turn power OFF (0). Remove and reseat tank. 3. Pump may have lost prime. 3. Turn power OFF (0) and then back ON (I).
Replacement parts Item 1 2 3 4 5 6 7 8 9 10 Part No. Part Name 203-7443 Hose assembly 203-7451 Float 203-7452 Dirty tank bottom 203-7449 Dirty tank lid with handle 203-7454 Clean tank assembly 203-7455 Clean tank cap assembly 203-7457 Nozzle assembly 203-7458 Brush 203-7459 Brush endcap 203-7460 Belt 1 2 3 4 5 6 7 8 9 10 www.bissell.
Accessories While all of these accessories may not have come with your model, they are all avaiable for purchase. Item Part No. Part Name 1 2 3 6 7 8/9 14/15 16 17 1 203-6651 3” Tough Stain Tool 2 203-6652 Powered TurboBrush™ Hand Tool 3 203-6653 4” Upholstery Tool 4 203-6654 6" Stair Tool 5 203-6655 Spraying Crevice Tool 6 203-0116 2-in-1 Crevice Tool 7 203-7240 Oxy Gen2 Tool 8 82M1-E 946 mL BISSELL 2X Advanced Deep Cleaning Formula with Scotchgard™ Protection 9 82M2-E 1.
Warranty - BISSELL Big Green deep cleaning machine This warranty gives you specific legal rights, and you may also have other rights which may vary from country to country. If you need additional instruction regarding this warranty or have questions regarding what it may cover, please contact BISSELL Consumer Services by E-mail, telephone, regular mail as described below, or contact your local in country distributor.
BISSELL consumer services For information about repairs or replacement parts, or questions about your warranty, call: BISSELL Consumer Services Or visit the BISSELL website - www.bissell.com For UK inquiries: Monday - Friday 9:00 am — 7:30 pm Saturday 9:00 am — 6:00 pm Sunday 10:00 am — 4:00 pm BISSELL Homecare (Overseas) Inc. Ground Floor 226 Berwick Avenue Slough Berkshire, SL1 4QT United Kingdom Telephone: 0844-888-0870 For all other inquiries: Monday - Friday 8 am — 4 pm BISSELL Homecare, Inc.