Earn BISSELL Rewards! Register your product today! See details on back page USER'S GUIDE 86T3 & 40M1 SERIES 2 Thank You 3 Safety Instructions 4-5 6 6-12 13-15 Product View Assembly Operations Maintenance and Care 16 Troubleshooting 17 Replacement Parts 18 Accessories 19 Warranty 20 Product Registration 20 Consumer Services
Thanks for buying a BISSELL Deep Cleaner Thanks for buying a BISSELL Big Green Clean Machine. We’re glad you purchased a BISSELL deep cleaner. Everything we know about floor care went into the design and construction of this complete, high-tech home cleaning system. Your BISSELL Big Green Clean Machine is well made, and we back it with a limited five year warranty.
IMPORTANT SAFETY INSTRUCTIONS When using an electrical appliance, basic precautions should be observed, including the following: Read all instructions before using your Big Green Clean Machine. WARNING: To reduce the risk of fire, electric shock, or injury: ■ ■ ■ ■ ■ ■ ■ ■ ■ ■ ■ ■ ■ ■ ■ ■ ■ ■ ■ ■ ■ ■ ■ ■ ■ ■ ■ ■ ■ Do not immerse. Use only on surfaces moistened by cleaning process. Always connect to a properly grounded outlet. See Grounding Instructions.
Product view Spray Trigger Power Cord Adjustable Handle Tank Carry Handle Hose Latch Flow Indicator Solution Hose Connection Dirty Water Tank Clean Water Tank Front Carry Handle 4 www.bissell.com 800.237.
Product view Spray Trigger Power Switch Upper Handle Release Back Carry Handle Handle Detent WARNING: To reduce the risk of fire and electric shock due to internal component damage, use only BISSELL cleaning fluids intended for use with the deep cleaner. Non-BISSELL cleaning solutions may harm the machine and void the warranty. Cleaning fluid Keep plenty of genuine BISSELL 2X formula on hand so you can clean and protect whenever it fits your schedule. Always use genuine BISSELL deep cleaning formulas.
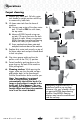
Assembly Your BISSELL Big Green Clean Machine comes with no assembly required! Operations Before you clean 1. Move furniture to another area if cleaning the entire room (optional.) 2. Vacuum area with a dry vacuum cleaner thoroughly before deep cleaning. 3. Plan your cleaning route to leave an exit path. It is best to begin cleaning in the corner farthest from your exit. 4.
Operations Carpet cleaning 1. 1. 2. 2A. 1. Remove dirty water tank. Pull dirty water tank handle to upright position and lift up to remove dirty water tank. 2. Lift clean water tank from the base of machine. A. Unscrew cap on top of the clean water tank. Fill tank to FILL line with clean, hot tap water. B. Measure BISSELL formula using cap on tank. Fill cap to line twice for each full tank of water. Always use genuine BISSELL formulas to maximize cleaning and for the safety of your machine C.
Operations Carpet cleaning continued 7. Cleaning strokes. Release the trigger and make one slow forward and backward pass over the same area to remove any residual dirty water and aid in drying. Repeat cleaning passes until solution being pulled up appears clean. Continue passes without pressing the trigger until you can’t see any more water being pulled up. 8. Remove the dirty water tank by pulling the handle to the upright position and lift up.
Operations Cleaning with attachments 2. Fill the clean water tank. Lift clean water tank from the base of machine. A. Unscrew cap on top of the clean water tank. Fill tank to FILL line with clean, hot tap water. B. Measure BISSELL formula using cap on tank. Fill cap to line twice for each full tank of water. Always use genuine BISSELL formulas to maximize cleaning and for the safety of your machine. C. Screw cap back onto clean water tank and place tank onto base of the machine. www.bissell.
Operations Cleaning with attachments continued 3. Attach Hose A. Connect solution hose to the hose connection point on unit, next to flow indicator. Insert hose and turn clockwise until locked into place. B. Open hose latch on the front of the unit and insert hose into place. Turn clockwise until locked into place. 3A. 4. Attach the cleaning tool to the end of the 3B. hose. 5. Clean by pressing the red trigger to spray solution onto the area to be cleaned.
Operations Cleaning with Oxy Gen2 tool Select models only 1. Follow instruction on page 10 to attach hose to machine. 2. To pretreat heavy traffic areas: A. Pour Oxy GEN2 formula into the Oxy GEN2 Tool and attach tool to your machine’s hose. B. Hold tool 2-4 inches above the floor and press red trigger to spray onto carpet. C. Wait for 3-5 minutes then clean as normal using your machine 3. To use as a spot and stain tool on carpet: A.
Operations Stain Removal Do Not Delay! Attending to an accident soon after it occurs ensures the most optimal clean. Leaving it for an extended period of time may cause it to set and become permanent 1. Blot up liquids with an absorbent cloth or paper towels. White materials are recommended because certain dyes may bleed and make the stain worse. 2. Gently scrape up any semi-solids with a spoon or spatula. Do not use a knife or other utensil with sharp edges because it could damage the carpet or upholstery.
Maintenance and care Machine storage Once your cleaning is complete, make sure both the dirty and clean water tanks are emptied, rinsed out and dried before the next use. Note: Store cleaner in a protected, dry area. Since this product uses water, it must not be stored where there is a danger of freezing. Freezing will damage internal components and void the warranty. Machine care For best results, a few simple steps can assure your machine is well maintained after your cleaning is complete 1.
Maintenance and care Belt removal and replacement WARNING: To reduce the risk of fire, electric 1. Turn off the machine and unplug it from the outlet. shock, or injury,turn power OFF and disconnect plug from electrical outlet before performing maintenance or troubleshooting. 2. Remove the dirty and clean water tanks from the base of the machine. 3. While standing behind the unit, lay the unit on its’ side (cord side up) 3. 4.
Maintenance and care 3. Brush removal and replacement 1. Turn OFF (0) the machine and unplug from the outlet. 2. Remove the dirty and clean water tanks from the base of the machine. 4. 3. While standing behind the unit, lay the unit on its’ side (cord side down). 4. Looking at the bottom of the unit, find the center of the brush carriage where the carriage latch is located. It is between the brush assembly and wheels. 5. Pull the brush carriage towards you with one hand until it stops.
Troubleshooting Reduce Spray or No Spray Possible causes WARNING: To reduce the risk of fire, electric shock, or injury,turn power OFF and disconnect plug from electrical outlet before performing maintenance or troubleshooting. Remedies 1. Water tank may be empty 1. Fill clean tank with hot tap water 2. Tank may not be seated completely 2. Turn power OFF (0). Remove and reseat tank. 3. Pump may have lost prime. 3. Turn power OFF (0) and then back ON (I). Wait one minute, then depress trigger 4.
Replacement parts - BISSELL Big Green Clean Machine Item 1 2 3 4 5 6 7 8 9 10 11 Part No. Part Name 203-7443 Hose assembly 203-7451 Float 203-7452 Dirty tank assembly 203-7453 Dirty tank gasket 203-7454 Clean tank assembly 120-7455 Clean tank cap assembly 203-7456 Nozzle gasket 203-7457 Nozzle assembly 203-7458 Brush 120-7455 Brush endcap 203-7460 Belt 1 2 3 4 5 6 7 8 9 10 11 www.bissell.com 800.237.
Accessories Item Part No. Part Name 1 2 3 4 5 6 7 8 9 10 11 12 13 1 203-6651 3” Tough Stain Tool 2 203-6652 Powered TurboBrush® Hand Tool 3 203-6653 4” Upholstery Tool 4 203-6654 6" Stair Tool 5 203-6655 Spraying Crevice Tool 6 203-6655 2-in-1 Crevice Tool 7 203-7240 Oxy Gen2 Tool 8 62E5 2X Fiber Cleansing Formula with Scotchgard™ Protection 24 oz. 9 99K5 2X Pet Stain and Odor Removal Formula with Scotchgard™ Proection 24 oz.
Warranty - BISSELL Big Green Clean Machine This warranty gives you specific legal rights, and you may also have other rights which may vary from state to state. If you need additional instruction regarding this warranty or have questions regarding what it may cover, please contact BISSELL Consumer Services by E-mail, telephone, or regular mail as described below. Limited Five Year Warranty Subject to the *EXCEPTIONS AND EXCLUSIONS identified below, upon receipt of the product BISSELL Homecare, Inc.
Don't forget to register your product! Registering is quick, easy and offers you benefits over the lifetime of your product. You’ll receive: BISSELL Rewards Points Automatically earn points for discounts and free shipping on future purchases. Faster Service Supplying your information now saves you time should you need to contact us with questions regarding your product. Product Support Reminders and Alerts We’ll contact you with any important product maintenance reminders and alerts.