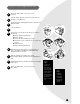
ProHeat ™ ClearView® USER’S GUIDE 1699 SERIES - 120V 8905 SERIES - 120V 3 Safety Instructions 4 5 6-17 18-20 21-22 22 23 24 Product view / Accessories Assembly Features / Operations Routine Maintenance Troubleshooting Consumer Services Replacement Parts Warranty
Thanks for buying a BISSELL ProHeat ™ ClearView ® We’re glad you purchased a BISSELL ProHeat ClearView heated formula deep cleaner. Everything we know about floor care went into the design and construction of this complete, high-tech home cleaning system. Your ProHeat ClearView is well made, and we back it with a limited one-year warranty. We also stand behind it with a knowledgeable, dedicated Consumer Services department, so, should you ever have a problem, you’ll receive fast, considerate assistance.
IMPORTANT SAFETY INSTRUCTIONS When using an electrical appliance, basic precautions should be observed, including the following: Read all instructions before using your PROHEAT™ CLEARVIEW.™ WARNING: To reduce the risk of fire, electric shock, or injury: ■ Do not immerse. ■ Use only on surfaces moistened by cleaning process. ■ Always connect to a properly grounded outlet. ■ See Grounding Instructions. ■ Unplug from outlet when not in use and before conducting maintenance or troubleshooting.
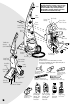
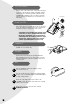
Keep plenty of genuine BISSELL Advanced Cleaning Formulas on hand so you can clean whenever it fits your schedule. Always use genuine BISSELL deep cleaning formulas. Non-BISSELL cleaning solutions may harm the machine and void the warranty. Trigger Upper Handle Crevice Tool Storage 3. Tool Caddy Power Cord Quick Release Power Switch SmartTemp™ Switch Tough Stain Brush Storage Tank-inTank™ 2. 4. Hex Nuts TurboBrush® Storage (Select Models) 5. Handle Release 1.
How to Use this Guide This User’s Guide has been designed to help you get the utmost satisfaction from your BISSELL ProHeat ClearView. You’ll find assembly and operating instructions, safety precautions, as well as maintenance and troubleshooting instructions. Please read this Guide thoroughly before assembling your Deep Cleaner. Pay particular attention to the product diagram, assembly instructions, and part names. Locate and organize all parts before assembly.
Special Features of Your BISSELL ProHeat™ ClearView® The BISSELL SmartClean® System The ProHeat ClearView is a home cleaning system that automatically mixes hot tap water with the BISSELL advanced cleaning formula and heats the solution as it is applied to the carpet. The combination of heated cleaning solution, powered brush and suction provide a safe & effective method of cleaning.
SmartMix Continued 4. Replace SmartMix concentrate bottle. O-ring Position Note: If bottle leaks, check for proper positioning of o-ring and straw. Choose the SmartMix setting that fits the cleaning job. Water Rinse - use for gentle cleaning or for the final rinse after cleaning. When filling bottle or storing unit, set dial to: SmartMix Dial Normal- automatically provides the best mix of water and concentrate for most cleaning jobs.
Tank-in-Tank Our Tank-in-Tank system is designed with a Bladder inside for clean water. As you clean, the Bladder will empty. Dirty water collects in the tank outside the Bladder. 1. Step on handle release to lay the machine handle down out of the way. 2. Lift the Tank-in-Tank handle. The handle locks the lid in place. 3. Carry it like a bucket to fill at the sink.
When It’s Time to Empty Tank-in-Tank 1. 2. 3. Remove the Tank-in-Tank – follow steps 1 and 2 on page 8. Carry the Tank-in-Tank, like a bucket, to the sink where you will dispose of the dirty water. Remove Tank Lid by rotating handle forward to unlatch lid and lifting lid off tank. Pour out 3 Rotate Handle to 4 dirty water Unlatch Pour out dirty water. 4. 5. 6. After each use, remove and rinse the lint screen located on the Tank Lid. A. Remove Tank Assembly from unit. B. Remove Tank Lid. C.
The Flow Indicator This is located on the machine base. It spins when the trigger is pressed to indicate that the machine is applying cleaning solution to the floor. It will stop spinning to indicate that the SmartMix bottle or Bladder needs to be refilled, or when the trigger is released. Flow Indicator does not spin when set to Tool setting. Flow Indicator ReadyTools Dial This provides above floor cleaning with the flip of a switch.
When You’re Done 1. Disconnect the TurboBrush from the flex hose by pushing down on the button lock and pulling straight off. 2. Once removed from the Flex Hose, the TurboBrush can be cleaned. A Move the switch to the “SUCTION” position. B Rinse under running water. C Check spray nozzle for dirt. If necessary, clean with a soft bristle brush. D Replace TurboBrush in the special storage location on the handle front. (on select models only) Operations Before You Clean Carpets 1.
PreTreating Pretreating is recommended to improve cleaning effectiveness for heavily soiled carpet in high traffic areas such as entryways and hallways: 1. 2. Set the SmartMix dial to High Traffic. Set ReadyTools dial to PreTreat. 3. Plug into a proper outlet and turn on both the Power and Smart Temp Switches. 4. While pressing the trigger slowly make several passes over the area to be cleaned. Caution Do not overwet. 5.
Stain Removal Do Not Delay! Failure to attend to an accident soon after it occurs may cause it to set and become permanent. Before treating any stain, follow these pre-treatment steps: Blot up liquids with an absorbent cloth or paper towels. White materials are recommended because certain dyes may bleed and make the stain worse. 1. 2. Gently scrape up semi-solids with a spoon or spatula. Do not use a knife or other utensil with sharp edges because it could damage the carpet or upholstery. 3.
How to Clean Upholstery and Small Areas Important - Check Upholstery Tags: 1. 2. 4. 5. 14 Check for colorfastness in an inconspicuous place. If possible, check upholstery stuffing. Colored stuffing may bleed through fabric when wet. h bv g kvh gh j j h d b g fd hn l kl sd jkn f h Ad bj jh b j cv ghh gc 3. Check manufacturer’s tag before cleaning. “W” or “WS” on the tag means you can use your ProHeat ClearView.
Machine Preparation 1. Set up the machine following instructions in the Features section, pages 6-11. 2. Use BISSELL Advanced Cleaning Formulas in SmartMix tank. 3. Set the ReadyTools dial to Tools or PreTreat. 4. Set SmartMix Dial to Normal. * SmartTemp heats the cleaning solution for carpet and bare floor application only. It does not heat solution sprayed through the accessory tools.
Cleaning Bare Floors The Bare Floor Tool is included in select models only. If your ProHeat CleaView did not come so equipped, you may contact BISSELL Consumer Services at www.bissell.com or 1-800-237-761 to order one. The Bare Floor Tool provides effective cleaning for linoleum, vinyl, and tile floors. Caution: Do not use on hardwood floors. 1. 2. 3. 4. 5. Use BISSELL Floor Cleansing Formula. Vacuum or sweep thoroughly to pick up loose debris and pet hair.
Cleaning Bare Floors Continued Machine Preparation Set up machine following instructions in the Features section, pages 6-11. Be sure to thoroughly rinse out any remaining Fiber Cleansing Formula from the SmartMix bottle to prevent slippery linoleum, vinyl, and tile floors. Use BISSELL Floor Cleansing Formula in the SmartMix tank. 1. Check ReadyTools Dial - it should be set on Floor Cleaning. 2. When filling bottle or storing unit, set Choose the SmartMix setting to match the cleaning job. 3.
Routine Maintenance 1. Turn Power and SmartTemp switches OFF. WARNING: To reduce the risk of fire, 2. Unplug power cord from the outlet and coil around Power Cord Quick Release. 3. Remove and rinse tools in clean, running water, dry and replace in the Tool Caddy. 4. electric shock or injury unplug from outlet before servicing. Tip: SmartMix Bottle may be stored with concentrate ready for your next cleaning job. Make sure dial is turned to the Water Rinse Setting when storing.
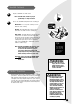
Pump Belt Replacement To Remove Broken Pump Belt 1. Turn the machine off and unplug from the wall outlet. 2. Step on the release pedal and recline the handle down onto floor (see illustration). 3. Remove Tank-In-Tank and SmartMix tanks. Set them aside (see illustration). 2 3a 4. 5. Remove Belt Access Door located near the Floor Cleaning/ Tools switch by inserting a flat head screwdriver into the slot nearest to the handle and gently prying the access door off (see illustration).
1 To Install the Replacement Pump Belt 1. 2. With the unit still on its side, loop one end of the replacement pump belt around the red pump pulley and then the other end around the silver motor shaft (see illustration). Do not twist the replacement pump belt. Re-install the toothed brush belt first onto the red pump pulley and then onto the toothed end of the brush (see illustration). 3 2 3. 4. Re-install the brush into the base of unit.
Troubleshooting SmartTemp Ready Light does not illuminate. Possible Causes WARNING: To reduce the risk of fire, electric shock or injury unplug from outlet before servicing. The SmartTemp switch is not turned ON. Remedies Turn on the SmartTemp switch. The machine Power Switch is not turned ON. Reduced spray or no spray Both switches must be ON to activate the SmartTemp Ready Light. Possible Causes Remedies Bladder may be empty. Refill tank with hot tap water. SmartMix bottle may be empty.
Troubleshooting Continued Cleaner not picking up solution. Possible Causes Remedies Ready Tools dial may be at the wrong setting for the cleaning job. Set ReadyTools dial to either Tools or PreTreat or Floor Cleaning. Nozzle Window may not be properly attached. Press down firmly on the black oval gasket at the top window to make sure the two tabs on the back of the Nozzle Window are snapped into the mating slots in the main housing. Re-install lid; refer to the Features section.
Replacement parts - BISSELL ProHeat ClearView Item Part No.
About Your Warranty If you need additional instruction regarding this warranty or have questions regarding what it may cover, please contact BISSELL Customer Service by e-mail, telephone, or regular mail as described below. Limited One Year Warranty Subject to the *EXCEPTIONS AND EXCLUSIONS identified below, upon receipt of the product BISSELL Ltd.