מדריך למשתמש דגם 220 – 240 44L6וולט 2 תודה 3 הוראות בטיחות 4 מראה המוצר 5 הרכבה 11-6 הפעלה 12 תחזוקה וטיפול 13 פתרון בעיות 14 חלקי חילוף 14 אביזרים 15 אחריות 16 שירות לקוחות
אנו מודים לכם על שקניתם CleanView PowerBrushשל BISSELL אנו שמחים שרכשתם CleanView PowerBrushשל .BISSELLבתכנון המערכת עתירת הטכנולוגיה והמושלמת הזו לניקוי הבית כללנו את כל הידע שלנו בנושא טיפול ברצפות. מכשיר CleanView PowerBrushשל BISSELLבנוי היטב ,ואנו מגבים אותו בשנת אחריות של חברת אלקטרה מוצרי צריכה ( )1951בע"מ .,לה מחלקת שירות לקוחות ייעודית ובעלת ידע ,כך שאם אי פעם תיתקלו בבעיות ,תקבלו סיוע מהיר ומקצועי. הסבא רבא שלי המציא את מטאטא הרצפות בשנת .
הוראות בטיחות חשובות בעת שימוש במכשיר חשמלי ,יש להקפיד על אמצעי זהירות בסיסיים ,ובכלל זה: ■ יש לקרוא את כל ההוראות לפני תחילת השימוש במכשיר שלכם. ■ חברו תמיד לשקע הארקה תקני .נתקו את המכשיר מהחשמל אם אינו בשימוש ובבואכם לבצע בו פעולות תחזוקה או לפתור בעיה. ■ אזהרה :לצמצום סכנת שרפה ,התחשמלות או פציעה: ■ ■ ■ ■ ■ ■ ■ ■ ■ ■ ■ ■ ■ ■ ■ ■ מיועד אך ורק לשימוש ביתי.
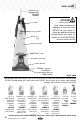
מראה המוצר ידית ארגונומית Ergonomically Designed ™Handle אזהרה: לצמצום סכנת שרפה והתחשמלות כתוצאה מנזק במרכיבים פנימיים ,השתמשו רק בחומרי ניקוי של BISSELL שמיועדים לשימוש עם מכשיר זה .חומרי ניקוי שאינם מתוצרת BISSELLעלולים להזיק למכשיר ולגרום לביטול האחריות.
הרכבה מכשיר CleanView PowerBrushמגיע מפורק לחמישה חלקים קלים להרכבה: אזהרה: • מכלול ידית • מכלול גוף עליון • מתלה עליון לצינור • מכלול גוף תחתון • מתלה תחתון לצינור באריזה כלולים שלושה ברגי פיליפס. תמצאו אותם מודבקים למכלול הידית. יש לחבר את המכשיר לחשמל רק לאחר שהשלמתם את הרכבתו לפי ההנחיות הבאות ולמדתם את ההנחיות ואת נהלי ההפעלה. 1 להרכבת מכשיר הניקוי שלכם כל הנדרש לכם הוא רק מברג פיליפס. .
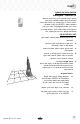
הפעלה תכונות ואביזרים מכשיר CleanView PowerBrushשל ,BISSELLמערכת לניקוי הבית שמשתמשת בשילוב של מי ברז חמימים ,חומרי ניקוי מתקדמים של ,BISSELLהנעת מברשת ושאיבה כדי לנקות בבטחה את השטיחים. מברשת ™:Dirt Lifter Powerbrush מברשת DirtLifter PowerBrushמיועדת לשיפור ביצועי הניקיון .דוגמת הזיפים מרימה בבטחה את הלכלוך העמוק ומנקה ברכות את סיבי השטיח. המתלה הצף מתאים את עצמו לגובה השטיח. כשהמכשיר מופעל ובמצב עומד ,השטיח שלכם מוגן היות שהמברשות מורמות מהשטיח.
הפעלה תכונות מיוחדות (המשך) מגן Scotchgard™ Protector שכבת ההגנה שמגיעה בדרך כלל מבית החרושת מתבלה עם הזמן כתוצאה מתנועה רבה וניקוי יומיומי ,ובכלל זה ניקוי לעומק .כדי להשיב את ההגנה החשובה הזאת BISSELL ,היא היחידה שמציעה חומרי ניקוי עם מגן .Scotchgardחומרי ניקוי אלה מעניקים הגנה נוספת מפני לכלוך וכתמים קשים ,כדי שהשטיחים שלכם ייראו טוב זמן ממושך יותר. לפני תחילת הניקוי .1 תכננו את הפעולות באופן שישאיר לשטיח זמן להתייבש. .
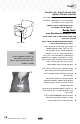
הפעלה מלאו את מיכל מים 2-ב1- 1 2 .1הרימו את הידית לנשיאת המיכל ושלפו את המיכל מבסיס המכשיר. .2נשאו אותו כמו דלי אל הכיור .סובבו את הידית קדימה ,לפתיחת המכסה .הסירו את המכסה ,הפכו את המיכל ומצאו את כוסית המדידה המובנית. .3מלאו חומר ניקוי 2Xשל BISSELLעד לקו המילוי של כוסית המדידה ומזגו לתוך פתח המיכל הפנימי. 4 3 .4מלאו את המיכל במי ברז פושרים נקיים. *אין להרתיח או לחמם מים במיקרוגל. זה יכול להרוס את המיכל הפנימי.
הפעלה ניקוי שטיח .1חברו את המכשיר לשקע חשמל מתאים. להפעלת המכשיר לחצו ברגלכם על מתג החשמל האדום שבגב המכשיר. .2ברגלכם ,לחצו על המנוף האפור לשחרור הידית שבגב המכשיר ,מתחת למיכל המים. .3בעת לחיצה על לחצן הריסוס ,בצעו מעבר רטוב אחד לאט ומעבר נוסף בחזרה. הניחו לחומר הניקוי ולמברשת DirtLifter PowerBrushלעשות את העבודה בשבילכם. לחצן הפעלה 1 שחרור הידית 2 זהירות :אין להרטיב יתר על המידה. .
הפעלה רוקנו את מיכל המים 2-ב/1-נקו את המברשת הנשלפת (המשך) .6כדי להמשיך ולנקות את השטיח ,שובו לעיין בעמודים 8עד ,9החל מהפסקה "מלאו את מיכל המים 2-ב "1-שבעמוד .8 אם סיימתם לנקות ,נא עיינו בפסקה "תחזוקה וטיפול" שבעמוד .12 bvh g kvh gh j j h d b lg fd hn l kl sd jkn f h Ad bj jh b j cv hh gcg ™Ready Tools מכשיר CleanView PowerBrushשלכם מגיע מצויד בצינור ובאביזר אחד לפחות לניקוי מדרגות ,ריפוד ועוד.
הפעלה ( Ready Toolsהמשך) .9 11 נקו על ידי לחיצה על לחצן הריסוס כדי לרסס תמיסה על האזור שדורש ניקוי .באיטיות ,הזיזו את האביזר אחורה וקדימה על פני האזור המלוכלך .שחררו את לחצן הריסוס כדי לשאוב מים מלוכלכים .המשיכו לנקות את האזור, קטע קטן בכל פעם ,עד להסרת הלכלוך. זהירות :אין להרטיב יתר על המידה. .10בתום הניקיון ,הסירו ושטפו את האביזר/ים במי ברז נקיים וזורמים. 12 .11מומלץ לשאוב מים נקיים מקערה כדי לנקות את הצינור. .
תחזוקה וטיפול טיפול במכשיר מספר צעדים פשוטים יסייעו לכם להבטיח תחזוקה טובה של המכשיר שלכם ,ותוצאות אופטימליות. כבו את המכשיר .נתקו את המכשיר מהחשמל .1 וכרכו את כבל החשמל. .2 לאחר ריקון מיכל המים 2-ב ,1-שטפו אותו במי ברז זורמים חמים בעודכם דואגים לנקות מתחת לתא הפנימי העמיד ומסביבו .נקו את פילטר הסיבים האדום .במידת הצורך ,אפשר לשטוף את המברשת הנשלפת .עיינו בעמוד .9 .3 החזירו את מיכל המים 2-ב 1-למקומו במכשיר.
אזהרה: פתרון בעיות עוצמת ריסוס פחותה או המכשיר לא מרסס לצמצום סכנת שרפה ,התחשמלות או פציעה, נתקו את המכשיר משקע החשמל לפני טיפול. פתרונות סיבות אפשריות .1כבו את המכשיר; מלאו שנית את המיכל הפנימי במי .1ייתכן שהמיכל הפנימי ריק. ברז חמים. .2ייתכן שמיכל 2-ב 1-אינו ממוקם כראוי .2 .כבו את המכשיר; הוציאו את המיכל והחזירו אותו למקומו. .3כבו את המכשיר; כעבור דקה ,הפעילו את המכשיר ולחצו .3המשאבה התעייפה. על לחצן הריסוס. .
חלקי חילוף פריט 1 2 3 4 5 6 1 שם חלק מכלול מיכל מלא בסיס מיכל מברשת נשלפת רצועת משאבה חלופית (עם הנחיות) רצועת מברשת חלופית (עם הנחיות) פילטר סיבים מק"ט 203-0104 203-0102 203-8114 215-0628 015-0621 203-0105 3 2 5 4 6 אביזרים וחומרי ניקוי אף כי ייתכן שלא כל החלקים האלה הגיעו עם המכשיר שלכם ,אם תרצו ,תוכלו לרכוש את כולם.
שירות לקוחות של BISSELL אם נחוץ לך שירות למוצר של BISSELLשברשותך: התקשר אל שירות הלקוחות של BISSELLלמספרים שמופיעים למטה ואנו נמסור לך את פרטי מרכז שירות הלקוחות המורשה של BISSELLבאזורך .לשאלות בנושא אחריות ולחלקי חילוף ,התקשרו אל המספרים שלמטה.
תוקף תעודה זו מותנה בצירוף חשבונית קנייה מקורית היצרןBISSELL : היבואן :אלקטרה מוצרי צריכה ( )1951בע"מ מרח' שמעון ישראלי ,3 א.ת חדש ראשל"צ ,טל.03-9633030 : סוג המכשיר :שואב אבק BISSELL דגם2T22 : אנו אחראים בזאת לפעולתו התקינה של המכשיר לתקופה של שנה מתאריך האספקה. אחריות זו לא תחול במקרים הבאים: .1קלקול הנובע מהפעלה שלא לפי הוראות השימוש. .2קלקול עקב אספקת חשמל לא סדירה. .3שבר מכל סיבה שהיא. .
תחנות שירות ברחבי הארץ טל08-6378368 : סלון ששון ,א.ת חדש .1אילת טל08-8525104 : חשמל קמי ,מרכז מסחרי ב' חנות 24 .2אשדוד טל08-6271410 : מאור הנגב ,96רח' יאיר 27 .3באר שבע 08-6274563 טל04-6326088 : אחים איטח ,הנשיא 53 .4חדרה טל04-8671507 : שירות רם ,רח' ביאליק 9 .
USER'S GUIDE 44L6 SERIES 220-240V 2 Thank You 3 Safety Instructions 4 Product View 5 Assembly 6-11 Operations 12 Maintenance and Care 13 Troubleshooting 14 Replacement Parts 14 Accessories 15 Warranty 16 Consumer Care
Thanks for buying a BISSELL CleanView PowerBrush We’re glad you purchased a BISSELL CleanView PowerBrush. Everything we know about floor care went into the design and construction of this complete, high-tech home cleaning system. Your BISSELL CleanView PowerBrush is well made, and we back it with a limited two-year warranty. We also stand behind it with a knowledgeable, dedicated Consumer Care department, so, should you ever have a problem, you’ll receive fast, considerate assistance.
IMPORTANT SAFETY INSTRUCTIONS When using an electrical appliance, basic precautions should be observed, including the following: ■ Remove plug from electrical outlet before Read all instructions before using your deep cleaner.
Product view Ergonomically Designed Handle™ WARNING: To reduce the risk of fire and Handle Assembly electric shock due to internal component damage,use only BISSELL cleaning formulas intended for use with the deep cleaner. Non-BISSELL cleaning formulas may harm the machine and void the warranty.
Assembly Your CleanView PowerBrush comes in five easy to assemble components: • Handle assembly • Upper body assembly • Upper hose rack • Lower body assembly • Lower hose rack Three Phillips head screws are included and can be found taped to the handle assembly. The only tool you will need to assemble your cleaner is a Phillips head screwdriver. 1. Slide upper body assembly onto lower body and secure with two screws. 2.
Operations Special features Your BISSELL CleanView PowerBrush is a home cleaning system that uses a combination of hand hot tap water, BISSELL advanced cleaning formula, brush agitation and suction to safely clean carpets. DirtLifter™ Powerbrush The DirtLifter PowerBrush is designed to enhance cleaning performance. The bristle pattern safely lifts out the deep down dirt while gently grooming carpet fibers. The floating suspension self-adjusts to all carpet heights.
Operations Special features continued Scotchgard™ Protector Carpet protection applied at the mill typically wears down over time from heavy foot traffic and everyday cleaning, including deep cleaning. To help restore this important protection, only BISSELL offers cleaning formulas with Scotchgard protector. This offers extra protection against dirt and tough stains to keep your carpets looking good longer. Before you clean 1. Plan activities to give your carpet time to dry. 2.
Operations Fill the 2-in-1 water tank 1. Remove the tank from the base of the machine by lifting the tank carry handle. 2. Carry like a bucket to the sink. Rotate the handle forward to unlatch the lid. Remove lid, turn over and locate built in measuring cup. 1. 2. 3. 3. 4 Fill with BISSELL 2X formula to the indicated fill line on the built in measuring cup and pour into mouth of the bladder. 4. Fill the bladder with clean hand hot tap water.
Operations Carpet cleaning 1. Plug the deep cleaner into a proper outlet. Turn the power ON by pressing the red power switch on the back of the unit with your foot. 2. With your foot, press the gray handle release lever located on the back of unit below water tank. Handle Release Power Switch 3. While pressing the spray trigger, make one slow forward wet pass and another back. Let the formula and DirtLifter PowerBrush do the work for you. Caution: Do not overwet. 4.
Operations Empty the 2-in-1 water tank/clean removable nozzle continued 6. To continue carpet cleaning, refer back to pages 8 through 9, beginning with “Fill the 2-in-1 water tank” on page 8. If cleaning is complete, refer to the “Maintenance and care” section on page 12. Ready Tools™ bvh g kvh gh j j h d b lg fd hn l kl sd jkn f h Ad bj jh b j cv hh gcg Your CleanView PowerBrush comes equipped with a hose and at least one attachment for cleaning stairs, upholstery, and more.
Operations Ready Tools™ continued 9. Clean by pressing the spray trigger to spray solution onto the area to be cleaned. Slowly move the tool back and forth over the soiled surface. Release the spray trigger to suction dirty water. Continue to clean in the area, working in small sections, until dirt is removed. Caution: Do Not Overwet. 11. 10. When finished cleaning, remove and rinse tool(s) in clean, running water. 11. It is recommended that you suction clean water from a bowl to rinse out the hose. 12.
Maintenance and care Machine care For best results, a few simple steps can assure your machine is well maintained after your cleaning is complete. 1. Turn power switch OFF. Unplug the machine and wrap the power cord. 2. After emptying the 2-in-1 water tank, rinse it with running hot tap water, taking care to clean underneath and around the heavy duty bladder. Clean out red lint screen. Removable nozzle may be rinsed if necessary. Refer to page 9. 3. Replace the 2-in-1 water tank on the machine. 4.
Troubleshooting WARNING: To reduce the risk of fire, electric shock or injury, unplug from the outlet before servicing. Reduced Spray OR No Spray Possible causes Remedies 1. Bladder may be empty. 1. Turn power switch OFF; Refill bladder with clean hot tap water. 2. 2-in-1 tank may not be seated properly. 2. Turn power switch OFF; remove tank and reseat tanks. 3. Pump may have lost prime. 3. Turn power switch OFF; after 1 minute turn ON and depress spray trigger. 4.
Replacement parts Item 1 2 3 4 5 6 1 Part No. 203-0104 203-0102 203-8114 215-0628 015-0621 203-0105 Part Name Tank Assembly Complete Tank Base Removable Nozzle Replacement Pump Belt (with instructions) Replacement Brush Belt (with instructions) Lint Screen 2 3 5 4 6 Accessories and formula While not all of these parts may not have come with your machine, all are available to you for purchase, if desired. Item 1 2 3 4 5 6 7 8 9 Part No.
BISSELL consumer care If your BISSELL product should require service: Call BISSELL Consumer Care at the numbers below and we will give you the location of a BISSELL Authorized Service Center in your area. If you have questions about your warranty or need replacement parts please contact the numbers below. For Israel inquiries: Sunday - Thursday 9 am - 5 pm For Middle East & Africa inquiries: Sunday - Thursday 9 am - 6 pm Electra Consumer Prod. 1951 Ltd. 1, Sapir St.