
User`s guide


Assembly
WARNING:
Do not plug in your cleaner
until you have completely assem-
bled it per the following instructions
and are familiar with all instructions
and operating procedures.
1.
2.
3.
5.
6.
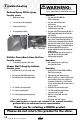
Tab
Upper Hose Rack
Notch
4.
Your CleanView PowerBrush comes
in five easy to assemble components:
•Handleassembly
•Upperbodyassembly
•Upperhoserack
•Lowerbodyassembly
•Lowerhoserack
Three Phillips head screws are
included and can be found taped to
the handle assembly.
The only tool you will need to
assemble your cleaner is a Phillips
head screwdriver.
1. Slide upper body assembly onto lower
body and secure with two screws.
2. With the “tabs” on upper hose rack
pointing toward top of handle, attach
upper hose rack to handle assembly
by sliding it to top of handle until it
can go no further. Turn hose rack until
it snaps into place.
3. Slide handle assembly down into upper
body until it will go no further and
secure with screw.
4. Attach lower hose rack to back of
upper body by pushing into open slots
and sliding down until it snaps into
place.
5. Wrap flex hose around hose rack and
secure it into notched out holder as
shown.
6. Keep flex hose locked in place with
hose secure latch.
Hose
Secure
Latch
www.bissell.com
5