PREMIER USER GUIDE DEEPCLEAN 47A2, 80R4, 17N4, 36Z9 SERIES
Important Safety Instructions Read all instructions before using your portable DEEP CLEANER. When using an electrical appliance, basic precautions should be observed, including the following: WARNING To reduce the risk of fire, electric shock, or injury: » Connect to a properly grounded outlet only. See grounding instructions. Do not modify the 3-prong grounded plug. » Do not leave appliance when it is plugged in. Unplug from outlet when not in use and before servicing. » Use indoors only.
Quick Start Guide Assembly 1. Slide upper handle onto machine base 2. Screw 2 screws into the marked holes 3. Place upper hose rack onto back of upper handle, and secure with screw 4. Wrap power cord to the left and flex hose to the right of the upper hose rack 5. Attach tool to hose grip Before you begin cleaning 1. Move furniture to another area if cleaning an entire room 2. Remove large dirt and debris from carpet 3. Pre-treat spots & stains and heavy traffic areas (optional) 4.
Thanks for buying a BISSELL deep cleaner We’re glad you purchased a BISSELL deep cleaner. Everything we know about floor care went into the design and construction of this complete, high-tech home cleaning system. Your BISSELL deep cleaner is well made, and we back it with a limited three-year warranty. We also stand behind it with a knowledgeable, dedicated Consumer Care department, so, should you ever have a problem, you’ll receive fast, considerate assistance.
Product View 1 13 2 4 3 5 6 14 7 15 8 12 9 10 11 1 2 3 4 5 6 7 8 Spray Trigger Extra Long Power Cord Upper Handle Flex Hose Power Switch Easy Carry Handle Tank Carry Handle Large Capacity 2-in-1 Water Tank 9 10 11 12 13 14 15 Surround Suction® Easy To Remove Nozzle EdgeSweep® Brushes Lower Base Upper Hose Rack Lower Hose Rack Handle Recline Pedal www.bissell.com 800.237.
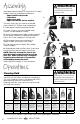
Assembly WARNING Do not plug in your deep cleaner until you are familiar with all instructions and operating procedures. Your deep cleaner comes in three (four on select models) easy-to-assemble components: Upper Handle with Screws Lower Base Upper Hose Rack Upper Tool Holder (select models) 1. 2. The only thing you will need to assemble your cleaner is a Phillips head screwdriver. 1. Slide upper handle onto lower handle. 2. Screw 2 screws into the marked holes (screws will be taped to handle). 3.
Operations Before you clean 1. Move furniture to another area if cleaning an entire room (optional). 2. Pick up all loose dirt, debris, and pet hair before deep cleaning. It is recommended that you vacuum the area prior to deep cleaning. 3. Plan your cleaning route to leave an exit path. It is best to begin cleaning in the corner farthest from your exit. 7 8 9 6 5 4 1 2 3 4.
Operations Carpet cleaning 1. Plug into a proper outlet and push the on/off button located on the front of the handle. 2. Recline the handle by pressing on the lever at the back of the machine behind the 2-in-1 water tank. 1. 3. Cleaning Strokes. While pressing the trigger, make one slow forward wet pass and another one back. Caution: Do not overwet. Take care not to run over loose objects or edges of area rugs. Stalling brush may result in premature belt failure.
Operations WARNING Cleaning with attachments To reduce the risk of injury, be extra careful when cleaning stairs. Make sure machine is secure and level. Your deep cleaner comes equipped with a hose and at least one attachment for cleaning stairs, upholstery, and more. 1. Important! If using to clean upholstery, check upholstery tags. bvh g kvh gh j j h d b lg fd hn l kl sd jkn f h Ad bj jh b j cv hh gcg 1. Check manufacturer’s tag before cleaning.
Operations Cleaning with the Stain Trapper tool (select models) Your deep cleaner may have come with a Stain Trapper tool. This tool is great for keeping messes out of the machine’s hose system. 1. Attach the Stain Trapper tool to the end of the hose. 2. Gently scrape up any semi-solids with a spoon or spatula. Do not use a knife or other utensil with sharp edges because it could damage the carpet or upholstery. 3. Follow instructions 3-6 on page 9 under “Cleaning with attachments”.
Operations 5. Empty the Pet Hair Basket (select models) by sliding it toward the front of the tank and lifting up. Replace the Pet Hair Basket before storing/continuing to clean. 5. 6. Fill the heavy duty bladder with clean hot tap water, following instructions on page 7. Note: Remember to secure the tank latches and test to make sure it is secure before picking up the tank. 7. Water rinse (recommended).
Operations Hard floor cleaning (select models only) Your DeepClean Premier model may have come with a hard floor attachment and 2X Hard Floor Solutions Formula. If not, these products are available for purchase by contacting the BISSELL Consumer Care department by phone or at the website. The hard floor tool provides effective cleaning for linoleum, vinyl, and tile floors. Caution: Do not use on unsealed hardwood floors.
Maintenance & Care Tip Machine care For best results, a few simple steps can assure your machine is well maintained after your cleaning is complete. » Let all parts dry completely before storing 1. Flush your machine of any remaining residual solution. WARNING a. Fill the 2-in-1 water tank with clean hot tap water. To reduce the risk of electric shock, turn power switch off and disconnect plug from electrical outlet before performing maintenance or troubleshooting checks. b.
Maintenance & Care Drive belt removal & replacement Occasional replacement of one or both belts may become necessary. If that is needed, please follow the instructions below. 4. 3. 1. Turn off the machine, and unplug it from the outlet. 2. Remove the 2-in-1 water tank. Set aside. 3. Remove the nozzle and end caps by following the instructions in Step 5 on page 13. 5. 4. Turn the machine on its side. IMPORTANT: cord side up. 7. 5. Remove 1 silver screw from the pivot arm. 6.
Maintenance & Care Brush removal and brush belt replacement Brushes can be removed for cleaning or replacement as needed. 1. Follow drive belt removal Instructions on page 14. 2. Remove brush rolls by pulling them off of the metal rods. Be careful not to lose the small washer at each end of the brush rolls. 2. 5. 3. Replace the brush belt if necessary. 4. Place cleaned or new brush rolls back onto the rods. Make sure one washer is on each end of the rollers prior to sliding onto the rod.
Troubleshooting Problem Reduced spray or no spray DirtLifter® PowerBrush does not turn Cleaner not picking up solution Possible causes Remedies Water tank may be empty Fill heavy duty bladder with hot tap water Tank may not be seated completely Turn power OFF. Remove and reseat tank Pump may have lost prime. Turn power OFF and then back ON. Wait one minute, then depress trigger The belt is off or broken Turn power OFF and unplug unit from outlet.
Replacement Parts These items are available for your BISSELL DeepClean Premier deep cleaner. Call 1-800-237-7691 or visit www.BISSELL.
Accessories These items are available for your BISSELL DeepClean Premier deep cleaner. Call 1-800-237-7691 or visit www.BISSELL.com Part # Part Name Part # Part Name 203-6651 3” Tough Stain Tool 203-6652 Powered TurboBrush® Hand Tool 203-6653 4” Upholstery Tool 203-6654 6” Stair Tool 203-6655 Spraying Crevice Tool 160-0208 Bare Floor Tool 203-7412 Deep Reach Pet Tool 160-0057 Stain Trapper Tool 62E5-2 2X Deep Clean and Protect Formula with Scotchgard™ Protection 60 oz.
Warranty Service Limited Three-Year Warranty Contact BISSELL Consumer Care to locate a BISSELL Authorized Service Center in your area. If you need information about repairs or replacement parts, or if you have questions about your warranty, contact BISSELL Consumer Care. This warranty gives you specific legal rights, and you may also have other rights which may vary from state to state.
Register your product today! Registering is quick, easy and offers you benefits over the lifetime of your product. You’ll receive: BISSELL Rewards Points Automatically earn points for discounts and free shipping on future purchases. Faster Service Supplying your information now saves you time should you need to contact us with questions regarding your product. Product Support Reminders and Alerts We’ll contact you with any important product maintenance reminders and alerts.