770/1970 SERIESQUICKSTEAMER 2080 SERIESQUICKSTEAMER POWERBRUSH 2090 SERIESQUICKSTEAMER MULTISURFACE SafetyInstructions ProductView Operations Me Maintenance Troubleshooting ConsumerServices Replacement Parts ug603-5603 1770 206Jndd 1 2/28/06 4:26:45 PM
for buyinga BISSELLQuickSteamer ® We're glad you purchased er. Everything tion of this complete, Your QuickSteamer year warranty. Consumer receive high-tech My great-grandfather homecare clean- system. it with a knowledgeable, so, should deep and construc- onededicated you ever have a problem, you'll assistance.
IMPORTANTSAFETYINSTRUCTIONS Whenus_ganeleckical appliance, basicprecau• Closeattentionis necessary whenusedby or nearchildren. tionsshouldbeobserved, including thefollowing: ThePowerCordonthisproductcontains Readall_ instructions beforeusingyourQUICKSTEAMER c_ WARNING: lead,achemicalknowntothe StateofCalifornia to causebirthdefectsor otherreproductive harm. WASHHANDSAFTERHANDLING. of fire, electricshock, or injury: • Donotimmerse. • Useonlyonsurfacesmoistened bycleaningprocess.
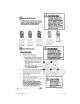
Quick Release--____ Cord Wrap TM PowerCord-----___ --Handle Assembly CleanWater/ SolutionTank LowerCord Wrap UpperBody -_--Lower Body VentCover LargeEasy RollingWheels Power Switch FoamFilter) Detent Lever Tank CollectionTankLatch-/ BISSELLFormulas: Removable Nozzle Theseitems are availablefor purchasewith your model. To order replacementparts or additional tools or formulas, pleaserefer to page 11. 48 oz.
to Use this Guide This User's Guide has been designed to help you get the utmost satisfaction from your BISSELL QuickSteamer Lightweight Deep Cleaner. You'll find assembly and operating instructions, safety precautions, as well as maintenance and troubleshooting instructions. Please read this Guide thoroughly before assembling your Deep Cleaner. Payparticularattentionto the productdiagram,assembly instructions,andpart names.Locateand organizeall parts beforeassembly.
to UseYourBISSELLQuickSteamer BeforeYou Clean 1. Planactivities to give carpettime to dry. 2. Removeeasily moved furniture (chairs, lamps, coffee/cocktailtables, etc.) from room if needed. Vacuumcarpet thoroughly. 3. 4. Decidewhere to begin -- and end -- your job. Clean in 3' X 4' sections,starting in areasfarthest from exit. Plan to leavea path open to empty soiled water and refill cleaner. 5. Carpetingwill dry in three to four hours,depending on carpetstyleand air circulationin room.
_g 1. 2. With your foot, press the red PowerSwitch [located in foot of unit] ON. With foot, press the Detent Leveron right side of Lower Body. 3. DepressSpray Triggerto spray cleaning solution. Do not overwet. 4. To suction u _ water, repeat motion over same area without depressingTrigger. 5. RepeatSteps 3 and4 until no more dirt can be removed. 6. Continueto clean entire carpet,working in 3' x 4' sections. 7.
A WARNING: ianing Fluid Section KeepplentyofgenuineBISSELLFiberCleansing Formula TM on handsoyoucancleanandprotect wheneverit fitsyourschedule.Alwaysuse genuineBISSELL deepcleaningformulas. ToReducethe Risk of Fire and ElectricShockdue to internalcomponentdamage, useonly BISSELLcleaning fluids intendedfor use with the deep cleaner. NonBISSELLcleaningsolutions may harm the machineand voidthe warranty. 48 oz,BBSELL 48 oz,BBSELL 48 oz BBSELL 48 oz.
To Install the Re lacement Brush Belt *QuickSteamer PowerBrush models only |. 2. TLrnthe machineoff and unplug from wall outlet. RemoveClean/Solutionand CollectionTanks. 3. Lie machinedown to access the bottomof the machine. 4. With a Phillips head screwdriver,(_ unscrew the Brush Coverand remove. 5. Removethe Brush EndCap and removebelt from brush. 6. Brush can now be removed. 7. Belt can be removedby slidingoff the Motor Pulley. 8. Clean or replace belt.
iubleshooting Reduced Spray Or No Spray. PossibleCauses Remedies 1. RefillTankwithwater and formula 1. CleanTankempty Deep Cleaner Not Picking Up Cleaning Solution. PossibleCauses Remedies 1. CollectionTanknot aligned/secured 1. CheckTankproper alignment and secure with side latches 2. DirtyTankfull 3. RemoveableNozzleinstalledimproperly 2. EmptyTank 3. Align four "hooks" into bottom first, then snap into place on top Thankyoufor selectinga BISSELLproduct.
RB placement parts - BISSELL QuickSteamer Belowislistofcommon replacement parts*.Whilenotallofthesepartsmayhavecome withyourspecific machine, allareavailable toyouforpurchase, ifdesired. Item PartNo.
- BISSELL QuickSteamer This warranty givesyou specific legal rights, and you may also have otner rtcqts wntcn may vary from state to state. If you need additional instruction regarding this warranty or nave auesttonsregardingwhat it may cover, pleasecontact BISSELLConsumer Servicesby E-mail,telephone, or regular mal as describec below. LimitedOne YearWarranty Subjectto the *EXCEPTIONSAND EXCLUSIONSidentified below, upon receipt of the product BISSELL Homecare, Inc.